digiKam/Lysbord
Undersøg fotoer med digiKams lysbord
Udgivet: 2/2 2011 | Forfatter: Dmitri Popov
Hvis du har en håndfuld hukommelseskort i din fototaske, så er der ingen grund til at bekymre dig om, hvor mange fotoer du kan tage, før dit digitalkamera bliver fyldt. Det betyder, at du let kan tage dusinvis af billeder af det samme motiv med forskellige vinkler, komposition og belysning. Med det gør opgaven med at udvælge det bedste foto til lidt af en udfordring. Heldigvis har digiKam et enkelt men effektivt værktøj til at hjælpe dig med at sammenligne og analysere flere billeder ved siden af hinanden og vælge det, som du bedst kan lide. Navnet på dette vidunderlige værktøj er Lysbordet, og du kan starte det ved at vælge i hovedmenuen.

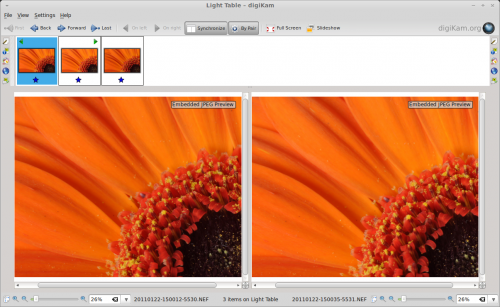
This opens an empty Light Table window, and you can add two or more photos by dragging them onto the thumbnail pane (called thumbbar in digiKam) of the window. Alternatively, you can select the photos in an album and use the Ctrl + L keyboard shortcut or the command to add the selected photos to a new Light Table window. You can then add more photos to the current Light Table window by selecting them in an album and choosing the command or using the Ctrl + Shift + L keyboard shortcut.
Using Light Table is rather straightforward. If you have added only a pair of photos to the Light Table window, they will be displayed side by side, making it easier for you to examine and compare photos. Press the button, and Light Table will keep both photos in sync. So when you zoom in and out or drag one photo, these actions are automatically applied to the other photo, too. You can reorder the photos in the Light Table window using the and buttons. And if you have more than two photos in the Light Table window, you can view them by pairs by clicking the button.
Find more tutorials like this by clicking on the Photography link below.
