Kdenlive/Manual/Kom godt i gang
Kom godt i gang
Lav et nyt projekt
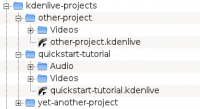
Første skridt er at lave en ny (tom) mappe. Jeg vil kalde den quickstart-tutorial/ i denne vejledning. Anskaf så nogle videoklip; du kan fx downloade dem på kdenlive-tutorial-videos-2011-avi.tar.bz2 (7 MB)[1] og udpakke dem til fx undermappen quickstart-tutorial/Videos/ i projektmappen.
Billedet til venstre viser den foreslåede mappestruktur: Hvert projekt har sin egen mappe med videofiler i undermappen Videos, lydfiler i mappen Audio osv. (læs mere)
(Vejledningen antage herefter, at du bruger de nævnte eksempelvideoer, med den virker også med andre.)
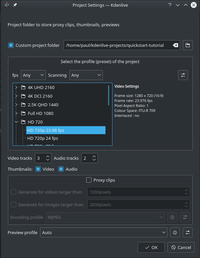
Åbn Kdenlive og lav et nyt projekt ( → ).
Vælg projektmappen (quickstart-tutorial/), som du lavede tidligere og vælg er passende projektprofil. Videofilerne, som du hentede ovenfor er 720p, 23.98 fps.[2] Hvis du bruger dine egne filer og ikke ved, hvilken profil, du skal bruge, så vil Kdenlive foreslå en passende en når det første klip bliver tilføjet[3], så du behøver ikke at vælge noget i dette felt.
Tilføj klip
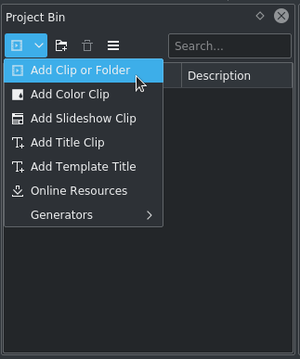
Now that the project is ready, let’s start adding some clips (i.e. the ones you downloaded). This works via the Project Bin widget; a click on the icon ![]() directly opens the file dialog, a click on the small arrow shows a list of additional clip types that can be added as well. Video clips, audio clips, images, and other Kdenlive projects can be added via the default dialog.
directly opens the file dialog, a click on the small arrow shows a list of additional clip types that can be added as well. Video clips, audio clips, images, and other Kdenlive projects can be added via the default dialog.
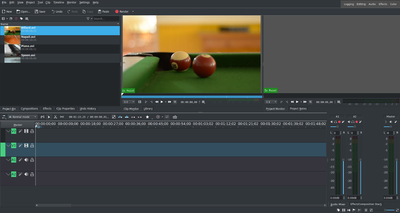
After loading the clips, Kdenlive will look similar to this. On the top left there is the already known project tree. Right of it are the monitors that show video; The clip monitor displays video from the original clips, the project monitor shows how the output video will look, with all effects, transitions, etc. applied. The third, also very important, item is the timeline (below the monitors): This is the place where the video clips will be edited. There are two different types of tracks, Video and Audio. Video tracks can contain any kind of clip, audio tracks as well – but when dropping a video file to the audio track, only the audio will be used.
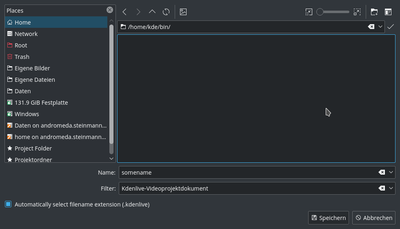
Let’s save the work via → . This saves our project, i.e. where we placed the clips on the timeline, which effects we applied, and so on. It can not be played.[4] The process of creating the final video is called Rendering.
Tidslinjen
Se også manualens afsnit om tidslinjen
Nu kommer den egentlige redigering. Projektets klip kombineres til det endelige resultat på tidslinjen. Du henter dem ved træk og slip: Træk Napoli fra projekttræet og slip den på tidslinjen.
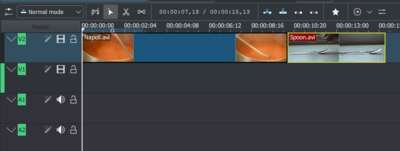
Vi får også brug for noget bestik, så træk også Spoon over på det første spor. Træk så Napoli til begyndelsen af tidslinjen (ellers vil den genererede tidslinje starte med nogle sekunders sort skærm) og træk Spoon, så den ligger lige efter Napoli, sådan at det ser ud som på billedet til venstre. (Jeg har zoomet ind med Ctrl + musehjul.)

Du kan allerede se en forhåndsvisning af resultatet ved at taste Mellemrum (eller klikke på knappen i projektmonitoren). Du vil se Napoli umiddelbart fulgt af Spoon. Hvis tidslinjemarkøren ikke er ved begyndelsen, så vil projektmonitoren starte et eller andet sted i midten; du kan flytte markøren ved at trække den enten i tidslinje-linealen eller i projektmonitoren. Hvis du foretrækker tastaturgenveje, så gør Ctrl + Home det samme for den aktive monitor. (Vælg hvis den ikke allerede er valgt før du bruger denne genvej.)

Føj nu klippet Billard til tidslinjen. I de første 1,5 sekunder sker der ingenting i klippet, så det bør måske klippes for at undgå, at videoen bliver kedelig. En nem måde[5] at gøre dette er at flytte tidslinjemarkøren til den ønskede position (dvs. til det sted, hvor du vil klippe videoen), og så trække i videoklippets venstre kant, når markøren til ændring af størrelsen dukker op. Den vil hægte sig til tidslinjemarkøren, når du flytter den tæt nok på.
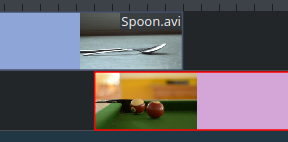
For at tilføje en overgang imellem Spoon og Billard skal de to klip overlappe. For at være nøjagtig, så skal det andet klip være under eller over det første, og det første klip skal slutte nogle billeder efter at det andet klip starter. Det hjælper at zoome ind, indtil mærkerne for enkelte billeder dukker op. Det er også en fordel altid at bruge samme varighed af overgangen, i dette eksempel fem billeder.
Du kan zoome ind ved enten at bruge for neden i Kdenlives vindue eller med Ctrl + Musehjul. Kdenlive vil zoome omkring tidslinjemarkøren, så den skal først sættes til den position, som du vil se forstørret; så kan du zoome ind.
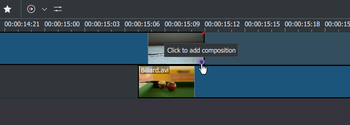
Now that the clips overlap, the transition can be added. This is done either by right-clicking on the upper clip and choosing or, easier, by hovering the mouse over the lower right corner of the Spoon clip until the pointing-finger pointer is shown and the message "Click to add transition" appears. The latter, by default, adds a dissolve transition, which is in this case the best idea anyway since the Spoon is not required for playing.
Dissolve-overgange fader det første klip ind i det næste. Se også manualens afsnit om overgange.

Let’s now add the last clip, the Piano, and again apply a dissolve transition. When adding it on the first track of the timeline, you need to click on the new clip’s lower left edge to add the transition to the previous clip.
Effekter
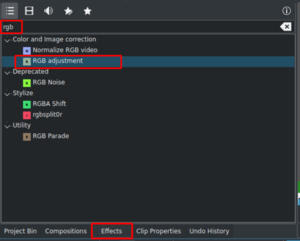
The Piano can be colourized by adding an effect to it. Select the piano clip, then double-click the effect in the . If it is not visible, you can get it via → .
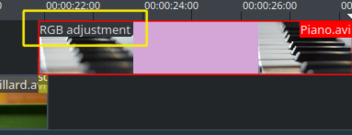
Once the effect has been added, its name will be added to the timeline clip. It will also be shown in the widget.
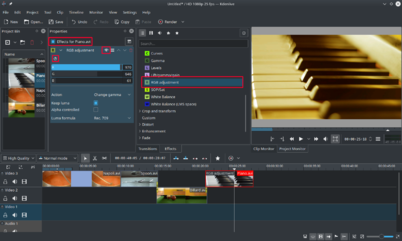
To get a warm yellow-orange tone on the image, fitting the comfortable evening, blue needs to be reduced and red and green improved.
The values in the Properties widget can be changed by using the slider (middle mouse button resets it to the default value), or by entering a value directly by double-clicking the number to the right of the slider.
The Properties widget always refers to the timeline clip that is currently selected. Each effect can be temporarily disabled by clicking the eye icon, or all effects for that clip can be disabled using the check box at the top of the Properties widget (the settings are saved though), this is e.g. useful for effects that require a lot of computing power, so they can be disabled when editing and enabled again for rendering.
For nogle effekter, som den der er blevet brugt her, er det muligt at tilføje keyframes. Det indrammede ur-ikon indikerer dette. Keyframes bruges til at ændre effektens parametre over tid. I vort klip lader dette os fade klaverets farver fra en varm aftenfarve til en kold nattefarve.
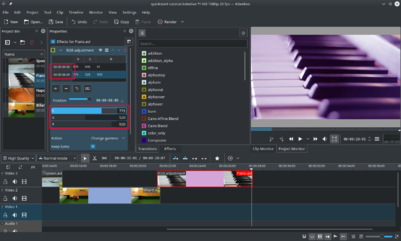
After clicking the icon (the clock icon framed in the previous image), the Properties widget will re-arrange. By default there will be two keyframes, one at the beginning of the timeline clip and one at the end. Move the timeline cursor to the end of the timeline clip, such that the project monitor actually shows the new colours when changing the parameters of the keyframe at the end.
Make sure the last keyframe is selected in the Properties list. Then you are ready to flood the piano with a deep blue.
Flytte du tidslinjemarkøren til starten af projekter og spiller det (med Mellemrum-tasten eller med knappen i ), så skulle klaveret nu ændre farve, som vi ønskede.
Brug af keyframes var den vanskeligste del af denne vejledning. Hvis du klarede at gøre det, så vil du let kunne mestre Kdenlive!
Se også manualens afsnit om effekter.
Musik

Since the clips do not provide any audio, let’s search for some nice piece of music, from your local collection or on web pages like Jamendo. The audio clip should, after adding it, be dragged to an audio track on the timeline.
The audio clip can be resized on the timeline the same way as video clips are. The cursor will snap in at the end of the project automatically. To add a fade out effect at the end of the audio clip (except if you found a file with exactly the right length) you can hover the top right (or left) edge of the timeline clip and drag the red shaded triangle to the position where fading out should start.[6]
Generering
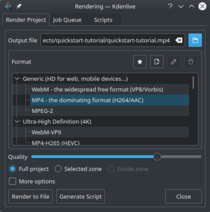
A few minutes left, and the project is finished! Click the Render button (or go to → , or press Ctrl + Enter) to get the dialog shown on the left. Select the desired output file for our new video with all effects and transitions, choose MP4 (works nearly everywhere), select the output file location and press the button.
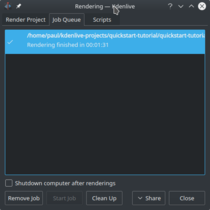
After some seconds rendering will be finished, and your first Kdenlive project completed. Congratulations!
Complete manual
Further documentation for the current version of Kdenlive can be found in the full manual.
Referencer og noter
- ↑ Hvis du foretrækker Theora (hvilket du nok ikke gør, da Ogg Video sædvanligvis skaber problemer), så kan du i stedet downloade kdenlive-tutorial-videos-2011-ogv.tar.bz2.
- ↑ 720 er videoens højde, p står for progressiv scanning i modsætning til interlacet video og fps-tallet angiver antallet af hele billeder pr. sekund.
- ↑ Forudsat, at indstillingen under Diverse er sat til
- ↑ To be correct, it can be played using
melt yourproject.kdenlive, but this is not the way you would want to present your final video since it is (most likely) too slow. Additionally, it only works if melt is installed. - ↑ Når man skriver sådan, så antyder det, at der er flere måder at klippe videoer på; det er der faktisk også
- ↑ This shaded triangle is a shorthand for adding the effect → . Both ways lead to the same result.
