Taking Screenshots/zh-cn: Difference between revisions
Appearance
Created page with "== 另见 ==" |
Updating to match new version of source page |
||
| (28 intermediate revisions by 3 users not shown) | |||
| Line 3: | Line 3: | ||
== 前言 == | == 前言 == | ||
截图是为了给潜在用户展示软件的观感,在运行软件时让用户有个期待。所以,应该在常见环境和应用下截图,用硬件的标准配置。 | |||
== | == 准则 == | ||
* | <div class="mw-translate-fuzzy"> | ||
* | * 如果不是中文截图,请把语言设为相应的语言 | ||
* | * 把图片存为 PNG 格式 | ||
* | * 最好使用默认设置(图标、配色、风格、窗口、应用设置等等) | ||
* | * 最好使用<menuchoice>混成 </menuchoice>([[Special:myLanguage/System Settings|系统设置]]里的桌面效果模块),如果你的显卡不支持混成那就别用了,别担心。 | ||
* | * 最好使用 9 点的 “Liberation Sans” 字体 | ||
* | * 如果截图展现的是部分桌面,最好使用 plasma 的默认背景。如有可能,给图片留个边(约20像素),这样就不像把窗口阴影给去了 | ||
* 如果是张中文截图,请用原来的英文文件名,外加 “zh-cn” 这个语言码 | |||
* 如果更新已有截图,请用相同的文件名,这样就自动更新了(常见 [[Special:myLanguage/Update_an_Image|上传图片]]). | |||
</div> | |||
== 步骤 == | == 步骤 == | ||
下面这个例子用了 [[Special:myLanguage/KSnapshot| | <div class="mw-translate-fuzzy"> | ||
下面这个例子用了 [[Special:myLanguage/KSnapshot|KSnapshot]],不过别的截屏应用也可以。 | |||
</div> | |||
[[Image:Taking_Screenshots.png|center| | <div class="mw-translate-fuzzy"> | ||
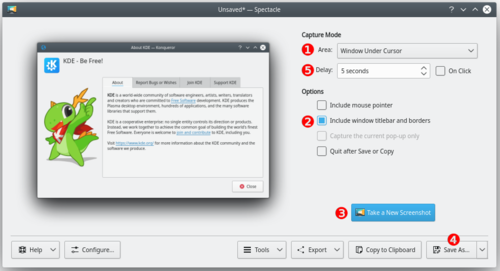
[[Image:Taking_Screenshots.png|thumb|500px|center|用 [[Special:myLanguage/KSnapshot|KSnapshot]] 的“光标处的窗口”截屏]] | |||
</div> | |||
# | <div class="mw-translate-fuzzy"> | ||
# | # 运行 [[Special:myLanguage/KSnapshot|KSnapshot]] | ||
#; | # 从以下抓图模式中选一个: | ||
#: | #;当前屏幕(只会在多屏幕环境下出现) | ||
#; | #: 抓取单个屏幕上的所有东西,常用于“桌面截图”。 | ||
#: | #;全屏 | ||
#; | #: 所抓内容因屏幕个数而定,针对单屏幕用户抓取当前屏幕上的所有内容,对于多屏用户抓取所有屏幕到一个窗口。 | ||
#: | #;光标处的窗口 | ||
#; | #: 抓取应用程序或对话框窗口的内容,常用于“应用程序截图”,选中“包含窗口装饰”选项(2)就更好了。 | ||
#: | #;区域 | ||
# | #: 只抓取稍后界定的区域。 | ||
#; | # 单击<menuchoice>新建抓图</menuchoice>(3)。 | ||
#; | #;全屏 | ||
#; | #;当前屏幕 | ||
#: | #;光标处的窗口 | ||
#; | #: 单击屏幕的任一区域截图。 | ||
#:# | #;区域: | ||
#:# | #:# 用鼠标在所抓区域(比如窗口)画个矩形。 | ||
# | #:# 按下<keycap>回车</keycap>键,或双击所选区域截图。 | ||
# | # 单击<menuchoice>另存为...</menuchoice>(4)。 | ||
# 浏览想存图片的位置,命名('''''name.png''''')然后单击<menuchoice>保存</menuchoice> | |||
</div> | |||
To upload the image: | |||
* | * If you are making a new version of an existing image, see [[Special:myLanguage/Update_an_Image|Update an Image]] | ||
* If you are making a new image go to [[Special:Upload|Upload File]] under '''Tools''' in the right margin. That brings you to a page, where you can upload the image file. | |||
* | |||
== 提示和技巧 == | |||
<div class="mw-translate-fuzzy"> | |||
* <menuchoice>抓图延时</menuchoice>选项(5)让 [[Special:myLanguage/KSnapshot|KSnapshot]] 在抓图前等上特定一段时间(单位是秒),在为下拉菜单截图为首的许多情况下都很管用 | |||
* 为保证标准外观和默认设置,建立单独用于截图的用户往往有所帮助。 | |||
* 在墙纸设置里调整<menuchoice>颜色:</menuchoice>来得到白色背景。 | |||
</div> | |||
== 另见 == | == 另见 == | ||
<div class="mw-translate-fuzzy"> | |||
[[Special:myLanguage/KSnapshot|KSnapshot]] | |||
</div> | |||
[[Category: | <div class="mw-translate-fuzzy"> | ||
[[Category:贡献/zh-cn]] | |||
</div> | |||
Latest revision as of 17:13, 23 June 2021
前言
截图是为了给潜在用户展示软件的观感,在运行软件时让用户有个期待。所以,应该在常见环境和应用下截图,用硬件的标准配置。
准则
步骤
下面这个例子用了 KSnapshot,不过别的截屏应用也可以。

- 运行 KSnapshot
- 从以下抓图模式中选一个:
- 当前屏幕(只会在多屏幕环境下出现)
- 抓取单个屏幕上的所有东西,常用于“桌面截图”。
- 全屏
- 所抓内容因屏幕个数而定,针对单屏幕用户抓取当前屏幕上的所有内容,对于多屏用户抓取所有屏幕到一个窗口。
- 光标处的窗口
- 抓取应用程序或对话框窗口的内容,常用于“应用程序截图”,选中“包含窗口装饰”选项(2)就更好了。
- 区域
- 只抓取稍后界定的区域。
- 单击(3)。
- 全屏
- 当前屏幕
- 光标处的窗口
- 单击屏幕的任一区域截图。
- 区域
-
- 用鼠标在所抓区域(比如窗口)画个矩形。
- 按下回车键,或双击所选区域截图。
- 单击(4)。
- 浏览想存图片的位置,命名(name.png)然后单击
To upload the image:
- If you are making a new version of an existing image, see Update an Image
- If you are making a new image go to Upload File under Tools in the right margin. That brings you to a page, where you can upload the image file.
提示和技巧
- 选项(5)让 KSnapshot 在抓图前等上特定一段时间(单位是秒),在为下拉菜单截图为首的许多情况下都很管用
- 为保证标准外观和默认设置,建立单独用于截图的用户往往有所帮助。
- 在墙纸设置里调整来得到白色背景。
