Digikam
 |
Visualizar, administrar, editar, melhorar, organizar, etiquetar e compartilhar fotos. |
O digiKam permite a importação de fotos de câmeras, criação de álbuns, atribuição de etiquetas com datas, assuntos e outras propriedades, e excelentes facilidades de pesquisas. Consulte o manual para ver todos os detalhes, incluindo os formatos de imagens suportados.
Gerenciando suas fotos
-
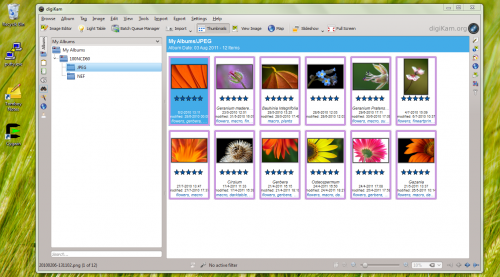
Visualização do álbum
-
Visualização da linha de tempo
-
Visualização das informações EXIF
-
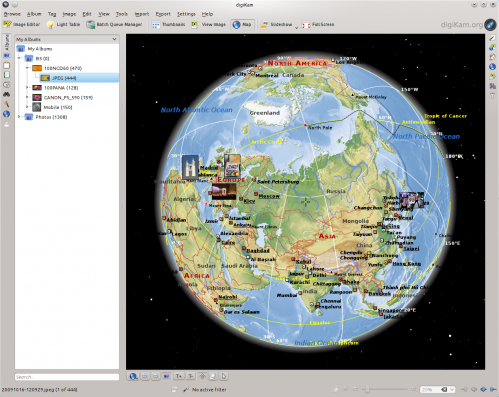
Localização geográfica
-
Visualização de pesquisas
-
Pesquisa detalhada
-
Identificação de duplicadas
-
Pesquisa aproximada
O editor de imagens
-
Etiquetamento
-
Atribuição de classificação
-
Ajuste dos níveis de cores
-
Ajuste do balanço de branco
-
Converter para preto e branco
-
Correção de olhos vermelhos
-
Correção automática de cores
-
Correção automática de lentes
A interface para câmeras
-
Leitura de mídias removíveis
-
ou a partir de uma câmera
-
Salvar diretamente nos álbuns
-
Adicionar a localização geográfica para fotos individuais
A Mesa de Luz
-
Comparar um conjunto de fotos
-
Examinar detalhes
-
Facilidade de escolha da classificação
-
Ver as configurações da câmera
ShowFoto
Para aqueles que acham a interface do digiKam muito técnica, o ShowFoto permite o acesso às mesmas ferramentas, com uma interface popular.
-
Navegação
-
Propriedades da imagem
-
Ver as propriedades da imagem
-
Novamente a localização geográfica
-
Ampliações/Reduções predefinidas
-
Histograma
-
Configurações gerais
-
Opções das dicas de ferramentas
-
Configurações das images RAW
-
Configurações do gerenciamento de cores
-
Opções de salvamento de arquivos
-
Configuração de apresentações
A página de suporte do projeto tem links para as Perguntas mais frequentes (FAQs) e os detalhes para assinatura das listas de discussão.
Existe um pequeno tutorial em vídeo aqui.
A seção Gerenciamento de recursos digitais não está disponível nas páginas Web, mas no manual, que deve estar presente em sua instalação como digikam-doc, ou você pode baixar um conjunto de arquivos .pdf digikam.pdf, showfoto.pdf e kipi-plugins.pdf.
O blog Evolução do processamento de fotos no código aberto de rm42 destaca o desenvolvimento desde a versão 3 do KDE e proporciona uma visão geral bastante útil.
Nós temos uma crescente coleção de tutoriais que vão ajudá-lo a obter mais divertimento e produtividade com o digikam. A Página de tutoriais do Digikam, apresenta uma lista com um breve comentário sobre o conteúdo.
Useful digiKam Tricks
Transcribed from Dmitri Popov's blog, 26 September 2011
- To quickly adjust thumbnail size in the Album view, press and hold the Ctrl key, then use the mouse scroll wheel to make the thumbnails larger or smaller.
- With the feature enabled, digiKam automatically hides originals and displays the latest modified versions of the photos. For example, if you process a NEF file and save it in the JPEG format, digiKam hides the original RAW file and shows only the JPEG photo. To disable this feature, choose and make sure that the option in the In main view section is enabled. To keep things tidy, you can then group the original and all its versions. To do this, select the photos you want to group, right-click on the selection, and choose .
The trash has reached its maximum size! Cleanup the trash manually
If you receive this error message and emptying the Trash doesn’t help, then the following command may solve the problem:rm ~/.local/share/Trash/metadata
- Need to quickly locate all untagged photos? In digiKam, expand the left sidebar, and press the button. In the window, tick the check box and press to run the search.
- Instead of the conventional thumbnail view, digiKam lets you map your photos on a globe. Choose , and you should see photos from the current album mapped on the 3-D globe. You can then use the mouse to rotate the globe and the mouse wheel to zoom in and out. Obviously, the Map view displays only geotagged photos.

digiKam 2.2.0 Installer for Windows
In his blog of 22 October, 2011, Dmitri Popov writes:
"Good news for those who want to run the latest version of digiKam on Windows. The SourceForge repository now has a Windows installer of the latest digiKam version courtesy of Ananta Palani.

I tested the installer with a Windows 7 machine, it worked like a charm. While the installer makes it supremely easy to deploy digiKam on Windows, the application does have a few quirks. Most notably, the Windows version of digiKam cannot import photos directly from storage media or cameras, so you need to copy them to the hard disk using Windows’ own built-in image transfer tool, and then add the transferred photos to digiKam. The Trash feature doesn’t work either, but you can work around this issue by deleting photos instead of sending them to the trash. To be fair, though, these issues are not caused by digiKam itself, but are due to bugs in the underlying KDE libraries which the application relies on."


