Dolphin/File Management/zh-tw: Difference between revisions
Updating to match new version of source page |
Updating to match new version of source page |
||
| (9 intermediate revisions by the same user not shown) | |||
| Line 1: | Line 1: | ||
<languages /> | <languages/> | ||
<span id="Discover Dolphin"></span> | <span id="Discover Dolphin"></span> | ||
<div class="mw-translate-fuzzy"> | |||
=== Dolphin 或是 Konqueror? === | |||
</div> | |||
<div class="mw-translate-fuzzy"> | |||
這份指南描述的是 KDE 4的 '''Dolphin'''。'''Konqueror'''是KDE 2和KDE 3預設的檔案管理員。你依然可以在KDE SC 4中使用'''Konqueror'''當預設檔案管理員。在KDE SC 4.2 以後,打開系統設定,然後找到<menuchoice>預設應用程式</menuchoice>,選擇'''Konqueror''' 或其他程式當預設檔案管理員。 | |||
</div> | |||
[[Special:myLanguage/Konqueror|Konqueror]] was the default file manager in KDE 2 and 3, and is still available for those who prefer its interface. It is a web browser, a file manager, media viewer and more. For file management it uses the Dolphin KPart, and so has all of the functionality of Dolphin. | |||
<div class="mw-translate-fuzzy"> | |||
==發掘 Dolphin== | ==發掘 Dolphin== | ||
第一部分將帶您導覽 '''Dolphin'''。第二部分涉及不同類型的書籤的概念。第三部分討論檔案管理。最後,我們來看「更酷的東西」。點擊圖片檢視大圖。 | 第一部分將帶您導覽 '''Dolphin'''。第二部分涉及不同類型的書籤的概念。第三部分討論檔案管理。最後,我們來看「更酷的東西」。點擊圖片檢視大圖。 | ||
</div> | |||
The first section takes you on a guided tour of '''Dolphin'''. The second section deals with the concepts of different types of bookmarks. The third section discusses archive management. Finally we look at 'More Cool Things'. The images are clickable - you can see the enlarged view. | |||
===介紹 Dolphin=== | ===介紹 Dolphin=== | ||
| Line 15: | Line 23: | ||
我會展示如何用 '''Dolphin''' 完成一般的檔案管理任務和自定它滿足你的需要。 | 我會展示如何用 '''Dolphin''' 完成一般的檔案管理任務和自定它滿足你的需要。 | ||
[[Image:Dolphin_Plasma5_thumbnail.png|thumb|240px|center]] | [[Image:Dolphin_Plasma5_thumbnail.png|thumb|240px|center]] | ||
<div class="mw-translate-fuzzy"> | |||
當我們從[[Special:myLanguage/Plasma/Kickoff|Kickoff 選單]]裡打開 '''Dolphin''',他首先顯示的是開始目錄-通常是[[Special:myLanguage/Glossary#Home_Directory|家目錄]] 。 | 當我們從[[Special:myLanguage/Plasma/Kickoff|Kickoff 選單]]裡打開 '''Dolphin''',他首先顯示的是開始目錄-通常是[[Special:myLanguage/Glossary#Home_Directory|家目錄]] 。 | ||
</div> | |||
<div class="mw-translate-fuzzy"> | |||
在檔案夾裡點一下即可打開檔案。你不必用雙擊。(如果你喜歡雙擊打開,KDE 4.5 中在 <menuchoice>系統設定 > 硬體 > 輸入裝置 > 滑鼠部分 </menuchoice> 里改)。 | |||
</div> | |||
要選擇和取消選擇檔案/資料夾,懸停滑鼠指針到圖示上,點擊出現的+號來選擇,點-號來取消選擇。像是這樣: | 要選擇和取消選擇檔案/資料夾,懸停滑鼠指針到圖示上,點擊出現的+號來選擇,點-號來取消選擇。像是這樣: | ||
[[Image:Dolphin folder | <div class="mw-translate-fuzzy"> | ||
[[Image:Dolphin folder hovered.png|thumb|240px|center]] | |||
</div> | |||
當你點擊+號,檔案/資料夾就會被選中。你可以用這種方法輕易選擇多個檔案(鼠標拖拽矩形選擇檔案也是有效的)。你也可以用<keycap>Ctrl + 單擊</keycap>一次一個的選定/取消選定,用<keycap>Shift + 單擊</keycap>來連續操作。 | 當你點擊+號,檔案/資料夾就會被選中。你可以用這種方法輕易選擇多個檔案(鼠標拖拽矩形選擇檔案也是有效的)。你也可以用<keycap>Ctrl + 單擊</keycap>一次一個的選定/取消選定,用<keycap>Shift + 單擊</keycap>來連續操作。 | ||
多個被選中的文件看起來是這樣的: | 多個被選中的文件看起來是這樣的: | ||
[[Image:Dolphin folder hovered deselect.png|thumb|240px|center]] | [[Image:Dolphin folder hovered deselect.png|thumb|240px|center]] | ||
<div class="mw-translate-fuzzy"> | |||
'''新增資料夾''':你可以在當前活動的目錄下用滑鼠右鍵菜單新增資料夾,或快捷鍵<keycap>F10</keycap>。 | '''新增資料夾''':你可以在當前活動的目錄下用滑鼠右鍵菜單新增資料夾,或快捷鍵<keycap>F10</keycap>。 | ||
</div> | |||
'' | <div class="mw-translate-fuzzy"> | ||
'''分頁''':'''Dolphin'''支援分頁瀏覽。舉例來說 <menuchoice>檔案->新增分頁 </menuchoice>或滑鼠中鍵點擊資料夾圖示和導航按鈕(前進/後退)。 | |||
</div> | |||
{{Note|Starting from KDE 4.7, Dolphin's menu bar is hidden, but easy to reach and restore. If you prefer menu bar to be present, you can enable it by selecting <menuchoice> Control | {{Note|Starting from KDE 4.7, Dolphin's menu bar is hidden, but easy to reach and restore. If you prefer menu bar to be present, you can enable it by selecting <menuchoice>Control</menuchoice> → <menuchoice>Show Menubar</menuchoice> or pressing <keycap>Ctrl + M</keycap>.}} | ||
預設點擊任何檔案夾都會啟動 '''Dolphin'''。也能在[[Special:myLanguage/Plasma/Kickoff|Kickoff 選單]]裡啟動它。 | 預設點擊任何檔案夾都會啟動 '''Dolphin'''。也能在[[Special:myLanguage/Plasma/Kickoff|Kickoff 選單]]裡啟動它。 | ||
== | == The Interface == | ||
<div class="mw-translate-fuzzy"> | |||
== 導航欄 == | |||
</div> | |||
'''Dolphin''' | <div class="mw-translate-fuzzy"> | ||
'''Dolphin''' 整合了新概念以一種更快速和更準確的方法使用導航欄。因此使用了新的麵包屑(breadcrumb)導航欄。取代傳統的顯示完整的路徑,僅從「地址」之一開始的導航點作為按鈕顯示。點擊那些按鈕你能直接進入這個檔夾。所以你能快速的從一個子檔夾到達父檔夾。 | |||
</div> | |||
在代表檔夾的按鈕之間有一個小的箭頭也是個可點擊的按鈕。點擊這個箭頭你能看到一份列表,列表裏是跟你現在這個目錄同級的所有子目錄(譯者注:這說的是你點當前這個檔夾按鈕前的「箭頭」的情況,其實列表顯示的就是「箭頭」前那個檔夾的所有子檔夾),使你能快速改變目錄。 | 在代表檔夾的按鈕之間有一個小的箭頭也是個可點擊的按鈕。點擊這個箭頭你能看到一份列表,列表裏是跟你現在這個目錄同級的所有子目錄(譯者注:這說的是你點當前這個檔夾按鈕前的「箭頭」的情況,其實列表顯示的就是「箭頭」前那個檔夾的所有子檔夾),使你能快速改變目錄。 | ||
| Line 49: | Line 70: | ||
<div class="mw-translate-fuzzy"> | |||
同樣也有一個顯示完整路徑的經典導航欄。要使用這種樣式,你需要選擇<menuchoice>查看 -> 導航欄 -> 顯示完整路徑</menuchoice>或用鍵盤快捷鍵 <keycap>Ctrl+L </keycap>觸發。點擊「麵包屑樣式」裏緊跟最後一個顯示檔夾的空曠區域,你也能改變到經典樣式。一旦選擇了「經典樣式」,一個標記符號就會在導航欄末端出現。這個標記符號是個按鈕,可以用來返回樣式到「麵包屑樣式」。當然也能用菜單和鍵盤快捷鍵。 | |||
</div> | |||
<div class="mw-translate-fuzzy"> | |||
== 拆分視圖 == | == 拆分視圖 == | ||
</div> | |||
<div class="mw-translate-fuzzy"> | |||
'''Dolphin''' 能夠拆分當前檔夾視圖產生出兩個彼此相鄰的檔夾視圖,參考[[:wikipedia:Midnight Commander|Midnight Commander]]。這種流覽方式非常適合從一個檔夾複製或移動檔到另一個檔夾。 | '''Dolphin''' 能夠拆分當前檔夾視圖產生出兩個彼此相鄰的檔夾視圖,參考[[:wikipedia:Midnight Commander|Midnight Commander]]。這種流覽方式非常適合從一個檔夾複製或移動檔到另一個檔夾。 | ||
</div> | |||
[[Image:Dolphin split view.png|thumb|350px|center]] | |||
<div class="mw-translate-fuzzy"> | |||
你能用<menuchoice>查看 -> 拆分</menuchoice> (鍵盤快捷鍵<keycap>F3</keycap>)拆分視圖。要變回到只有一個檔夾視圖,你可以點<menuchoice>查看 -> 關閉</menuchoice>。小圖示會顯示哪個視圖會被關閉。取決於當前啟動的視圖,減號會顯示在圖示的左側或右側。啟動的視圖會被關閉。如果你想用鍵盤快捷鍵操作的話,需要知道這點。在工具欄上也有一個用來拆分和關閉視圖按鈕。這個按鈕也會顯示減號,所以很容易的能看出來哪個視圖會被關閉。 | |||
</div> | |||
<div class="mw-translate-fuzzy"> | |||
當然每個視圖都有他自己的導航欄,每個視圖也能用不同的視圖模式。 | |||
</div> | |||
=== Sorting Files === | |||
<div class="mw-translate-fuzzy"> | |||
默認在現在選擇的檔夾內的檔是依字母順序排序。通過菜單<menuchoice>查看 -> 排序以</menuchoice>修改排序方式。提供如下的排序條件: | |||
</div> | |||
Files may be sorted by the following attributes | |||
<div class="mw-translate-fuzzy"> | |||
* 名字 | |||
* 大小 | |||
* 日期 | |||
* 許可權 | |||
* 擁有者 | |||
* 群組 | |||
* 類型 | |||
* Link Destination | |||
* 路徑 | |||
此外排序序列可以用<menuchoice>查看 -> 排序方式 -> 降序</menuchoice>定義,或 <menuchoice>視圖 -> 排序方式 -> 檔夾優先</menuchoice>。 | |||
</div> | |||
The sorting method can be changed by selecting <menuchoice>Sort by</menuchoice> from the toolbar and then select <menuchoice>A-Z</menuchoice> or <menuchoice>Z-A</menuchoice>. Additionally you may choose whether folders should be listed first by selecting <menuchoice>Folders First</menuchoice>. | |||
<div class="mw-translate-fuzzy"> | |||
== 視圖模式 == | == 視圖模式 == | ||
</div> | |||
'''Dolphin''' features three different folder view modes: | |||
''' | * {{Icon|breeze-dolphin-view-icons}} '''Icons''' shows each file or folder as an icon with its name | ||
* {{Icon|breeze-dolphin-view-compact}} '''Compact''' is the same as icons, but in a more compact form, allowing more folders and files to be displayed at once | |||
* {{Icon|breeze-dolphin-view-details}} '''Details''' presents a list of files and folders, giving information on each, including but not limited to size and date | |||
The | The mode can be changed from within Dolphin | ||
* | * Select <menuchoice>View Mode</menuchoice> from the <menuchoice>View</menuchoice> menu. This option is only available if the main Menubar is enabled | ||
* | * Select <menuchoice>View Mode</menuchoice> from the <menuchoice>Control</menuchoice> menu. This option is only available when the main Menubar is disabled | ||
* | * By selecting the appropriate icon from the main toolbar, if it is enabled | ||
* | * Using the default keyboard shortcuts: | ||
* | ** <keycap>Ctrl+1</keycap> switches to the Icon display mode, | ||
* | ** <keycap>Ctrl+2</keycap> switches to Compact and, | ||
** <keycap>Ctrl+3</keycap> switches to Detailed view. | |||
==== View as Icons ==== | |||
<div class="mw-translate-fuzzy"> | |||
在''"圖示"''視圖模式下每個檔和每個檔夾都用一個圖示表示。也可以顯示檔的縮略圖取代顯示圖示。這種做法可以通過菜單<menuchoice>查看 -> 預覽</menuchoice>或是通過工具欄按鈕開啟/關閉。檔預覽是有大小限制。這個大小限制可以在<menuchoice>設置 -> 配置 Dolphin -> 常規</menuchoice>選項<menuchoice>預覽 -> 最大檔大小</menuchoice>自定義。這裏也有選項在預覽時使用嵌入到檔裏的縮略圖(比如說mp3檔裏的專輯封面)。KDE 4.5中預覽通過<menuchoice>設置-> 配置Dolphin -> 常規 -> 預覽</menuchoice>選項開啟、配置。 | |||
</div> | |||
<div class="mw-translate-fuzzy"> | |||
Dolphin 能夠在圖示下顯示額外的資訊。這些資訊可以通過<menuchoice>查看 -> 額外資訊</menuchoice>啟用/關閉。主要來說可以選擇的都是能作為排序條件的資訊。 | |||
</div> | |||
<div class="mw-translate-fuzzy"> | |||
你能給圖示分組來達到更好的預覽效果。這個通過<menuchoice>查看 -> 分組顯示</menuchoice>啟用。現在這些圖示都被分組,組和組又被一條以組名為標題的水平線劃分開。分組是依據選擇的排序方式裏的排序條件。 | |||
</div> | |||
[[Image:Dolphin show in groups effect.png|thumb|240px|center]] | [[Image:Dolphin show in groups effect.png|thumb|240px|center]] | ||
=== 細節 === | === 細節 === | ||
| Line 102: | Line 167: | ||
分列 ''"名稱''" 總是顯示的。點擊每個分列的頂部,列表會根據這個分列重新排序。點擊分列頂部,分類序列會復原(譯者注:靠(#‵′) 為什麼我這不會恢復,只會反向再排序一次)。 | 分列 ''"名稱''" 總是顯示的。點擊每個分列的頂部,列表會根據這個分列重新排序。點擊分列頂部,分類序列會復原(譯者注:靠(#‵′) 為什麼我這不會恢復,只會反向再排序一次)。 | ||
<div class="mw-translate-fuzzy"> | |||
自從KDE 4.1後Dolphin能夠樹形展開顯示檔夾。在這種模式下,一個加號的標記符號會在檔夾旁顯示。點擊標記符號,檔夾就會被展開,所有包含的子檔夾和文件也會顯示在列表but they are itenuated.點擊標記符號後標記符號會變成減號,再次點擊,展開就會被關閉。當然多少的檔夾都能用樹形結構。樹形視圖默認是沒啟用,可以通過 <menuchoice>設置 -> 配置 Dolphin -> 視圖模式 -> 細節 </menuchoice>打開選項<menuchoice>可展開的檔夾</menuchoice>啟用。 | |||
</div> | |||
<div class="mw-translate-fuzzy"> | |||
===設置所有檔夾默認的視圖屬性=== | |||
在<menuchoice>查看 > 調整視圖屬性</menuchoice>菜單項,你能為所有的檔夾流覽設置默認的任何屬性。 | |||
</div> | |||
Under <menuchoice>Control</menuchoice> → <menuchoice>Adjust View Properties</menuchoice> (or under the menu item <menuchoice>View</menuchoice> → <menuchoice>Adjust View Properties</menuchoice> if you have enabled menu bar) you can set any of these attributes to be the default for all folder views. | |||
Under <menuchoice>Control | |||
== 面板 == | == 面板 == | ||
'''Dolphin''' | <div class="mw-translate-fuzzy"> | ||
'''Dolphin''' 包含了多個面板,能通過菜單<menuchoice>查看 -> 面板</menuchoice>啟動。每個面板都能放到左側或右側dock區域。要移動面板你必須點擊面板頂部然後拖放面板。釋放滑鼠將被放置面板的那個區域會被高亮。面板可以堆疊在其他面板之上。在這種情況下,面板會放入分頁標籤。 | |||
</div> | |||
<div class="mw-translate-fuzzy"> | |||
在每個面板的標題有兩個按鈕。接近標題的按鈕可以游離(undock)面板。這使得面板成為一個獨立的窗口「漂浮」於 '''Dolphin'''上。但窗口還是與 '''Dolphin'''結合的,不能在沒有 '''Dolphin'''時顯示,不能像普通窗口一樣最小化。再次點擊按鈕,面板可以回復停靠。第二個按鈕會關閉面板。 | 在每個面板的標題有兩個按鈕。接近標題的按鈕可以游離(undock)面板。這使得面板成為一個獨立的窗口「漂浮」於 '''Dolphin'''上。但窗口還是與 '''Dolphin'''結合的,不能在沒有 '''Dolphin'''時顯示,不能像普通窗口一樣最小化。再次點擊按鈕,面板可以回復停靠。第二個按鈕會關閉面板。 | ||
</div> | |||
=== 非模態窗口(Non Modal Dialogs) === | === 非模態窗口(Non Modal Dialogs) === | ||
| Line 121: | Line 193: | ||
當移動,複製或刪除檔/目錄,這個對話框甚至會在操作還沒完成的時就消失不見。然後一個進度條便出現在螢幕右下角,之後也會消失,如果你想要查看進度你需要點擊系統託盤裏的一個小的「i」資訊圖示。 | 當移動,複製或刪除檔/目錄,這個對話框甚至會在操作還沒完成的時就消失不見。然後一個進度條便出現在螢幕右下角,之後也會消失,如果你想要查看進度你需要點擊系統託盤裏的一個小的「i」資訊圖示。 | ||
{{Warning | {{Warning|New users who are not used to this way of working (and even experienced users) can get caught out by this, if you are Moving, Copying or Deleting large directories then you need to use the icon to monitor the progress of your operation. | ||
If you don't then any subsequent actions you do, may well use an incomplete file structure resulting in corrupted files. '''You have been warned!'''}} | |||
''' | |||
=== 地址 === | === 地址 === | ||
'''Dolphin''' | <div class="mw-translate-fuzzy"> | ||
'''Dolphin''' 包含了一種被叫做''"地址"''的書簽。通過<menuchoice>查看 -> 面板 -> 地址</menuchoice>(鍵盤快捷鍵<keycap>F9</keycap>)啟動顯示在一個面板內。地址的內容跟K菜單 [[Special:myLanguage/Plasma/Kickoff|Kickoff菜單]] 中的''"電腦"''目錄一樣。 | |||
</div> | |||
点击地址中一个,他就会在当前文件夹视图内打开。右键关联菜单能够编辑「地址」或再次删除它们。同样能临时隐藏个别的条目。 | 点击地址中一个,他就会在当前文件夹视图内打开。右键关联菜单能够编辑「地址」或再次删除它们。同样能临时隐藏个别的条目。 | ||
| Line 141: | Line 212: | ||
=== 資訊 === | === 資訊 === | ||
<div class="mw-translate-fuzzy"> | |||
資訊面板能通過<menuchoice>查看 -> 面板 -> 資訊</menuchoice> (鍵盤快捷鍵<keycap>F11</keycap>)啟動。這個面板顯示了當前選擇的檔/檔夾或是滑鼠游標懸停的檔/檔夾的預覽或是圖示。一些額外的資訊像是檔/檔夾的修改日期或是大小也會同時顯示。 | |||
</div> | |||
資訊面板提供了給檔評星級,添加注釋或標記檔的可能性。這是為桌面提供語義網路特性的語義桌面[[Special:myLanguage/Nepomuk|Nepomuk]]的一種介面。自KDE 4.2後,可以通過搜索「標記」(tags)搜索語義鏈接。現在的「標記」(tags)僅給了對未來版本的一個展望。 | 資訊面板提供了給檔評星級,添加注釋或標記檔的可能性。這是為桌面提供語義網路特性的語義桌面[[Special:myLanguage/Nepomuk|Nepomuk]]的一種介面。自KDE 4.2後,可以通過搜索「標記」(tags)搜索語義鏈接。現在的「標記」(tags)僅給了對未來版本的一個展望。 | ||
<div class="mw-translate-fuzzy"> | |||
[[Image:dolphin_panel.png|thumb|240px|center|資訊面板l]] | [[Image:dolphin_panel.png|thumb|240px|center|資訊面板l]] | ||
</div> | |||
{{Tip/zh-tw|1=如果你想知道一些檔中缺失的mp3 ID標籤(標題,時間。。。),那最有可能是ID3v2標籤丟失了。你可以自行添加ID3v2標籤,比如用 '''KID3'''。}} | {{Tip/zh-tw|1=如果你想知道一些檔中缺失的mp3 ID標籤(標題,時間。。。),那最有可能是ID3v2標籤丟失了。你可以自行添加ID3v2標籤,比如用 '''KID3'''。}} | ||
| Line 151: | Line 226: | ||
=== 檔案夾 === | === 檔案夾 === | ||
<div class="mw-translate-fuzzy"> | |||
一個提供檔系統的樹形結構的面板能通過 <menuchoice>查看 -> 面板 -> 檔夾 </menuchoice> (鍵盤快捷鍵<keycap>F7</keycap>)顯示出來。樹形結構提供了這樣的可能性,點擊+和-符號來展開/折疊子檔夾。點擊其中之一的檔夾,檔夾的內容就會在當前視圖打開。 | |||
</div> | |||
=== | === Terminal === | ||
The terminal emulator [[Special:myLanguage/Konsole|Konsole]] can be displayed directly in '''Dolphin''' via <menuchoice>Control | The terminal emulator [[Special:myLanguage/Konsole|Konsole]] can be displayed directly in '''Dolphin''' via <menuchoice>Control</menuchoice> → <menuchoice>Panels</menuchoice> → <menuchoice>Terminal</menuchoice> (keyboard shortcut <keycap>F4</keycap>). This makes it possible to use shell commands directly in '''Dolphin'''. The terminal is opened in the folder which is displayed in the current view. <keycap>Shift + F4</keycap> opens [[Special:myLanguage/Konsole|Konsole]] in new window. | ||
<div class="mw-translate-fuzzy"> | |||
[[Image:dolphin_terminal.png|thumb|240px|center|帶終端的 Dolphin]] | [[Image:dolphin_terminal.png|thumb|240px|center|帶終端的 Dolphin]] | ||
</div> | |||
==Bookmarks and Places== | ==Bookmarks and Places== | ||
KDE Plasma offers two different systems of user-based links to different locations in the file system. One is called ''Places'' and the other one is called ''Bookmarks''. They reside in different files, and have different functions. This offers more flexibility, however, it makes it necessary to learn the differences. | |||
[[Image:Konq3bookmarks.png|350px|thumb|center|KDE3 Konqueror didn't share bookmarks]] | [[Image:Konq3bookmarks.png|350px|thumb|center|KDE3 Konqueror didn't share bookmarks]] | ||
In contrast to the way '''Konqueror''' stored the bookmarks back in KDE3, both ''Places'' and ''Bookmarks'' are available to all applications as well as the '''Dolphin''' file manager. More of that later. | |||
=== Places in applications === | |||
=== | ====Places for system-wide navigation==== | ||
There is a default set of ''Places'' - | There is a default set of ''Places'' - | ||
| Line 197: | Line 267: | ||
You can see the result of that command if you read ~/. | You can see the result of that command if you read {{Path|~/.local/share/apps/kfileplaces/bookmarks.xml}}. | ||
In some applications too there is an option in the File menu to add a folder to Places. At this stage, however, applications vary in which features are available. The important thing to remember is that ''the default is for Places items to be available to all applications in the <menuchoice>File | In some applications too there is an option in the File menu to add a folder to Places. At this stage, however, applications vary in which features are available. The important thing to remember is that ''the default is for Places items to be available to all applications in the <menuchoice>File</menuchoice> → <menuchoice>Open</menuchoice> dialogue. '' | ||
=== | ====Constraining to one application==== | ||
Some applications allow you to edit items in the Places menu. For instance, if in [[Special:myLanguage/Gwenview|Gwenview]] you right click on a folder in Places you can set an option to <menuchoice>Only show when using this application (Gwenview)</menuchoice>. | |||
[[Image: | [[Image:OnlyShowIn2.png|350px|thumb|center|Constraining a bookmark to an application]] | ||
If you need to constrain to an application that does not yet allow you to do that, the only way left is to edit the file ~/.local/share/kfile/bookmarks.xml. Immediately before the </metadata> tag you will need to add the line {{Input|1= <OnlyInApp>appname</OnlyInApp>}} | |||
===Bookmarks in applications=== | |||
=== | ====Enable bookmarks==== | ||
Bookmarks are not enabled in dialogs by default. To enable them | |||
* Open the <menuchoice>File</menuchoice> menu and select <menuchoice>Open</menuchoice> or <menuchoice>Save</menuchoice> | |||
* Click the '''Options''' {{icon|breeze-configure}} icon | |||
* Select <menuchoice>Show Bookmarks</menuchoice> | |||
[[Image:EnablingBookmarks.png|350px|thumb|center|Enabling Bookmarks]] | |||
==== Using bookmarks ==== | |||
Bookmarks are the second class of user-based links to the file system. Remember opening <menuchoice>File</menuchoice> → <menuchoice>Open</menuchoice> and using the spanner/wrench? Next to it is a yellow star. This is the ''bookmark management menu''. | |||
[[Image:BookmarkManagement.png|350px|thumb|center|Manage Application bookmarks here]] | |||
Here you can define bookmarks that will be visible in the same menu on any application. They are stored in one file, {{Path|~/.local/share/kfile/bookmarks.xml}}, which is used by all applications having that menu. | |||
<span id="Archive Management in Dolphin"></span> | <span id="Archive Management in Dolphin"></span> | ||
===Archive Management in Dolphin=== | ===Archive Management in Dolphin=== | ||
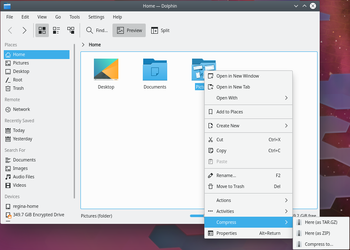
Managing archives now becomes simple. In any directory in '''Dolphin''', highlight the files that you want to compress, and right-click. Here, using the Compress option, you can elect to create a RAR archive, a Gzipped tar archive, or define another compression mode that you have already set up. | Managing archives now becomes simple. In any directory in '''Dolphin''', highlight the files that you want to compress, and right-click. Here, using the Compress option, you can elect to create a RAR archive, a Gzipped tar archive, or define another compression mode that you have already set up. | ||
[[Image:Compress.png|350px|thumb|center|Create a new archive]] | [[Image:Compress.png|350px|thumb|center|Create a new archive]] | ||
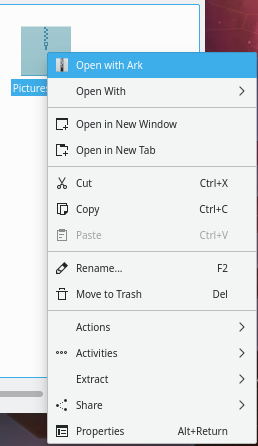
Similarly, if you right-click on an existing archived file you get a range of actions added to the right-click menu. You can extract the archive to the current folder, to an autodetected subfolder or to another place of your choosing. | Similarly, if you right-click on an existing archived file you get a range of actions added to the right-click menu. You can extract the archive to the current folder, to an autodetected subfolder or to another place of your choosing. | ||
Should you wish to add files to an existing archive, you can choose <menuchoice>Open with Ark</menuchoice>. | Should you wish to add files to an existing archive, you can choose <menuchoice>Open with Ark</menuchoice>. | ||
[[Image:ManageArchives.png|350px|thumb|center|Manage existing archives]] | [[Image:ManageArchives.png|350px|thumb|center|Manage existing archives]] | ||
==More Cool Actions== | ==More Cool Actions== | ||
===Change a File Association on-the-fly=== | ===Change a File Association on-the-fly=== | ||
Have you ever wanted to open a file, only to find that it is [[Special:myLanguage/System_Settings/File_Associations|associated]] with an application that is not of your choice? | Have you ever wanted to open a file, only to find that it is [[Special:myLanguage/System_Settings/File_Associations|associated]] with an application that is not of your choice? | ||
You can, for one, alter this in <menuchoice>Kickoff | You can, for one, alter this in <menuchoice>Kickoff</menuchoice> → <menuchoice>Computer</menuchoice> → <menuchoice>System Settings</menuchoice> → <menuchoice>Common Appearance and Behavior</menuchoice> → <menuchoice>File Associations</menuchoice>. This is the same as running '''kcmshell5 filetypes''' in a Konsole. | ||
Alternatively, if you want to change '''multiple''' associations right quick, you would edit the *.desktop file directly, e.g. the file | Alternatively, if you want to change '''multiple''' associations right quick, you would edit the *.desktop file directly, e.g. the file {{Path|/usr/share/applications/org.gnome.Builder.desktop}}. For example, Gnome Builder associates with a great number of file-types which may not be desirable. So the line | ||
MimeType=application/javascript; # we do not want all of these .... | MimeType=application/javascript; # we do not want all of these .... | ||
| Line 264: | Line 340: | ||
===The Actions sub-menu=== | ===The Actions sub-menu=== | ||
The <menuchoice>Actions</menuchoice> sub-menu opens up a whole lot more cool things to do from '''Dolphin'''. Some possibilities only appear when applicable to the file you have selected. An apps .desktop file below /usr/share/applications defines what actions are applicable for a particular type of file. Some of the options are | The <menuchoice>Actions</menuchoice> sub-menu opens up a whole lot more cool things to do from '''Dolphin'''. Some possibilities only appear when applicable to the file you have selected. An apps .desktop file below {{Path|/usr/share/applications}} defines what actions are applicable for a particular type of file. Some of the options are | ||
* Convert an image file to a different format | * Convert an image file to a different format | ||
* Preview the file | * Preview the file | ||
| Line 274: | Line 350: | ||
* Insert an audio CD | * Insert an audio CD | ||
* Navigate to this CD in '''Dolphin''': it must appear as "Volume" in your '''Dolphin''' 'Places' or you can reach it by typing audiocd:/ in the address bar. | * Navigate to this CD in '''Dolphin''': it must appear as "Volume" in your '''Dolphin''' 'Places' or you can reach it by typing audiocd:/ in the address bar. | ||
[[Image:Cdaudiodolphin.jpeg|550px|thumb|center|Dolphin presenting audio CD]] | [[Image:Cdaudiodolphin.jpeg|550px|thumb|center|Dolphin presenting audio CD]] | ||
You now notice that '''Dolphin''' is proposing a WAV file for each track, plus: | You now notice that '''Dolphin''' is proposing a WAV file for each track, plus: | ||
| Line 289: | Line 363: | ||
You then just have to copy the folder of your choice, in your preferred format to obtain the relative encoded version of your CD! | You then just have to copy the folder of your choice, in your preferred format to obtain the relative encoded version of your CD! | ||
=== Using <tt>timeline</tt> to have your recent files as startup folder === | |||
=== <tt>timeline | |||
[[File:Recent.jpg|400px|thumb|right|Have your recent files always in Dolphin]] | [[File:Recent.jpg|400px|thumb|right|Have your recent files always in Dolphin]] | ||
You can start up dolphin (with '''baloo''' up and running) with a view of ''recently modified files'': Just navigate to the address/location of <tt>timeline:/today/</tt> (copy paste it to the address bar) or use it as '''dolphin start-up-folder''' in dolphin-settings. | |||
== 外部鏈接 == | == 外部鏈接 == | ||
<div class="mw-translate-fuzzy"> | |||
[http://zh.wikipedia.org/wiki/Dolphin 維基百科- Dolphin] | |||
</div> | |||
<div class="mw-translate-fuzzy"> | |||
[http://dot.kde.org/1172721427/ 通向KDE 4之路: Dolphin 和 Konqueror] | |||
</div> | |||
<div class="mw-translate-fuzzy"> | |||
[http://arstechnica.com/news.ars/post/20070405-afirst-look-at-dolphin-the-kde-4-file-manager.html Ars Technica: A First Look at Dolphin] | |||
</div> | |||
* [http://introducingkde4.blogspot.com/2007/12/dolphin.html Introducing KDE 4 Blog - Dolphin] | * [http://introducingkde4.blogspot.com/2007/12/dolphin.html Introducing KDE 4 Blog - Dolphin] | ||
Latest revision as of 17:39, 31 May 2021
Dolphin 或是 Konqueror?
這份指南描述的是 KDE 4的 Dolphin。Konqueror是KDE 2和KDE 3預設的檔案管理員。你依然可以在KDE SC 4中使用Konqueror當預設檔案管理員。在KDE SC 4.2 以後,打開系統設定,然後找到,選擇Konqueror 或其他程式當預設檔案管理員。
Konqueror was the default file manager in KDE 2 and 3, and is still available for those who prefer its interface. It is a web browser, a file manager, media viewer and more. For file management it uses the Dolphin KPart, and so has all of the functionality of Dolphin.
發掘 Dolphin
第一部分將帶您導覽 Dolphin。第二部分涉及不同類型的書籤的概念。第三部分討論檔案管理。最後,我們來看「更酷的東西」。點擊圖片檢視大圖。
The first section takes you on a guided tour of Dolphin. The second section deals with the concepts of different types of bookmarks. The third section discusses archive management. Finally we look at 'More Cool Things'. The images are clickable - you can see the enlarged view.
介紹 Dolphin
Dolphin 是 KDE SC 的檔案管理員。
我會展示如何用 Dolphin 完成一般的檔案管理任務和自定它滿足你的需要。
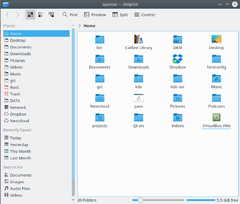
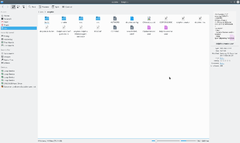
當我們從Kickoff 選單裡打開 Dolphin,他首先顯示的是開始目錄-通常是家目錄 。
在檔案夾裡點一下即可打開檔案。你不必用雙擊。(如果你喜歡雙擊打開,KDE 4.5 中在 里改)。
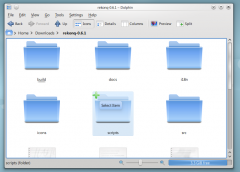
要選擇和取消選擇檔案/資料夾,懸停滑鼠指針到圖示上,點擊出現的+號來選擇,點-號來取消選擇。像是這樣:
當你點擊+號,檔案/資料夾就會被選中。你可以用這種方法輕易選擇多個檔案(鼠標拖拽矩形選擇檔案也是有效的)。你也可以用Ctrl + 單擊一次一個的選定/取消選定,用Shift + 單擊來連續操作。
多個被選中的文件看起來是這樣的:

新增資料夾:你可以在當前活動的目錄下用滑鼠右鍵菜單新增資料夾,或快捷鍵F10。
分頁:Dolphin支援分頁瀏覽。舉例來說 或滑鼠中鍵點擊資料夾圖示和導航按鈕(前進/後退)。
預設點擊任何檔案夾都會啟動 Dolphin。也能在Kickoff 選單裡啟動它。
The Interface
導航欄
Dolphin 整合了新概念以一種更快速和更準確的方法使用導航欄。因此使用了新的麵包屑(breadcrumb)導航欄。取代傳統的顯示完整的路徑,僅從「地址」之一開始的導航點作為按鈕顯示。點擊那些按鈕你能直接進入這個檔夾。所以你能快速的從一個子檔夾到達父檔夾。
在代表檔夾的按鈕之間有一個小的箭頭也是個可點擊的按鈕。點擊這個箭頭你能看到一份列表,列表裏是跟你現在這個目錄同級的所有子目錄(譯者注:這說的是你點當前這個檔夾按鈕前的「箭頭」的情況,其實列表顯示的就是「箭頭」前那個檔夾的所有子檔夾),使你能快速改變目錄。
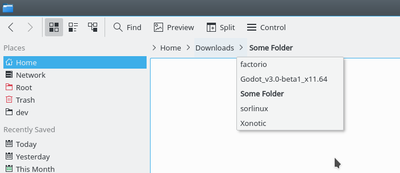
同樣也有一個顯示完整路徑的經典導航欄。要使用這種樣式,你需要選擇或用鍵盤快捷鍵 Ctrl+L 觸發。點擊「麵包屑樣式」裏緊跟最後一個顯示檔夾的空曠區域,你也能改變到經典樣式。一旦選擇了「經典樣式」,一個標記符號就會在導航欄末端出現。這個標記符號是個按鈕,可以用來返回樣式到「麵包屑樣式」。當然也能用菜單和鍵盤快捷鍵。
拆分視圖
Dolphin 能夠拆分當前檔夾視圖產生出兩個彼此相鄰的檔夾視圖,參考Midnight Commander。這種流覽方式非常適合從一個檔夾複製或移動檔到另一個檔夾。
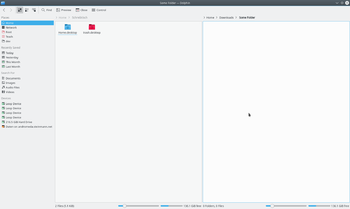
你能用 (鍵盤快捷鍵F3)拆分視圖。要變回到只有一個檔夾視圖,你可以點。小圖示會顯示哪個視圖會被關閉。取決於當前啟動的視圖,減號會顯示在圖示的左側或右側。啟動的視圖會被關閉。如果你想用鍵盤快捷鍵操作的話,需要知道這點。在工具欄上也有一個用來拆分和關閉視圖按鈕。這個按鈕也會顯示減號,所以很容易的能看出來哪個視圖會被關閉。
當然每個視圖都有他自己的導航欄,每個視圖也能用不同的視圖模式。
Sorting Files
默認在現在選擇的檔夾內的檔是依字母順序排序。通過菜單修改排序方式。提供如下的排序條件:
Files may be sorted by the following attributes
- 名字
- 大小
- 日期
- 許可權
- 擁有者
- 群組
- 類型
- Link Destination
- 路徑
此外排序序列可以用定義,或 。
The sorting method can be changed by selecting from the toolbar and then select or . Additionally you may choose whether folders should be listed first by selecting .
視圖模式
Dolphin features three different folder view modes:
 Icons shows each file or folder as an icon with its name
 Compact is the same as icons, but in a more compact form, allowing more folders and files to be displayed at once
 Details presents a list of files and folders, giving information on each, including but not limited to size and date
The mode can be changed from within Dolphin
- Select from the menu. This option is only available if the main Menubar is enabled
- Select from the menu. This option is only available when the main Menubar is disabled
- By selecting the appropriate icon from the main toolbar, if it is enabled
- Using the default keyboard shortcuts:
- Ctrl+1 switches to the Icon display mode,
- Ctrl+2 switches to Compact and,
- Ctrl+3 switches to Detailed view.
View as Icons
在"圖示"視圖模式下每個檔和每個檔夾都用一個圖示表示。也可以顯示檔的縮略圖取代顯示圖示。這種做法可以通過菜單或是通過工具欄按鈕開啟/關閉。檔預覽是有大小限制。這個大小限制可以在選項自定義。這裏也有選項在預覽時使用嵌入到檔裏的縮略圖(比如說mp3檔裏的專輯封面)。KDE 4.5中預覽通過選項開啟、配置。
Dolphin 能夠在圖示下顯示額外的資訊。這些資訊可以通過啟用/關閉。主要來說可以選擇的都是能作為排序條件的資訊。
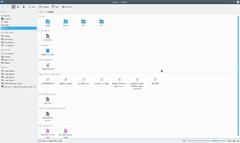
你能給圖示分組來達到更好的預覽效果。這個通過啟用。現在這些圖示都被分組,組和組又被一條以組名為標題的水平線劃分開。分組是依據選擇的排序方式裏的排序條件。
細節
"細節"視圖模式下對比"圖示"視圖模式默認會顯示許多額外的資訊。所有檔都列在一個表格內。表頭的關聯菜單能夠添加額外的列。可用的列如下:
- 大小
- 日期
- 許可權
- 擁有者
- 群組
- 類型
- Link Destination
- Path
分列 "名稱" 總是顯示的。點擊每個分列的頂部,列表會根據這個分列重新排序。點擊分列頂部,分類序列會復原(譯者注:靠(#‵′) 為什麼我這不會恢復,只會反向再排序一次)。
自從KDE 4.1後Dolphin能夠樹形展開顯示檔夾。在這種模式下,一個加號的標記符號會在檔夾旁顯示。點擊標記符號,檔夾就會被展開,所有包含的子檔夾和文件也會顯示在列表but they are itenuated.點擊標記符號後標記符號會變成減號,再次點擊,展開就會被關閉。當然多少的檔夾都能用樹形結構。樹形視圖默認是沒啟用,可以通過 打開選項啟用。
設置所有檔夾默認的視圖屬性
在菜單項,你能為所有的檔夾流覽設置默認的任何屬性。
Under → (or under the menu item → if you have enabled menu bar) you can set any of these attributes to be the default for all folder views.
面板
Dolphin 包含了多個面板,能通過菜單啟動。每個面板都能放到左側或右側dock區域。要移動面板你必須點擊面板頂部然後拖放面板。釋放滑鼠將被放置面板的那個區域會被高亮。面板可以堆疊在其他面板之上。在這種情況下,面板會放入分頁標籤。
在每個面板的標題有兩個按鈕。接近標題的按鈕可以游離(undock)面板。這使得面板成為一個獨立的窗口「漂浮」於 Dolphin上。但窗口還是與 Dolphin結合的,不能在沒有 Dolphin時顯示,不能像普通窗口一樣最小化。再次點擊按鈕,面板可以回復停靠。第二個按鈕會關閉面板。
非模態窗口(Non Modal Dialogs)
當移動,複製或刪除檔/目錄,這個對話框甚至會在操作還沒完成的時就消失不見。然後一個進度條便出現在螢幕右下角,之後也會消失,如果你想要查看進度你需要點擊系統託盤裏的一個小的「i」資訊圖示。
地址
Dolphin 包含了一種被叫做"地址"的書簽。通過(鍵盤快捷鍵F9)啟動顯示在一個面板內。地址的內容跟K菜單 Kickoff菜單 中的"電腦"目錄一樣。
点击地址中一个,他就会在当前文件夹视图内打开。右键关联菜单能够编辑「地址」或再次删除它们。同样能临时隐藏个别的条目。
檔夾的關聯菜單能用來添加這個檔夾作為一個條目到「地址」面板,有個菜單項是。你也能拖放一個檔夾到「地址」面板。
地址面板也包含了鏈接到可移動設備比如USB-keys或CD的條目。如果設備被掛載會顯示一個小的「插頭圖示指示」。關聯菜單能夠卸載這個設備。
「地址」被使用作為「麵包屑導航欄」中的基礎,導航欄中顯示的地址,起點就是「地址」中與其有關的最近的父檔夾。
資訊
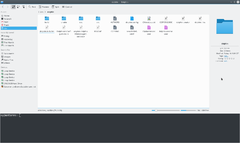
資訊面板能通過 (鍵盤快捷鍵F11)啟動。這個面板顯示了當前選擇的檔/檔夾或是滑鼠游標懸停的檔/檔夾的預覽或是圖示。一些額外的資訊像是檔/檔夾的修改日期或是大小也會同時顯示。
資訊面板提供了給檔評星級,添加注釋或標記檔的可能性。這是為桌面提供語義網路特性的語義桌面Nepomuk的一種介面。自KDE 4.2後,可以通過搜索「標記」(tags)搜索語義鏈接。現在的「標記」(tags)僅給了對未來版本的一個展望。
檔案夾
一個提供檔系統的樹形結構的面板能通過 (鍵盤快捷鍵F7)顯示出來。樹形結構提供了這樣的可能性,點擊+和-符號來展開/折疊子檔夾。點擊其中之一的檔夾,檔夾的內容就會在當前視圖打開。
Terminal
The terminal emulator Konsole can be displayed directly in Dolphin via → → (keyboard shortcut F4). This makes it possible to use shell commands directly in Dolphin. The terminal is opened in the folder which is displayed in the current view. Shift + F4 opens Konsole in new window.
Bookmarks and Places
KDE Plasma offers two different systems of user-based links to different locations in the file system. One is called Places and the other one is called Bookmarks. They reside in different files, and have different functions. This offers more flexibility, however, it makes it necessary to learn the differences.
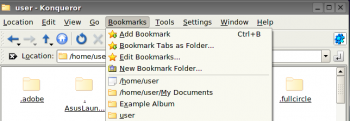
In contrast to the way Konqueror stored the bookmarks back in KDE3, both Places and Bookmarks are available to all applications as well as the Dolphin file manager. More of that later.
Places in applications
There is a default set of Places -
- Home
- Network
- Root
- Trash
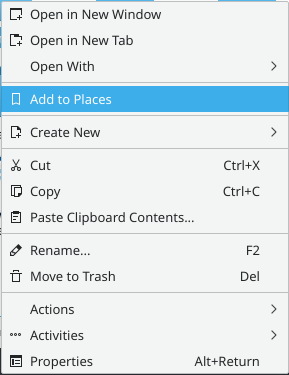
but you can add other places. In Dolphin, right-click on a folder and select , or just drag a folder onto Places.
By default this "Place" will be visible in all applications. If you want to keep it constrained to Dolphin, you need to right-click on the new name in the Places list, where you will find the option to Edit it. There is a check-box for .
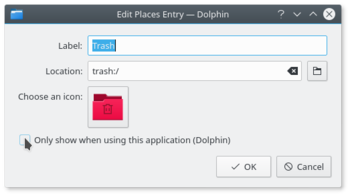
You can see the result of that command if you read ~/.local/share/apps/kfileplaces/bookmarks.xml.
In some applications too there is an option in the File menu to add a folder to Places. At this stage, however, applications vary in which features are available. The important thing to remember is that the default is for Places items to be available to all applications in the → dialogue.
Constraining to one application
Some applications allow you to edit items in the Places menu. For instance, if in Gwenview you right click on a folder in Places you can set an option to .
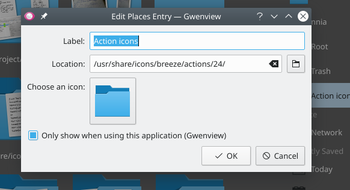
If you need to constrain to an application that does not yet allow you to do that, the only way left is to edit the file ~/.local/share/kfile/bookmarks.xml. Immediately before the </metadata> tag you will need to add the line
<OnlyInApp>appname</OnlyInApp>
Bookmarks in applications
Enable bookmarks
Bookmarks are not enabled in dialogs by default. To enable them
- Open the menu and select or
- Click the Options
 icon
icon - Select
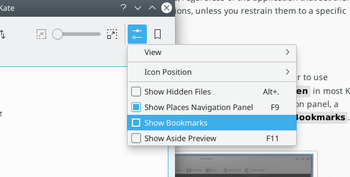
Using bookmarks
Bookmarks are the second class of user-based links to the file system. Remember opening → and using the spanner/wrench? Next to it is a yellow star. This is the bookmark management menu.
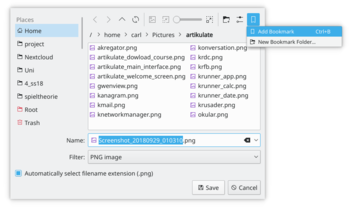
Here you can define bookmarks that will be visible in the same menu on any application. They are stored in one file, ~/.local/share/kfile/bookmarks.xml, which is used by all applications having that menu.
Archive Management in Dolphin
Managing archives now becomes simple. In any directory in Dolphin, highlight the files that you want to compress, and right-click. Here, using the Compress option, you can elect to create a RAR archive, a Gzipped tar archive, or define another compression mode that you have already set up.
Similarly, if you right-click on an existing archived file you get a range of actions added to the right-click menu. You can extract the archive to the current folder, to an autodetected subfolder or to another place of your choosing.
Should you wish to add files to an existing archive, you can choose .
More Cool Actions
Change a File Association on-the-fly
Have you ever wanted to open a file, only to find that it is associated with an application that is not of your choice?
You can, for one, alter this in → → → → . This is the same as running kcmshell5 filetypes in a Konsole.
Alternatively, if you want to change multiple associations right quick, you would edit the *.desktop file directly, e.g. the file /usr/share/applications/org.gnome.Builder.desktop. For example, Gnome Builder associates with a great number of file-types which may not be desirable. So the line
MimeType=application/javascript; # we do not want all of these ....
may be shortened or commented out with # . Maybe a line
   InitialPreference=2
   X-KDE-InitialPreference=3
in the builder.desktop file helps to keep your previous default associated app, with builder being only secondary or tertiary option.
Thirdly, Dolphin and Konqueror offer a quick method for changing a single association:
Right-click on the file and select . The first line there is descriptive, something like:
Type: XML document
At the same level, on the right, there is a spanner (wrench). Click on that and you can add or change an association.
Similarly, by working on a folder, you can change the default file manager to/from Konqueror, if you choose, or add another image browser to the possible associations.
The sub-menu opens up a whole lot more cool things to do from Dolphin. Some possibilities only appear when applicable to the file you have selected. An apps .desktop file below /usr/share/applications defines what actions are applicable for a particular type of file. Some of the options are
- Convert an image file to a different format
- Preview the file
- Download a remote file with KGet
- Sign and/or encrypt the file, according to the encryption software installed
Encode and copy audio CD tracks
- Insert an audio CD
- Navigate to this CD in Dolphin: it must appear as "Volume" in your Dolphin 'Places' or you can reach it by typing audiocd:/ in the address bar.
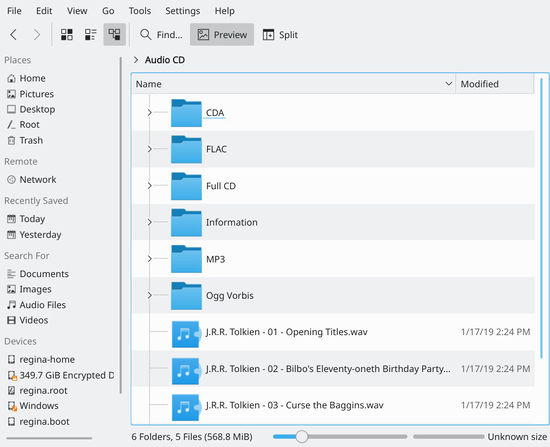
You now notice that Dolphin is proposing a WAV file for each track, plus:
- a CDA folder containing indexing information in the usual CDA format.
- a Whole CD folder, containing one file for each format (.cda, .flac, .mp3, .ogg, .wav) holding all the tracks
- a FLAC folder, containing the tracks encoded into FLAC format (lossless information format)
- an Information folder containing the CDDB informations
- an MP3 folder, containing all the tracks in MP3 format
- a Ogg Vorbis folder, containing the tracks encoded in OGG format
You then just have to copy the folder of your choice, in your preferred format to obtain the relative encoded version of your CD!
Using timeline to have your recent files as startup folder
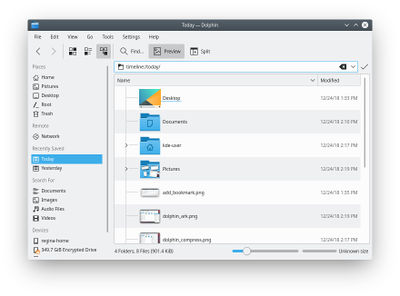
You can start up dolphin (with baloo up and running) with a view of recently modified files: Just navigate to the address/location of timeline:/today/ (copy paste it to the address bar) or use it as dolphin start-up-folder in dolphin-settings.

