Dolphin/File Management/it: Difference between revisions
(Updating to match new version of source page) |
(Updating to match new version of source page) |
||
| Line 1: | Line 1: | ||
<languages /> | <languages /> | ||
<span id="Discover Dolphin"></span> | <span id="Discover Dolphin"></span> | ||
== | === Dolphin o Konqueror? === | ||
Dolphin is the file management application of Plasma Workspace. It is designed to be simple to use, yet powerful. | |||
[https://userbase.kde.org/Konqueror Konqueror] was the default file manager in KDE 2 and 3, and is still available for those who prefer its interface. It is a web browser, a file manager, media viewer and more. For file management it uses the Dolphin KPart, and so has all of the functionality of Dolphin. | |||
==Scopri Dolphin== | |||
La prima sezione ti accompagna in una visita guidata di '''Dolphin'''. La seconda sezione riguarda i concetti relativi a diversi tipi di segnalibri. La terza sezione illustra la gestione degli archivi. Infine diamo un'occhiata ad 'altre cose interessanti'. Puoi fare clic sulle immagini per vederle ingrandite. | |||
===Introduzione a Dolphin=== | ===Introduzione a Dolphin=== | ||
| Line 39: | Line 39: | ||
'''Dolphin''' si apre in modo predefinito quando facciamo clic su una qualsiasi cartella. Può essere avviato anche dal [[Special:myLanguage/Plasma/Kickoff|menu Kickoff]]. | '''Dolphin''' si apre in modo predefinito quando facciamo clic su una qualsiasi cartella. Può essere avviato anche dal [[Special:myLanguage/Plasma/Kickoff|menu Kickoff]]. | ||
== The Interface == | |||
== Barra di navigazione == | == Barra di navigazione == | ||
| Line 61: | Line 63: | ||
Naturalmente ogni vista ha la sua barra di navigazione e ognuna può utilizzare una modalità di visualizzazione differente. | Naturalmente ogni vista ha la sua barra di navigazione e ognuna può utilizzare una modalità di visualizzazione differente. | ||
== | === Sorting Files === | ||
By default, the files in the currently displayed folder are sorted in ascending alphabetical order. However, this can be changed by selecting <menuchoice>Control -> Sort by</menuchoice>. | |||
Files may be sorted by the following attributes | |||
* Name | * Name | ||
| Line 80: | Line 78: | ||
* Link Destination | * Link Destination | ||
* Path | * Path | ||
The sorting method can be changed by selecting <menuchoice>Control -> Sort by -> Ascending</menuchoice>, <menuchoice>Control -> Sort by -> Descending</menuchoice> or <menuchoice>Control -> Sort by -> Folders First</menuchoice>. | |||
== Modalità di visualizzazione == | |||
'''Dolphin''' features three different folder view modes: | |||
* {{Icon|breeze-dolphin-view-icons}} '''Icons''' shows each file or folder as an icon with its name | |||
* {{Icon|breeze-dolphin-view-compact}} '''Compact''' is the same as icons, but in a more compact form, allowing more folders and files to be displayed at once | |||
* {{Icon|breeze-dolphin-view-details}} '''Details''' presents a list of files and folders, giving information on each, including but not limited to size and date | |||
The mode can be changed from within Dolphin | |||
* Select <menuchoice>View Mode</menuchoice> from the <menuchoice>View</menuchoice> menu. This option is only available if the main Menubar is enabled | |||
* Select <menuchoice>View Mode</menuchoice> from the <menuchoice>Control</menuchoice> menu. This option is only available when the main Menubar is disabled | |||
* By selecting the appropriate icon from the main toolbar, if it is enabled | |||
* Using the default keyboard shortcuts: | |||
** <keycap>Ctrl+1</keycap> switches to the Icon display mode, | |||
** <keycap>Ctrl+2</keycap> switches to Compact and, | |||
** <keycap>Ctrl+3</keycap> switches to Detailed view. | |||
==== View as Icons ==== | |||
Each file and each folder is represented by an icon in this mode. Alternatively a preview, or of the file can be displayed. Instead of displaying an icon a preview of the file can be shown. This feature can be turned on/off via the menu <menuchoice>View -> Preview</menuchoice> (if menu bar is enabled) or via the main toolbar button <menuchoice>Preview</menuchoice>. | |||
There is the possibility to display additional information below the icons. These can be turned on/off via <menuchoice>Control -> Additional Information</menuchoice> or <menuchoice>View -> Additional Information</menuchoice> (if menu bar is enabled). In principal the same criteria which are available as search criteria can be selected. | There is the possibility to display additional information below the icons. These can be turned on/off via <menuchoice>Control -> Additional Information</menuchoice> or <menuchoice>View -> Additional Information</menuchoice> (if menu bar is enabled). In principal the same criteria which are available as search criteria can be selected. | ||
| Line 171: | Line 198: | ||
In molte distro i segnalibri non sono abilitati in modo predefinito. Per poter utilizzare i segnalibri dobbiamo prima abilitarli. Apri un <menuchoice>File -> Apri</menuchoice> nella maggior parte delle applicazioni KDE e vedrai, nella parte destra del pannello icone, una chiave inglese. Dal menu a discesa scegli <menuchoice>Mostra segnalibri</menuchoice>. | In molte distro i segnalibri non sono abilitati in modo predefinito. Per poter utilizzare i segnalibri dobbiamo prima abilitarli. Apri un <menuchoice>File -> Apri</menuchoice> nella maggior parte delle applicazioni KDE e vedrai, nella parte destra del pannello icone, una chiave inglese. Dal menu a discesa scegli <menuchoice>Mostra segnalibri</menuchoice>. | ||
[[Image:EnablingBookmarks.png|350px|thumb|center|Abilitare i segnalibri]] | [[Image:EnablingBookmarks.png|350px|thumb|center|Abilitare i segnalibri]] | ||
===Le "Risorse" per una navigazione in tutto il sistema=== | ===Le "Risorse" per una navigazione in tutto il sistema=== | ||
| Line 207: | Line 232: | ||
Here you can define bookmarks that will be visible in the same menu on any application. They are stored in one file, ~/.local/share/kfile/bookmarks.xml, which is used by all applications having that menu. | |||
===Limitare ad una applicazione=== | ===Limitare ad una applicazione=== | ||
| Line 217: | Line 242: | ||
If you need to constrain to an application that does not yet allow you to do that, the only way left is to edit the file ~/.local/share/kfile/bookmarks.xml. Immediately before the </metadata> tag you will need to add the line {{Input|1= <OnlyInApp>appname</OnlyInApp>}} | |||
<span id="Archive Management in Dolphin"></span> | <span id="Archive Management in Dolphin"></span> | ||
===Gestione degli archivi in Dolphin=== | ===Gestione degli archivi in Dolphin=== | ||
Revision as of 07:00, 29 December 2018
Dolphin o Konqueror?
Dolphin is the file management application of Plasma Workspace. It is designed to be simple to use, yet powerful.
Konqueror was the default file manager in KDE 2 and 3, and is still available for those who prefer its interface. It is a web browser, a file manager, media viewer and more. For file management it uses the Dolphin KPart, and so has all of the functionality of Dolphin.
Scopri Dolphin
La prima sezione ti accompagna in una visita guidata di Dolphin. La seconda sezione riguarda i concetti relativi a diversi tipi di segnalibri. La terza sezione illustra la gestione degli archivi. Infine diamo un'occhiata ad 'altre cose interessanti'. Puoi fare clic sulle immagini per vederle ingrandite.
Introduzione a Dolphin
Dolphin è il gestore dei file della KDE Software Compilation.
Ti mostrerò come utilizzare Dolphin per le comuni attività di gestione dei file e come personalizzarlo sulla base delle tue esigenze.
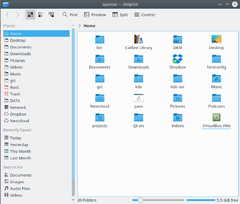
Quando apriamo Dolphin dal menu Kickoff, esso mostra la tua cartella di partenza, in modo predefinito è la tua cartella Home.
To open a file, or go to a folder just click on it. (This can be changed to double-click in )
Per selezionare e deselezionare i file e le cartelle passa il cursore del mouse sull'icona e fai clic sul segno più che appare per selezionare e sul segno meno per deselezionare. Come questo:
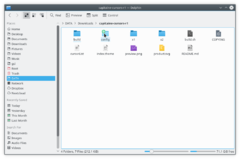
Quando fai clic sul segno più, questo file o cartella viene aggiunto alla tua selezione. Puoi selezionare più file nello stesso modo. La selezione può essere fatta anche trascinando un rettangolo (talvolta chiamato metodo "rubber band") e con la selezione e deselezione con Ctrl + clic per un elemento alla volta e Shift + clic per una serie consecutiva.
Molti file selezionati appaiono simili a questo:

Creazione di una nuova cartella: puoi creare una nuova cartella in quella attiva utilizzando o la scorciatoia F10.
Schede: Dolphin supporta la navigazione a schede. Una nuova scheda può essere aperta per esempio tramite (se hai attivato la barra dei menu), tramite Ctrl + T o facendo clic con il tasto centrale del mouse sull'icona della cartella e sui pulsanti di navigazione.
Dolphin si apre in modo predefinito quando facciamo clic su una qualsiasi cartella. Può essere avviato anche dal menu Kickoff.
The Interface
Dolphin integra un nuovo concetto di utilizzo della barra di navigazione in un modo più veloce e preciso: pertanto viene utilizzata una barra di navigazione "breadcrumb". Invece di visualizzare il percorso completo sono visualizzati come pulsanti solo i punti di navigazione a partire da una delle risorse. Facendo clic su uno di questi pulsanti vai direttamente nella cartella corrispondente. In questo modo puoi raggiungere una cartella genitore da una sotto-cartella in modo molto veloce.
Tra i pulsanti che rappresentano una cartella c'è una piccola freccia, anch'essa è un pulsante. Facendo clic su questa freccia puoi vedere un elenco di tutte le sotto-cartelle sullo stesso livello di quella attuale, dandoti un modo rapido per cambiare cartella.
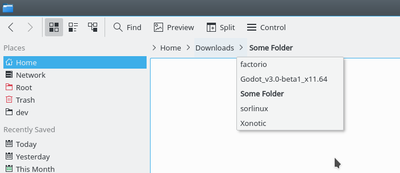
There is also a classical location bar which displays the complete path. To use this style you can right click on the Location Bar and select . If you want the Location bar to become editable, trigger the keyboard shortcut Ctrl + L or select . By clicking on the free space next to the last displayed folder in the breadcrumb style you can switch to an editable Location Bar as well. If the editable style is selected a checkmark is displayed at the end of the location bar. This checkmark is a button which can be used to change back to the breadcrumb style. Of course menu and keyboard shortcut can be used, too.
Vista divisa
Dolphin offre la possibilità di dividere la vista della cartella attuale così che vengano visualizzate due viste cartella una di fianco all'altra come noto in Midnight Commander. Questa è una vista molto comoda per copiare o spostare file da una cartella ad un'altra.
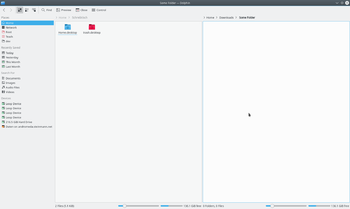
You can split the view by clicking on in the tool bar or, if you have enabled menu bar, (keyboard shortcut F3). To change back to only one folder view you can click on or just press F3 again. The symbol will show you which view will be closed. Depending on the currently active view the minus sign will be shown in the left or right part of the symbol. The active view will be closed. This is important to know if you want to use the keyboard shortcut. There is also a button for splitting and closing the view situated in the toolbar. This button displays the minus symbol as well, so it is easy to know which view would be closed.
Naturalmente ogni vista ha la sua barra di navigazione e ognuna può utilizzare una modalità di visualizzazione differente.
Sorting Files
By default, the files in the currently displayed folder are sorted in ascending alphabetical order. However, this can be changed by selecting .
Files may be sorted by the following attributes
- Name
- Size
- Date
- Permissions
- Owner
- Group
- Type
- Link Destination
- Path
The sorting method can be changed by selecting , or .
Modalità di visualizzazione
Dolphin features three different folder view modes:
 Icons shows each file or folder as an icon with its name
 Compact is the same as icons, but in a more compact form, allowing more folders and files to be displayed at once
 Details presents a list of files and folders, giving information on each, including but not limited to size and date
The mode can be changed from within Dolphin
- Select from the menu. This option is only available if the main Menubar is enabled
- Select from the menu. This option is only available when the main Menubar is disabled
- By selecting the appropriate icon from the main toolbar, if it is enabled
- Using the default keyboard shortcuts:
- Ctrl+1 switches to the Icon display mode,
- Ctrl+2 switches to Compact and,
- Ctrl+3 switches to Detailed view.
View as Icons
Each file and each folder is represented by an icon in this mode. Alternatively a preview, or of the file can be displayed. Instead of displaying an icon a preview of the file can be shown. This feature can be turned on/off via the menu (if menu bar is enabled) or via the main toolbar button .
There is the possibility to display additional information below the icons. These can be turned on/off via or (if menu bar is enabled). In principal the same criteria which are available as search criteria can be selected.
You can group the icons to achieve a better overview. This is turned on via or (if menu bar is enabled). Now the icons are grouped and the groups are divided by a horizontal line containing the name of the group as caption. The grouping is related to the selected search criteria.
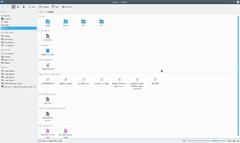
Dettagli
Nella modalità di visualizzazione "Dettagli" le informazioni aggiuntive sono visualizzate in modo predefinito a differenza della modalità di visualizzazione "Icone". Tutti i file sono elencati in una tabella. Il menu contestuale delle intestazioni della tabella offre la possibilità di aggiungere colonne aggiuntive. Sono disponibili le seguenti colonne:
- Dimensione
- Data
- Permessi
- Proprietario
- Gruppo
- Tipo
- Destinazione del collegamento
- Percorso
La colonna "Nome" è sempre visualizzata. Facendo clic sull'intestazione di una delle colonne, la tabella verrà ordinata a seconda di questa colonna. Facendo clic sull'intestazione della stessa colonna, la sequenza di ordinamento viene invertita.
Since KDE 4.1 it is possible to display the folders as a tree. In this mode a plus sign is shown next to the folder. Plus sign has been replaced by > symbol in newer KDE versions. By clicking on this sign the folder is expanded and all containing sub folders and files are also shown in the table but they are attenuated. By clicking the sign, which displays a minus now (or an arrow pointing downwards in latest versions), again the expansion is closed again. Of course the tree structure can be used for as many folders as wished. In latest KDE releases, the tree view is enabled by default, but can be deactivated via with option .
Colonne
View mode "Columns" was inspired by the file manager Finder of Mac OS X. Entering a sub folder did not replace the current folder view but the content of the sub folder was listed in an additional column next to the column of the parent folder. This could be used for several hierarchies, so that you could navigate in an easy and fast way in the file system. Since KDE 4.8, view mode "Columns" has been dropped and will not be available in future Dolphin releases.
Setting defaults for all folders
Under (or under the menu item if you have enabled menu bar) you can set any of these attributes to be the default for all folder views.
Pannelli
Dolphin contains several panels, which can be activated via menu . Each panel can be placed in the left or right docking area. To move a panel you have to unlock panels (right clik on a panel and select ), click on the header and Drag&Drop the panel. The area where the panel will be placed on mouse released is highlighted. It is possible to stack panels on top of each other. In this case the panels are placed into tabs.
Nell'intestazione di ogni pannello ci sono due pulsanti. Il pulsante vicino al titolo sgancia il pannello. Questo rende il pannello come una finestra indipendente che "galleggia" sopra Dolphin. La finestra è ancora combinata con Dolphin, non può essere visualizzata senza Dolphin e non può per esempio essere minimizzata come le normali finestre. Facendo clic sul pulsante di nuovo, il pannello viene agganciato nuovamente. Il secondo pulsante chiuderà il pannello.
Finestre di dialogo non modali
Quando sposti, copi o cancelli file/cartelle, la finestra di dialogo scompare anche se l'operazione non è ancora completata. Appare quindi una barra di avanzamento nella parte in basso a destra dello schermo. Anche questa poi scomparirà, se vuoi vedere l'avanzamento devi fare clic su una piccola icona (i) di informazione nel vassoio di sistema.
Risorse
Dolphin contains a new kind of bookmarks Places. These are displayed in a panel which can be activated via (keyboard shortcut F9). The default Places are identical to the ones shown in the category Computer of the K-Menu Kickoff.
Facendo clic su una di queste risorse questa verrà aperta nella vista attuale della cartella. Il menu contestuale offre la possibilità di modificare le risorse o di rimuoverle. È anche possibile nascondere temporaneamente le voci.
Il menu contestuale di una cartella può essere utilizzato per aggiungerla come nuova voce nel pannello Risorse. Pertanto c'è una voce del menu . Puoi anche trascinare una cartella nel pannello Risorse.
Il pannello risorse contiene anche voci per connettere dispositivi rimovibili come chiavette USB o CD. Una piccola icona a spina indica che il dispositivo è stato montato. Il menu contestuale offre la possibilità di smontare il dispositivo.
Le risorse sono utilizzato come base nella barra di navigazione "breadcrumb". Ogni indirizzo viene mostrato in relazione alla cartella genitore più vicina tra quelle nelle risorse.
Informazioni
The information panel can be activated via (keyboard shortcut F11). This panel displays a preview or an icon of the currently selected file/folder or of the file/folder below the mouse cursor. Some additional information like change date or size to the file/folder is displayed as well.
Il pannello informazioni offre la possibilità di valutare i file, aggiungere un commento o un'etichetta a un file. Questa è una delle interfacce del Desktop semantico Nepomuk che fornisce i vantaggi del web semantico al desktop. A partire da KDE 4.2 è possibile cercare collegamenti semantici utilizzando le etichette.
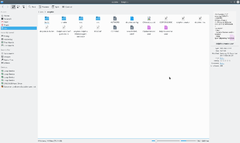
Cartelle
A panel providing a tree structure for the file system can be displayed via (keyboard shortcut F7). The tree structure offers the possibility by clicking the > and ˇ signs to expand/collapse sub folders. By clicking on one of the folders the content will be displayed in the current view.
Terminale
The terminal emulator Konsole can be displayed directly in Dolphin via (keyboard shortcut F4). This makes it possible to use shell commands directly in Dolphin. The terminal is opened in the folder which is displayed in the current view. Shift + F4 opens Konsole in new window.
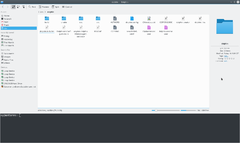
Segnalibri e Risorse
In KDE3 potevi creare un segnalibro in Konqueror, ma essi non erano disponibili in qualsiasi altra applicazione. KDE SC 4.x apre possibilità molto più flessibili, ma inevitabilmente questo significa maggiori complicazioni. Di fatto KDE SC 4 ha tre classi di segnalibri che devono essere differenziati. Essi si trovano in file differenti e hanno differenti funzioni.
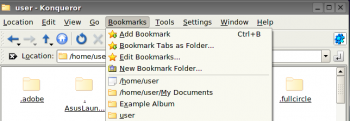
Tre tipi di segnalibri
First, there is the set of bookmarks available only to Konqueror - web bookmarks. These are stored in ~/.local/share/konqueror/bookmarks.xml. Then there is a set which Dolphin calls Places. This set is available to all applications as well as the Dolphin file manager. Every time you use you will see this set. The third set of bookmarks are Application Bookmarks. These share one file, regardless of the application that set them, and are available to all applications, unless you restrain them to a specific application. More of that later.
Abilitare i segnalibri
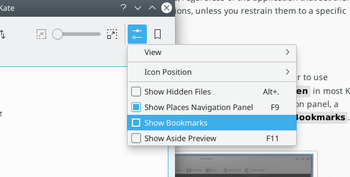
In molte distro i segnalibri non sono abilitati in modo predefinito. Per poter utilizzare i segnalibri dobbiamo prima abilitarli. Apri un nella maggior parte delle applicazioni KDE e vedrai, nella parte destra del pannello icone, una chiave inglese. Dal menu a discesa scegli .
C'è un gruppo predefinito di Risorse
- Home
- Rete
- Radice
- Cestino
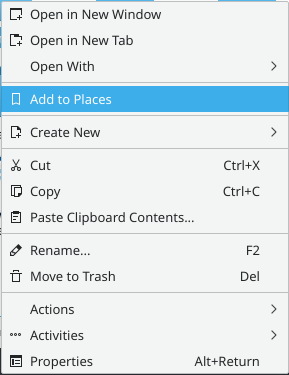
ma puoi aggiungerne altre. In Dolphin fai clic destro su una cartella e seleziona o semplicemente trascina una cartella sulle Risorse.
In modo predefinito questa "Risorsa" sarà visibile in tutte le applicazioni. Se vuoi tenerla solo in Dolphin, devi dare clic destro sul nuovo nome dell'elenco delle Risorse dove troverai l'opzione per modificarla. C'è una casella per .
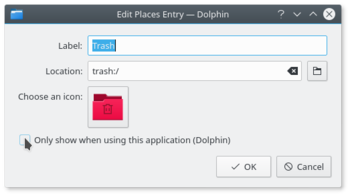
Puoi vedere il risultato di quel comando se leggi ~/.kde4/share/apps/kfileplaces/bookmarks.xml.
Anche in alcune applicazioni c'è un opzione nel menu File per aggiungere una cartella alle Risorse. In questa fase, comunque, le applicazioni differiscono per funzionalità disponibili. La cosa importante da ricordare è che l'impostazione predefinita è di rendere disponibili le voci delle Risorse a tutte le applicazioni nella finestra di dialogo .
Segnalibri nelle applicazioni
Questa è la seconda classe di segnalibri. Ricordi l'apertura di e l'utilizzo della chiave inglese? Di fianco ad essa c'è una stella gialla. Questa è il menu di gestione dei segnalibri.
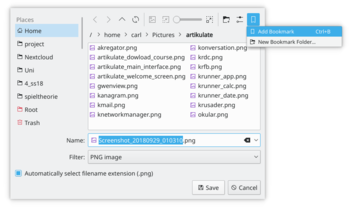
Here you can define bookmarks that will be visible in the same menu on any application. They are stored in one file, ~/.local/share/kfile/bookmarks.xml, which is used by all applications having that menu.
Limitare ad una applicazione
Alcune applicazioni ti permettono di modificare le voci nel menu Risorse. Per esempio, se in Gwenview fai clic destro su una cartella in Risorse, puoi impostare un'opzione per .
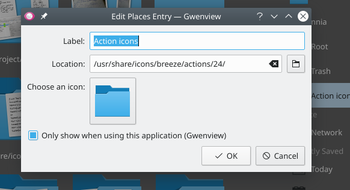
If you need to constrain to an application that does not yet allow you to do that, the only way left is to edit the file ~/.local/share/kfile/bookmarks.xml. Immediately before the </metadata> tag you will need to add the line
<OnlyInApp>appname</OnlyInApp>
Gestione degli archivi in Dolphin
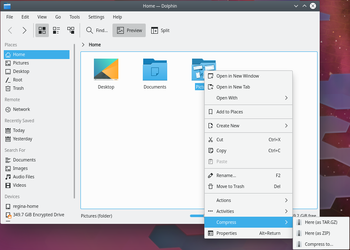
Gestire gli archivi ora è semplice. In qualsiasi cartella in Dolphin evidenzia i file che vuoi comprimere e fai clic destro. Qui, utilizzando l'opzione Comprimi, puoi scegliere di creare un archivio RAR, un archivio tar Gzip o definire un'altra modalità di compressione che hai già impostato.
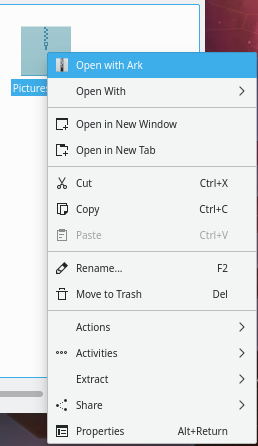
Analogamente se fai clic destro su un file archiviato esistente, ottieni una serie di azioni disponibili nel menu. Puoi estrarre l'archivio nella cartella attuale, in una sotto-cartella rilevata automaticamente o in un altro luogo da te scelto.
Se desideri aggiungere file ad un archivio esistente, puoi scegliere .
Altre azioni utili
Change a File Association on-the-fly
Have you ever wanted to open a file, only to find that it is associated with an application that is not of your choice?
You can, for one, alter this in . This is the same as running kcmshell5 filetypes in a Konsole.
Alternatively, if you want to change multiple associations right quick, you would edit the *.desktop file directly, e.g. the file /usr/share/applications/org.gnome.Builder.desktop . For example, Gnome Builder associates with a great number of file-types which may not be desirable. So the line
MimeType=application/javascript; # we do not want all of these ....
may be shortened or commented out with # . Maybe a line
   InitialPreference=2
   X-KDE-InitialPreference=3
in the builder.desktop file helps to keep your previous default associated app, with builder being only secondary or tertiary option.
Thirdly, Dolphin and Konqueror offer a quick method for changing a single association:
Right-click on the file and select . The first line there is descriptive, something like:
Type: XML document
Sullo stesso livello, a destra, c'è una chiave inglese. Fai clic su di essa e potrai aggiungere o cambiare un'associazione.
Analogamente, lavorando con una cartella, puoi cambiare il gestore di file predefinito in/da Konqueror, se scegli così o aggiungere un altro browser di immagini alle possibili associazioni.
The sub-menu opens up a whole lot more cool things to do from Dolphin. Some possibilities only appear when applicable to the file you have selected. An apps .desktop file below /usr/share/applications defines what actions are applicable for a particular type of file. Some of the options are
- Convert an image file to a different format
- Preview the file
- Download a remote file with KGet
- Sign and/or encrypt the file, according to the encryption software installed
Convertire e copiare tracce di CD audio
- Inserisci un CD audio
- Vai su questo CD in Dolphin: deve apparire come "Volume" nelle tue 'Risorse' in Dolphin o puoi raggiungerlo digitando audiocd:/ nella barra degli indirizzi.
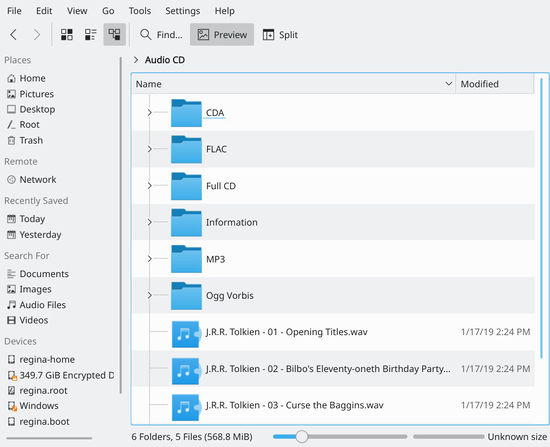
Ora noti che Dolphin propone un file WAV per ogni traccia, più:
- una cartella CDA contenente informazioni indicizzate nel consueto formato CDA,
- una cartella dell'intero CD contenente un file per ogni formato (.cda, .flac, .mp3, .ogg, .wav) contenente tutte le tracce,
- una cartella FLAC contenente le tracce codificate nel formato FLAC (formato senza perdita di informazioni),
- una cartella Informazioni contenente le informazioni CDDB,
- una cartella MP3 contenente tutte le tracce in formato MP3,
- una cartella Ogg Vorbis contenente le tracce codificate nel formato OGG.
Devi quindi solo copiare la cartella che preferisci nel tuo formato preferito per ottenere la relativa versione codificata del tuo CD!
timeline:/ and have your recent files as startup folder
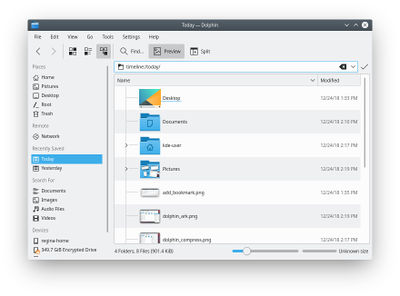
In a current (2017, Version 16.08.3 of) dolphin (with baloo up and running), you can start up dolphin with a view of recently modified files: Just navigate to the address/location of timeline:/today/ (copy paste it to the address bar) or use it as dolphin start-up-folder in dolphin-settings. With older versions of dolphin, this required the below manual steps:
Dolphin has access to a large number of file transfer protocols (KIO Slaves). One of those is provided by the KDE semantic search system (Nepomuk). Nepomuk offers a transfer protocol named history. You can navigate to it by entering timeline:/ in the location bar.
One particularly neat thing there is the ability to have the Today folder from the timeline:/ protocol in the Places sidebar (you can just drag it there!). You can then change the name and icon (do a right click on the new Today entry and choose ).
It could be very useful to have this view of recently used files immediately when you start Dolphin. Unfortunately, as of Dolphin 2.1 (part of KDE SC 4.9) this is not possible without editing the Dolphin configuration file. See this blog for more details on that.
To edit the configuration file, first close all Dolphin windows. Dolphin will save its configuration upon closing, overwriting any changes you might make!
Then use KRunner (Alt + F2) to edit ~/.config/dolphinrc with KWrite as follows: kwrite ~/.config/dolphinrc. You can of course use any other editor as well, like Kate. In the configuration file, locate the [General] section to edit the HomeUrl into: HomeUrl=timeline:/today and save the file. You should now have the today view as default and have the files you're most often looking for at your fingertips!


