Dolphin/File Management/ca: Difference between revisions
Created page with "Entre els botons que representen una carpeta hi ha una petita fletxa la qual és un botó. En fer clic a la fletxa podreu veure una llista de tots els subdirectoris en el mateix ..." |
Created page with "També hi ha una barra de navegació clàssica, que mostra la ruta completa. Per utilitzar aquest estil podeu seleccionar <menuchoice>Visualitza -> Barra de localització -> Ubic..." |
||
| Line 58: | Line 58: | ||
[[Image:Dolphin_nav.png|400px|thumb|center|Canviar de directoris ràpidament]] | [[Image:Dolphin_nav.png|400px|thumb|center|Canviar de directoris ràpidament]] | ||
També hi ha una barra de navegació clàssica, que mostra la ruta completa. Per utilitzar aquest estil podeu seleccionar <menuchoice>Visualitza -> Barra de localització -> Ubicació editable</menuchoice>, o activar la drecera de teclat <keycap>Ctrl + L</keycap>. En fer clic a l'espai lliure al costat de l'última carpeta que es mostra en l'estil «fil d'Ariane» podreu canviar l'estil clàssic. Si se selecciona l'estil clàssic pareixerà una marca de verificació al final de la barra de navegació. Aquesta marca de verificació és un botó que es pot utilitzar per tornar a l'estil «fil d'Ariane». Per descomptat, el menú i les dreceres de teclat també es poden utilitzar. | |||
== Vista dividida == | == Vista dividida == | ||
Revision as of 18:15, 4 November 2011
Descobrir el Dolphin
La primera secció proposa una visita guiada de Dolphin. La segona va dels conceptes dels diferents tipus d'adreces d'interès. La tercera debat sobre la gestió d'arxius. Finalment, examinem «les coses més útils». Les imatges són clicables -per veure una vista engrandida-.
Informació general
Dolphin o Konqueror?
Aquesta guia d'aprenentatge descriu Dolphin per a KDE SC 4. Konqueror era el gestor de fitxers estàndard en KDE 2 i 3. També podeu utilitzar Konqueror com el gestor de fitxers per omissió en KDE SC 4. Per fer-ho, a partir de KDE SC 4.2 en endavant, obriu Arranjament del sistema i aneu al mòdul . Podeu seleccionar Konqueror o un rang d'altres aplicacions per al seu ús com al gestor de fitxers per omissió.
- D3lphin és una bifurcació de Dolphin per a KDE 3. Li falten certes característiques de Dolphin al KDE SC 4. També és menys conegut, perquè el gestor de fitxers per omissió de KDE 3 era Konqueror. Aquesta bifurcació no està suportada per la comunitat i ja no és més mantinguda pel seu autor.
Introducció a Dolphin
Dolphin és el gestor de fitxers del KDE Software Compilation.
Us mostraré com utilitzar Dolphin per les tasques corrents de gestió de fitxers, i com personalitzar-lo en funció de les vostres necessitats.
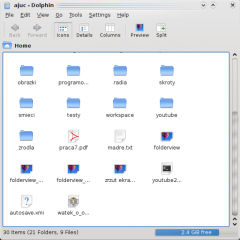
Quan obrim Dolphin des del menú Kickoff aquest mostra el vostre directori inicial, per omissió és el vostre directori inici.
Per obrir un fitxer, o anar a una carpeta només cal fer clic sobre seu. (Això es pot canviar pel doble clic a , Si ho preferiu. Algunes distribucions estableixen el doble clic com per omissió). Al KDE 4.5 això esdevé a .
Per seleccionar i deseleccionar fitxers i carpetes mantenint el cursor del ratolí sobre la icona i fer clic al signe més emergent per seleccionar i al signe menys per deseleccionar. Com segueix:
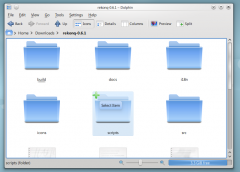
En fer clic al signe més, aquest fitxer o carpeta serà afegida a la vostra selecció. Podeu seleccionar diversos fitxers de la mateixa manera. La selecció també es pot fer arrossegant un rectangle (de vegades anomenat el mètode «rubber band»), i seleccionant i deseleccionant amb Ctrl + clic</ keycap> per a un i <keycap>Majús. + clic</ keycap > per a un rang consecutiu.
Molts fitxers seleccionats s'assemblarà a això:
[[Image:Dolphin folder hovered deselect.png|thumb|240px|center]]
'''Crear una carpeta nova''': Podeu crear una nova carpeta al directori actiu utilitzant el <menuchoice>menú contextual (clic dret) -> Crea nou</menuchoice> o la drecera <keycap>F10.
Pestanyes: Dolphin suporta la navegació amb pestanyes. Una nova pestanya es pot obrir, per exemple des de , amb la drecera Ctrl + T o fent clic del botó mig del ratolí sobre la icona de carpeta i els botons de navegació.
Dolphin s'obrirà per omissió quan fem clic sobre qualsevol carpeta. També es pot iniciar des del menú Kickoff.
Dolphin integra un nou concepte d'usar la barra de navegació d'una manera més ràpida i precisa: per tant s'utilitza una barra de navegació «fil d'Ariane». En lloc de mostrar la ruta completa, s'anuncien només els punts de navegació en forma de botons. En fer clic en un d'aquests botons, es va directament a aquesta carpeta. D'aquesta manera es pot arribar a una carpeta pare des d'una subcarpeta d'una manera molt ràpida.
Entre els botons que representen una carpeta hi ha una petita fletxa la qual és un botó. En fer clic a la fletxa podreu veure una llista de tots els subdirectoris en el mateix nivell que l'actual, oferint-vos un canvi ràpid de directori.
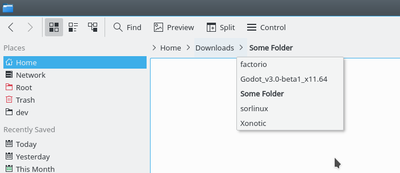
També hi ha una barra de navegació clàssica, que mostra la ruta completa. Per utilitzar aquest estil podeu seleccionar , o activar la drecera de teclat Ctrl + L. En fer clic a l'espai lliure al costat de l'última carpeta que es mostra en l'estil «fil d'Ariane» podreu canviar l'estil clàssic. Si se selecciona l'estil clàssic pareixerà una marca de verificació al final de la barra de navegació. Aquesta marca de verificació és un botó que es pot utilitzar per tornar a l'estil «fil d'Ariane». Per descomptat, el menú i les dreceres de teclat també es poden utilitzar.
Vista dividida
Dolphin offers the possibility to split the current folder view so that two folder views are displayed next to each other as known from Midnight Commander. This is a very comfortable view to copy or move files from one folder to another.
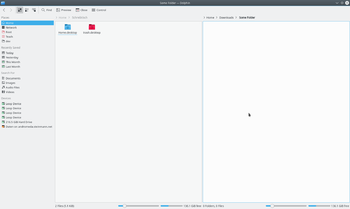
You can split the view with (keyboard shortcut F3). To change back to only one folder view you can use . The symbol will show you which view will be closed. Depending on the currently active view the minus sign will be shown in the left or right part of the symbol. The active view will be closed. This is important to know if you want to use the keyboard shortcut. There is also a button for splitting and closing the view situated in the toolbar. This button displays the minus symbol as well, so it is easy to know which view would be closed.
Of course each view has its own navigation bar and each view can use a different view mode.
Mode de vista
Dolphin supports three different view modes: "Icons", "Details" and "Columns". These can be changed via the menu or via the keyboard shortcuts Ctrl+1 (Icons), Ctrl+2 (Details) and Ctrl+3 (Columns). There is also a button for each view mode in the toolbar and the context menu of the folder view offers a submenu to change the view mode.
Icones
Each file and each folder is represented by an icon in the view mode "Icons". Instead of displaying an icon a preview of the file can be shown. This behaviour can be turned on/off via the menu or via a toolbar button. There is a size limit for the file previews. This size limitation can be configured via option . There is also an option to use thumbnails embedded in files. In KDE 4.5 Previews are enabled (and maximum size defined) by
The files in the currently selected folder are sorted in alphabetical order by default. The way of sorting can be changed via menu . The following sort criteria are available:
- Name
- Size
- Date
- Permissions
- Owner
- Group
- Type
Additionally the sorting sequence can be defined by .
There is the possibility to display additional information below the icons. These can be turned on/off via . In principal the same criteria which are available as search criteria can be selected.
You can group the icons to achieve a better overview. This is turned on via . Now the icons are grouped and the groups are divided by a horizontal line containing the name of the group as caption. The grouping is related to the selected search criteria.
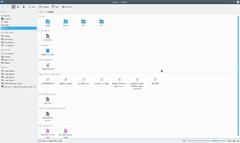
Detalls
In view mode "Details" additional information is displayed by default in contrast to view mode "Icons". All files are listed in a tabular. The context menu of the table header offers the possibility to add additional columns. The following columns are available:
- Size
- Date
- Permissions
- Owner
- Group
- Type
Column "Name" is always displayed. By clicking on the header of one of the columns the table will be sorted by this column. By clicking on the same column header the sorting sequence is reversed.
Since KDE 4.1 it is possible to display the folders as a tree. In this mode a plus sign is shown next to the folder. By clicking on this sign the folder is expanded and all containing sub folders and files are also shown in the table but they are attenuated. By clicking the sign, which display a minus now, again the expansion is closed again. Of course the tree structure can be used for as many folders as wished. The tree view is disabled by default, but can be activated via with option .
Columnes
View mode "Columns" is inspired by the file manager Finder of Mac OS X. Entering a sub folder does not replace the current folder view but the content of the sub folder is listed in an additional column next to the column of the parent folder. This can be used for several hierarchies, so that you can navigate in an easy and fast way in the file system.
Setting defaults for all folders
Under the menu item you can set any of these attributes to be the default for all folder views.
Plafons
Dolphin contains several panels, which can be activated via menu . Each panel can be placed in the left or right docking area. To move a panel you have to click on the header and Drag&Drop the panel. The area where the panel will be placed on mouse released is highlighted. It is possible to stack panels on top of each other. In this case the panels are placed into tabs.
In the header of each panel there are two buttons. The button near to the caption undocks the panel. This makes the panel an independent window which "floats" above Dolphin. The window is still combined with Dolphin and cannot be displayed without Dolphin and cannot for example be minimized like normal windows. By clicking the button again the panel is docked again. The second button will close the panel.
Diàlegs no modals
When Moving, Copying or Deleting files/directories the dialog disappears even when the operation has not yet completed. A progress bar then appears in the bottom right of the screen, this then disappears also, if you want see the progress you need to click a small (i) information icon in the system tray.
Llocs
Dolphin contains a new kind of bookmarks Places. These are displayed in a panel which can be activated via (keyboard shortcut F9). The default Places are identical to the one shown in the category System of the K-Menu Kickoff.
By clicking one of these places it will be opened in the current folder view. The context menu offers the possibility to edit the places or to remove them again. It is also possible to hide entries temporarily.
The context menu of a folder can be used to add this folder an another entry to the Places panel. Therefore there is a menu item . You can also Drag&Drop a folder to the Places panel.
The places panel also contains entries to connected removable devices like USB-keys or CDs. A small plug icon indicates if the device is mounted. The context menu offers the possibility to unmount the device.
The places are used as the basis in the breadcrumb navigation bar. Each address is shown in relation to the nearest parent folder which is one of the places.
Informació
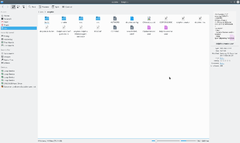
The information panel can be activated via (keyboard shortcut F11). This panel displays a preview or an icon of the currently selected file/folder or of the file/folder below the mouse cursor. Some additional information like change date or size to the file/folder is displayed as well.
The information panel offers the possibility to rate files, add a comment or tag a file. This is one of the interfaces to the semantic Desktop Nepomuk which provides the advantages of the semantic web for the desktop. Starting from KDE 4.2 it is possible to search for the semantic links given by the tags.
Carpetes
A panel providing a tree structure for the file system can be displayed via (keyboard shortcut F7). The tree structure offers the possibility by clicking the + and - signs to expand/collapse sub folders. By clicking on one of the folders the content will be displayed in the current view.
Terminal
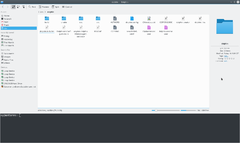
The terminal emulator Konsole can be displayed directly in Dolphin via (keyboard shortcut F4). This makes it possible to use shell commands directly in Dolphin. The terminal is opened in the folder which is displayed in the current view. Shift + F4 opens Konsole in new window.
Enllaços externs
Road to KDE 4: Dolphin and Konqueror
Ars Technica: A First Look at Dolphin
Youtube - KDE 4 rev 680445 - Dolphin
Introducing KDE 4 Blog - Dolphin
Bookmarks and Places
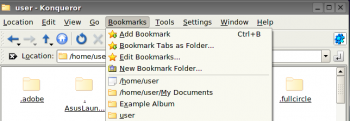
In KDE3 you could create bookmarks in Konqueror, but they were not available to any other application. KDE SC 4.x opens up a great deal more flexibility - but that inevitably means more complication. In fact KDE SC 4 has three classes of Bookmarks, which need to be differentiated. They reside in different files, and have different functions.
Tres tipus d'adreces d'interès
First, there is the set of bookmarks available only to Konqueror - web bookmarks. These are stored in ~/.kde/share/apps/konqueror/bookmarks.xml. Then there is a set which Dolphin calls Places. This set is available to all applications as well as the Dolphin file manager. Every time you use you will see this set. The third set of bookmarks are Application Bookmarks. These share one file, regardless of the application that set them, and are available to all applications, unless you restrain them to a specific application. More of that later.
Habilitar les adreces d'interès
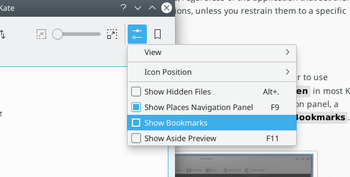
In most distros Bookmarks are not enabled by default. In order to use bookmarks we first have to enable them. Open a in most KDE applications and you will see, at the right-hand edge of the icon panel, a spanner or wrench. From the drop-down list, choose .
There is a default set of Places -
- Home
- Network
- Root
- Trash
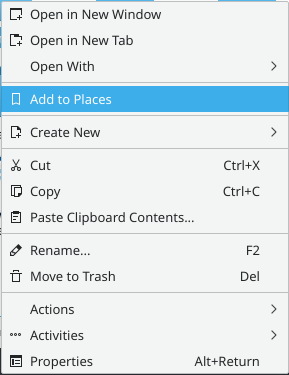
but you can add other places. In Dolphin, right-click on a folder and select , or just drag a folder onto Places.
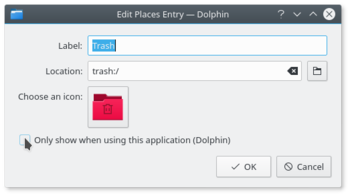
By default this "Place" will be visible in all applications. If you want to keep it constrained to Dolphin, you need to right-click on the new name in the Places list, where you will find the option to Edit it. There is a check-box for .
You can see the result of that command if you read ~/.kde4/share/apps/kfileplaces/bookmarks.xml.
In some applications too there is an option in the File menu to add a folder to Places. At this stage, however, applications vary in which features are available. The important thing to remember is that the default is for Places items to be available to all applications in the dialogue.
Adreces d'interès a les aplicacions
This is the second class of bookmarks. Remember opening and using the spanner/wrench? Next to it is a yellow star. This is the bookmark management menu.
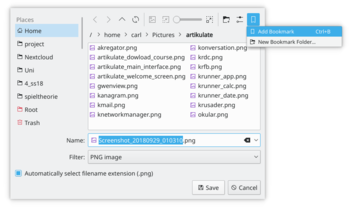
Here you can define bookmarks that will be visible in the same menu on any application. They are stored in one file, ~/.kde4/share/apps/kfile/bookmarks.xml, which is used by all applications having that menu.
Constraining to one application
Some applications allow you to edit items in the Places menu. For instance, if in Gwenview you right click on a folder in Places you can set an option to .
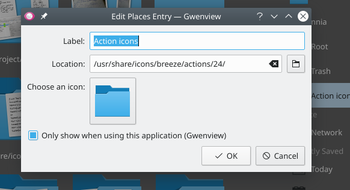
If you need to constrain to an application that does not yet allow you to do that, the only way left is to edit the file ~/.kde/share/apps/kfile/bookmarks.xml. Immediately before the </metadata> tag you will need to add the line
<OnlyInApp>appname</OnlyInApp>
Gestió de fitxers en Dolphin
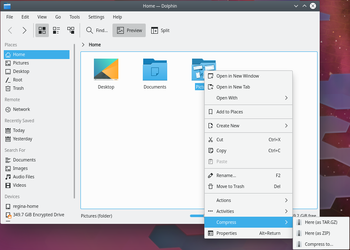
Managing archives now becomes simple. In any directory in Dolphin, highlight the files that you want to compress, and right-click. Here, using the Compress option, you can elect to create a RAR archive, a Gzipped tar archive, or define another compression mode that you have already set up.
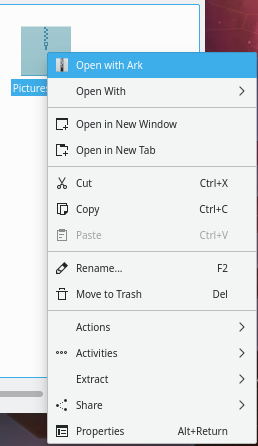
Similarly, if you right-click on an existing archived file you get a range of actions added to the right-click menu. You can extract the archive to the current folder, to an autodetected subfolder or to another place of your choosing.
Should you wish to add files to an existing archive, you can choose .
Les accions més útils
Change a File Association on-the-fly
Have you ever wanted to open a file, only to find that it is associated with an application that is not of your choice? You can, of course, alter this in . But Dolphin and Konqueror offer you a quick and cool method for changing a single association.
Right-click on the file and select . The first line there is descriptive, something like:
Type: XML document
At the same level, on the right, there is a spanner (wrench). Click on that and you can add or change an association.
Similarly, by working on a folder, you can change the default file manager to/from Konqueror, if you choose, or add another image browser to the possible associations.
El submenú Accions
The sub-menu opens up a whole lot more cool things to do from Dolphin. Some possibilities only appear when applicable to the file you have selected. Some of the options are
- Convert an image file to a different format
- Preview the file
- Download a remote file with KGet
- Sign and/or encrypt the file, according to the encryption software installed
Codificar i copiar pistes d'àudio CD
- Insert an audio CD
- Navigate to this CD in Dolphin: it must appear as "Volume" in your Dolphin 'Places' or you can reach it by typing audiocd:/ in the address bar.
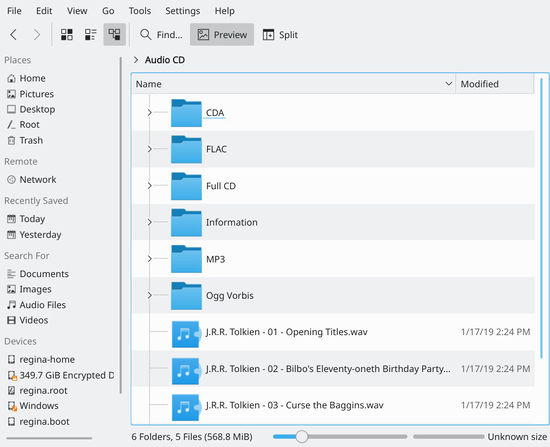
You now notice that Dolphin is proposing a WAV file for each track, plus:
- a CDA folder containing indexing information in the usual CDA format.
- a Whole CD folder, containing one file for each format (.cda, .flac, .mp3, .ogg, .wav) holding all the tracks
- a FLAC folder, containing the tracks encoded into FLAC format (lossless information format)
- an Information folder containing the CDDB informations
- an MP3 folder, containing all the tracks in MP3 format
- a Ogg Vorbis folder, containing the tracks encoded in OGG format
You then just have to copy the folder of your choice, in your preferred format to obtain the relative encoded version of your CD!


