Template:SearchLang: Difference between revisions
No edit summary |
Updated to handle many kdenlive pages |
||
| Line 7: | Line 7: | ||
|includemaxlength = 0 | |includemaxlength = 0 | ||
|format = ,\n* [[%PAGE%{{!}}%TITLE%]],, | |format = ,\n* [[%PAGE%{{!}}%TITLE%]],, | ||
|resultsheader = There are %TOTALPAGES% pages beginning with A-J\n | |||
}} | }} | ||
{{#dpl: | {{#dpl: | ||
|namespace = | |namespace = | ||
|titleregexp = ^K.*/{{{2|en}}}$ | |titleregexp = ^K[A-Z].*/{{{2|en}}}$ | ||
|include = * | |include = * | ||
|includematch = @{{{1}}}@ | |includematch = @{{{1}}}@ | ||
|includemaxlength = 0 | |includemaxlength = 0 | ||
|format = ,\n* [[%PAGE%{{!}}%TITLE%]],, | |format = ,\n* [[%PAGE%{{!}}%TITLE%]],, | ||
|resultsheader = There are %TOTALPAGES% pages beginning with KA-KZ\n | |||
}} | |||
{{#dpl: | |||
|namespace = | |||
|titleregexp = ^K[a-ce-z].*/{{{2|en}}}$ | |||
|include = * | |||
|includematch = @{{{1}}}@ | |||
|includemaxlength = 0 | |||
|format = ,\n* [[%PAGE%{{!}}%TITLE%]],, | |||
|resultsheader = There are %TOTALPAGES% pages beginning with Ka-Kz but not Kd\n | |||
}} | |||
{{#dpl: | |||
|namespace = | |||
|titleregexp = ^Kd.*/{{{2|en}}}$ | |||
|include = * | |||
|includematch = @{{{1}}}@ | |||
|includemaxlength = 0 | |||
|format = ,\n* [[%PAGE%{{!}}%TITLE%]],, | |||
|resultsheader = There are %TOTALPAGES% pages beginning with Kd\n | |||
}} | }} | ||
{{#dpl: | {{#dpl: | ||
| Line 23: | Line 43: | ||
|includemaxlength = 0 | |includemaxlength = 0 | ||
|format = ,\n* [[%PAGE%{{!}}%TITLE%]],, | |format = ,\n* [[%PAGE%{{!}}%TITLE%]],, | ||
|resultsheader = There are %TOTALPAGES% pages beginning with L-J\n | |||
}} | }} | ||
</includeonly><noinclude> | </includeonly><noinclude> | ||
Latest revision as of 06:21, 6 January 2015
Find pages in a given language containing a string: {{SearchLang|string|lang}} finds all pages with language code lang containing the string. Searches are case sensitive. In order to find both xyz and Xyz use a regular expression: {{SearchLang|[Xx]yz|da}}.
Regular expressions use a perl like syntax. Special characters like '[', '[','(' and ')' need to be escaped.
No wiki expansion takes place before passing arguments to the template.
Example: {{SearchLang|1=Learn more|2=en}} gives
There are 174 pages beginning with A-J
- Accessibility/en
- Flow/en
- Accessibility/Application Overview/en
- Braindump/en
- Browser Configuration/en
- Amarok/Manual/Introduction/en
- Blogilo/en
- Calligra/Handbooks/en
- Amarok/Manual/Playlist/en
- Digikam/Faded Effect/en
- Digikam/Simple Toning/en
- Akregator/Tutorials/How to get RSS from a Wordpress blog?/en
- Amarok/Manual/Organization/ScriptManager/en
- Amarok/Manual/Various/AmarokOnOtherPlatforms/en
- Amarok/Manual/References/KeybindingReference/en
- Digikam/Quick Tip:Disable Certain File Types/en
- Amarok/Manual/Organization/Collection/RemoteCollections/en
- Filelight/en
- Amarok/Manual/Organization/Collection/RemoteCollections/DAAP/en
- Digikam/BleachBypassEffect/en
- Bluedevil/en
- BlinKen/en
- Amarok/Manual/Various/en
- GCompris/en
- Amarok/Manual/Organization/Collection/RemoteCollections/Ampache/en
- Digikam/Tethered Shooting/en
- Amarok/Manual/Organization/Collection/RemoteCollections/UPnP/en
- BasKet/en
- Dragon Player/en
- Digikam/Check Database/en
- Digikam/Geotag Photos with Android/en
- Digikam/Photoshop Preset Curves/en
- Digikam/Effects/en
- Digikam/Batch Process/en
- Amarok/Manual/Various/AmarokOnOtherPlatforms/OSX/en
- Amarok/Manual/References/en
- Amarok/Manual/References/MenuAndCommandReference/AmarokMenu/en
- Amarok/Manual/References/MenuAndCommandReference/en
- Digikam/Optimise/en
- Applications/Accessibility/en
- Gwenview/en
- Digikam/Face Detection/en
- Amarok/Manual/AmarokWindow/en
- Browser Configuration/Mousegestures for all Browsers/en
- Amarok/QuickStartGuide/TheAmarokWindow/en
- Juk/en
- Amarok/Manual/Organization/Collection/en
- An introduction to KDE/en
- Digikam/Exif/en
- Amarok/Manual/References/KeybindingReference/GlobalShortcuts/en
- Digikam/MetadataToRaw/en
- Applications/Science/en
- Amarok/Manual/Organization/Applets/en
- Amarok/Manual/References/Credits and License/en
- Digikam/Using the Advanced Search Tool In digiKam/en
- Amarok/Manual/References/MenuAndCommandReference/Help/en
- Cantor/en
- Dolphin/Customize Folder Icon/en
- Digikam/Panorama/en
- Digikam/ChangeFormat/en
- Amarok/Manual/Organization/Collection/RemoteCollections/Samba/en
- Amarok/Manual/Playlist/QueueManager/en
- Digikam/Vintage Effect/en
- Amarok/QuickStartGuide/TheContextView/en
- Digikam/Picasa/en
- Digikam/Performing Fuzzy Searches In digiKam/en
- Amarok/Manual/Various/AmarokOnOtherPlatforms/Windows/en
- Gwenview/Hidden Configuration Options/en
- Amarok/Manual/Various/AmarokOnOtherPlatforms/NonKDE Desktops/en
- Amarok/Manual/References/MenuAndCommandReference/ViewMenu/en
- Amarok/Manual/Organization/en
- Amarok/QuickStartGuide/HowToDealWithProblems/en
- Amarok/Manual/Playlist/PlaylistFiltering/en
- Artwork/en
- Amarok/Manual/References/MenuAndCommandReference/Settings/en
- Digikam/Bugs/en
- Digikam/Import Photos in Digikam/en
- Digikam/Wikimedia Commons/en
- Digikam/Export via DNLA/en
- Digikam/Calibrate and Profile Monitor/en
- Homerun/en
- Digikam/Soft Proofing/en
- Akonadi/Postgres update/en
- Digikam/Maintenance/en
- Digikam/Adding Borders To Your Photos/en
- Calligra/en
- Digikam/Watermark/en
- Accessibility/Plasma/en
- Amarok/QuickStartGuide/Glossary/en
- Amarok/QuickStartGuide/GettingStarted/en
- Ark/en
- Amarok/Manual/References/MenuAndCommandReference/Playlist/en
- Digikam/Negatives/en
- Amarok/Manual/Playlist/SavedPlaylists/en
- Amarok/Manual/AmarokWindow/Toolbar/en
- Applications/Desktop/en
- Akregator/en
- Create a Page/en
- General KDE Software FAQs/en
- Getting Help/en
- Amarok/Manual/References/KeybindingReference/AmarokShortcuts/en
- Digikam/Calendars/en
- Amarok/Manual/References/MenuAndCommandReference/Tools/en
- Installing KDE neon/en
- Amarok/Manual/Organization/Collection/WorkingWithMediaDevices/en
- Amarok/Manual/Organization/CoverManager/en
- Adding an entry to the Create New menu/en
- Amarok/Manual/Various/ReplayGain/en
- How to chat with other KDE users/en
- Digikam/Batch Queue Manager and Script/en
- Apper/en
- Dolphin/en
- Amarok/Manual/Organization/Transcoding/en
- Digikam/Basic RAW Processing/en
- Amarok/Manual/Organization/Collection/SearchInCollection/en
- Digikam/Sharpening/en
- Amarok/QuickStartGuide/en
- Amarok/Manual/Organization/Collection/ExternalDatabase/en
- Amarok/Manual/Organization/Collection/StatisticsSynchronization/en
- Configure your desktop/en
- Applications/Development/en
- Amarok/Manual/AmarokWindow/ContextPane/en
- Applications/System/en
- Amarok/Manual/ConfiguringAmarok/ChangingLayout/en
- Amarok/Manual/Organization/TagEditor/en
- Amarok/Manual/Organization/Collection/OrganizeCollection/en
- Jovie/en
- Common Tasks/en
- Applications/Multimedia/en
- Amarok/Manual/en
- Akonadi and AddressBook/en
- Applications/en
- Applications/Education/en
- Amarok/Manual/Playlist/AutomaticPlaylistGenerator/en
- Concepts/OpenPGP Help Spread/en
- Digikam/TaggingEfficient/en
- Applications/Internet/en
- Applications/Graphics/en
- Bangarang/en
- Gluon/en
- Color Management/en
- Amarok/Manual/Organization/CollectionScanning/en
- Audex/en
- History of KDE/en
- Applications/Utilities/en
- Amarok/Manual/Playlist/DynamicPlaylists/en
- ChoqoK/Using ChoqoK/en
- Amarok/QuickStartGuide/Playlists/en
- IRC Channels/en
- Amarok/Manual/AmarokWindow/MediaSources/en
- Edit Markup/en
- Akonadi/en
- Digikam/en
- Applications/Office/en
- Applications/Games/en
- Introduction to new contributors/en
- Calligra/Download/en
- Discover/en
- How To Convert a UserBase Manual to Docbook/en
- Amarok/en
- Amarok/Manual/AmarokWindow/PlaylistPane/en
- Digikam/Tutorials/en
- Asking Questions/en
Using IRC to get help
Here are a few tips on asking questions, especially in #kde on Libera Chat, in a way that is more likely to get answers:
- Don't ask to ask, just ask: the irc.libera.chat channel #kde is a user support channel, so we expect your questions - go right ahead
 .
.
- Be ready with as much relevant details about your system as you can find: Questions you are likely to be asked are:
- What distribution do you use (and what version?) e.g. Kubuntu 18.04
- what version of Plasma you are running — if you don't know, open Konsole and type
plasmashell --versionand look at the version number given there - how you installed it — mostly likely from your distribution repositories.
You probably won't need to give all of this information straight away, but if you know how to find it quickly it often helps
- Try to do some troubleshooting yourself before asking: Google is your friend (entering error messages into Google often finds something useful). You should also take a look at Troubleshooting KDE Problems - the advice there is probably what you'll be told in #kde anyway, so try it first

- Also, try to make sure that the problem you're having is a problem with KDE software and not some other component of your system (for example, a problem with X or with ALSA). If possible, try an alternative, non-KDE application to see whether the problem also occurs there. Of course, if you're not sure, please ask.
- Use the Forum. Try asking a question on the forum. If the discussion brings up interesting information you might add it to UserBase, so that it can help others.
- Be prepared to wait! Often on IRC, someone will notice your question a little while after you ask it, so wait around for a while after you ask. There's nothing more annoying than typing out a long answer for someone, only to realise that they left 3 minutes after asking their question! In some cases there could be hours between your question being asked and someone who knows the answer coming on-line (remember that KDE users are all over the world) so sometimes you just have to ask again at a different time of day.
- If you don't get an answer on #kde, you can also try the channel for your distribution (eg, #suse, #kde-freebsd, etc), or an appropriate mailing list: see lists.kde.org or forum.
- Above all, be patient and polite. Remember that the people who help are all volunteers, and could be spending their time doing other things than helping.
If your problem is with sound, you might want to first read Sound Problems.
If your question relates to development, please see KDE TechBase's contribute page
Because KDE is so actively developed, changes arrive very frequently, so don't be surprised if you can't find any written information. Ask in IRC, the Forum or a mailing list, and when you have an answer, register an account on UserBase and add the information to the relevant page. At the same time as learning about your system you will be helping others do the same ![]()
The Forums
Another great place to get help is the KDE Community Forums. It is always a good idea to search the forums first. Maybe your question has already been answered. If not, find an appropriate forum and start a thread. Don't expect an immediate answer, but remember to come back regularly to participate in the discussion as it gets going. Remember that the forums are run by users like yourself.
The KDE Community forums offer a "guided post" feature that can help you post your question in the appropriate forum, increasing the chance of having it seen by people knowledgeable on the matter. It is accessible as a large "New Post" button on the forums' homepage, so if you have any doubts, that is the place to start.
The forums have an extensive search feature: prior to posting try finding if your question has already been answered, or there are hints that might help you solve your issue. If there is no satisfactory solution for your problem, make a new post. To search, enter keywords in the upper right box of any forum page. By default this will search the whole forums. For extended searches, click on the "Search" link under the "KDE Community Forums" banner.
If your question has been properly answered, consider marking a topic as "solved". It is a very little step, but quite helpful for other users and staff, because it tells them that there are no more issues. To mark a topic as solved, choose the topic with the best answer in the thread, and click the green tick mark under it. If you go back to the topic list you will notice a green tick mark next to the topic's title as well.
Most distributions have forums of their own; these can also be valuable. The web pages of your distribution should provide links to its forums.
Operating-System-Specific Questions
For questions relating to the desktop use of Plasma with a particular operating system (OS), you can try the above methods, but unless the question directly involves KDE software or KDE/GNU/Linux you are unlikely to find the answer. If your question does not directly involve KDE, please do not post the question on the "normal" KDE mailing lists. An example of questions that do not directly involve KDE is "my sound card does not work". In that case, please direct your questions at sites devoted to helping users of that system. For example, for GNU/Linux questions you may try looking at www.linuxnewbie.org or www.linuxnewbie.com, or the kde-linux mailing list mentioned above.
If you are not using GNU/Linux, you might want to try the kde-nonlinux (subscribe) mailing list. Also particularly useful are searches on your favorite search engine, such as Google, and searches on the Usenet archives.
In addition, many OS distributors have their own mailing lists which can address distribution-specific issues. You can find out more about these mailing lists at your distribution's website or find them through your browser search engine.
If you are searching for packages you may consider checking the ftp servers for your distribution, including the "contrib" sections, as well as indexing servers such as rpmfind.net. Wherever possible, install the package that your distro offers directly through its package manager.
Reporting KDE Bugs
Reporting bugs is a small but valuable contribution to KDE, and there's a website where you can report any bug or feature request you have about KDE: bugs.kde.org. The only requirement on your side is basic knowledge of English. With that, and following some additional guidelines, you'll be able to report helpful bug reports and thus help the whole KDE community and yourself.
The first thing you need is to open an account in the website. You can start here. Once you have a validated account, you can report.
There are usually two different situations to report a bug:
- You notice something which is not working properly or not working at all, a bad design, a missed functionality... If this is your case, open the application menu. You will then be guided to bugs.kde.org. Some information will be automatically picked up, like the application version number.
- Your program disappears and another window appears named "The KDE crash Handler". Don't get scared! You will be guided to efficiently report this crash. The link in the dialog "Learn more about bug reporting" will explain you the process. If you choose to report the problem, click on and an assistant will guide you through the steps. The requisite to report a crash is to have your distribution debug packages installed in order to provide a valid backtrace.
And these are a few tips on how to write good bug reports:
- Write it in English. You can switch every KDE application language through , so go there and choose American English as the primary language. Then restart the application. That can help you in explaining what happens.
- Be specific. One bug per report only! Do not mix different problems in the same report.
- Be clear. Explain the steps that lead to the bug so that we can reproduce them easily.
- Include screenshots: a picture is worth many words so attach a screenshot to the bug report. You can use KSnapshot to take screenshots. Also, do not link to an external web link which can expire, use the Attachments link at the bottom of the bug report.
- Include the backtrace within the bug report as a comment, it makes it easier to find duplicates for us (do not attach the backtrace as a text file).
- Clearly separate facts from speculation: only describe what happens. For a design problem, include a mock-up if possible.
If you are testing trunk or the beta, if you kept your precedent settings, sometimes you will want to check with a new user.
Also notice that Forums have a section about Beta Releases.
A good guide to bug reporting can be found here.
How to open a console
Typically when reporting a problem in IRC or on a mailing list, your helpers will ask you to open a console. A console is a text-based window that you can use to give commands for your computer to execute. You can open a console by typing Alt + Space. An input box called Krunner opens. Type the following to open a console:
konsole
If this does not work, you may not have it installed. In this case, type Alt + F2 and input:
xterm
| Back to Getting_Help |
- Amarok/Manual/Various/TroubleshootingAndCommonProblems/en
- Concepts/OpenPGP For Beginners/en
- Jargon File/en
- Amarok/QuickStartGuide/TheMusicCollection/en
The Music Collection
The Media Sources pane
The Media Sources pane is the place where you browse and display your complete collection of music. This includes the tracks on your local hard disk, as well as those on any external devices or media connected to your computer, such as audio CD, USB devices, media players, network disks or Internet sources.
Setting up a collection
Do you have music tracks in mp3, Ogg or FLAC format on your computer? Begin by telling Amarok where to find those files, so it can create your collection. In the top-level menu: .
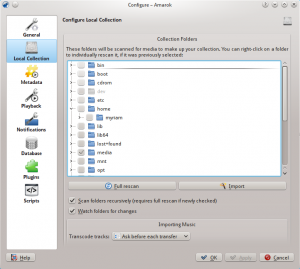
A tree-view of your home directory is shown above. Click the check box where your music is stored; usually . Then choose . This will take some time, so do not be alarmed if Amarok seems slow for a while. Once the scan is complete, it is best to quit Amarok using the top-level menu, or Ctrl + Q, and then restart it. Your newly-added music should show up under the Local Collection section.
More about configuring your collection here.
Adding Media Devices to the Collection
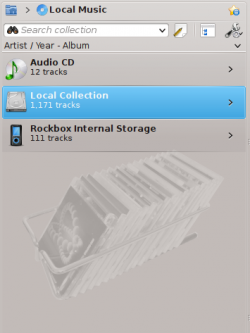
Underneath the search bar near the top of the Media Sources pane you see the different devices and/or content categories within the Content Browser. If you insert an Audio CD in the CD drive it will appear in the Media Sources pane, along with media players, thumb drives, and other USB devices. After an external device has been mounted, it will show automatically within the Media Sources pane.
Below is a screenshot showing three connected sources with music: Audio CD, mp3 player, and the Local Collection.
Ripping a CD into the collection
If you don't have any music files on your computer, it's easy to rip them (copy the tracks from your CDs to your collection). Just pop in a CD, and right-click on the banner of the CD device in the Content Browser to play, or copy to your collection, which will rip and tag your tracks (see image below). If you copy music from an audio CD to your Local Collection, the message bar at the bottom of the Amarok window will indicate that it is busy copying. The ripping may take several minutes. Once the rip is complete, the message in the message bar disappears and the music appears in the content browser of your Local Collection. If the ripped music does not appear in your Media Sources pane it's best to quit Amarok from the top-level menu, or Ctrl + Q, and then restart it. Now you should see it in your collection. The screenshot below shows how you move tracks from your audio CD, iPod or other device to your collection, using the context (right-click) menu.
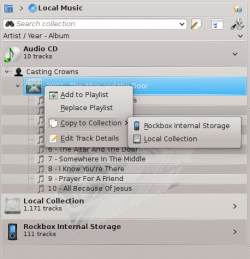
In the above context menu, you can also see the choice to . Use this option if you have a track that needs a tag edited. This becomes important when you rip music to .WAV format, losing some of the tags. If quite a bit of your collection needs tagging, consider dedicated tagging software, such as
Correct tagging is important to help Amarok show your tracks in the appropriate albums and proper sort order. Learn more about ripping and tagging.
Accessing other media sources
You might have wondered why the Media Sources pane is not called the 'Collections' pane. Amarok gives you access to much more music than just your collection -- Internet shops, audio books, podcasts, music files stored outside your collection, and previously stored playlists. The Amarok breadcrumb navigation is the key to all of this. The starting icon for the breadcrumb navigation is the home folder icon at the extreme top left of the Media Sources pane. This icon expands and contracts as you browse through the Media Sources pane, allowing you to easily navigate your collection by clicking your desired folder in the breadcrumb bar.

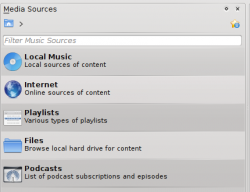
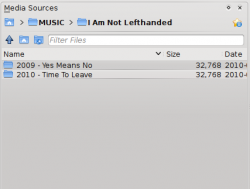
If you click the Amarok home folder you see the Media Sources pane on the left below, containing icons to available resources. If you click (left image below, second item from the bottom), you will see something similar to the image on the right, below. Notice how the breadcrumb bar expands and how the content of the selected folder is shown in the Media Sources pane (right image below). Clicking the > symbols among the breadcrumbs allows you to view the folders available at that level of the folder structure. The Amarok file browser gives you access to your entire file system, even outside your Local Collection.
| Media Sources pane | Files icon clicked |
|---|---|
 |
 |
The functions of the icons in the Amarok Home folder (left above) are:
| Icon | Name | Action |
|---|---|---|
| Your Amarok collection | ||
| Internet shops such as Magnatune, Jamendo and Last.fm. First configure your internet resources in: | ||
| Saved playlists -- see also Playlists. Also playlists on media devices | ||
| Your file system | ||
| Access to Podcasts via RSS feed |
Clicking in the root of Media Sources (image above) or in the breadcrumb bar returns you to your collection, showing you a list of all the available resources, artists, albums and tracks that you have previously defined as part of your collection. The breadcrumb bar indicates that you are viewing Local Music.
Streams and Podcasts
There are two ways to listen to streams.
- If you have a favorite station, get the stream URL and add it: . If you then save your playlist, later you can find it again in Playlists, as a Saved Playlist.
- Browse through the scripts available in our Script Manager, up to Amarok 2.4.0, after 2.4.1 . There are some excellent collections available, which will show up in the Internet section of your Media pane.
Podcasts have their own section in the Media pane, above. If you have an RSS or Atom feed URL, click the ![]() and add it there. If you have an OPML file to import, that choice is available also. Use the context (right-click) menus to , , , , or mark an episode as . If you are interested in browsing through a large collection of podcasts, check out the Podcast Directory available through the Script Manager, referred to above.
and add it there. If you have an OPML file to import, that choice is available also. Use the context (right-click) menus to , , , , or mark an episode as . If you are interested in browsing through a large collection of podcasts, check out the Podcast Directory available through the Script Manager, referred to above.
More about configuring Amaroks Internet Services here.
Using the Content Browser
The hard disk of your computer, audio CDs, external devices and the Internet are the basic resources for your collection. After your collection has been set up, it is likely that your collection will hold a large number of albums and tracks, much more than can be shown on a single window.
How to change the display of your collection, below:
Hiding or expanding information
The area of the Media Sources pane below the search bar is called the Content Browser. Three media sources are indicated in the image of a Content Browser below: CD, Local Collection and a Media Player:
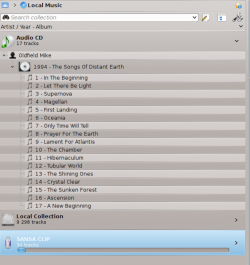
Clicking the banner for a device (the blue bar for the Sansa above) shows or hides the content of that device. The direction of the arrow on the right indicates whether the contents for that device is hidden or shown. The content on a particular device can, in turn, be hidden or shown using the same principle, clicking on the appropriate artist or album. An arrow pointing down on the left of an artist or an album indicates that the contents has been expanded. An arrow pointing right indicates that more content for that category is available but currently hidden. In the image above, the information for Mike Oldfield - The Songs of Distant Earth CD has been expanded, showing the individual tracks. On the other hand, the albums and tracks in the Local Collection are hidden. By clicking these arrows you also can expand or hide information.
Changing the order of tracks and albums
The order in which tracks are sorted in the Content Browser can be customised by using the ![]() button at the top of the Media Sources pane:
button at the top of the Media Sources pane:
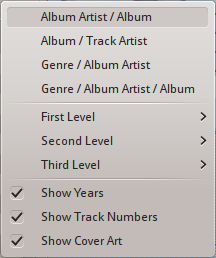
The sort order is indicated on the top left of the Media Sources pane, just below the Search text box. The default order is Artist / Year - Album. The display order of the Content Browser can be temporarily switched between the user-defined sort order (described above) and a Merged view in which artists are listed alphabetically, no matter on which media the music is stored. To toggle the Merged view, click the ![]() icon at the top right-hand of the Media Sources pane:
icon at the top right-hand of the Media Sources pane:
To search your collection, type your search term into the Search bar at the top of the Local Music section. Not only can you search by artist, album or track name, but any part. You might create a nice playlist by searching for winter, for instance, or merely find a track when you only remember one word of the title. You can also search by rating, playcount, even filetype. See Search in Collection for more details.
Deleting items from the collection
You can delete any item from your collection by right-clicking on it and choosing the bottom item . A confirmation dialog will appear, preventing the accidental deletion of any tracks. More than one item can be selected with Ctrl + click.
- Desktop Effects Performance/en
- Glossary/en
- Amarok/Manual/Various/Moodbar/en
- Concepts/OpenPGP Getting Started/en
- Amarok/Manual/ConfiguringAmarok/en
Configuring Amarok
On first start, some basic configuration is done; see also Quick Start Guide: Getting Started. But there is more under the hood.
To access the Configuration Menu, go to and see the following dialog:
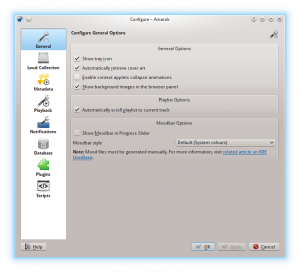
General
In the screenshot above, see some General Options you can set. Depending on the distribution, the default settings can vary. When hovering over the options with the mouse pointer, a tooltip will show to explain the individual settings.
General options:
| Option | Tooltip |
|---|---|
| Check to enable the Amarok system tray icon. | |
| Check to enable the automatic retrieval of cover art from the internet. | |
| Check to enable animations when context applets collapse. | |
| Check to make the playlist scroll so the current track is always visible. | |
| The Moodbar makes it possible to navigate in your music visually. Please note that this feature requires the external Moodbar Generator tool, or a script. | |
| Choose the mood display style. |
When you enable the Moodbar, be aware of the following requirements: the Moodbar will only display if your tracks have been tagged with moods. For more about the Moodbar, refer to: Moodbar.
Local Collection

This dialog shows your file system in a tree structure, called Collection Folders. Selecting a folder always includes its subfolders. These folders will be scanned for media to make up your collection. You can right-click on a folder to individually rescan it, if it was previously selected.
Collection options:
| Option | Tooltip |
|---|---|
| Rescan your entire collection. This will not delete any statistics. | |
| Imports ratings and/or statistics from older Amarok versions, the batch scanner, or media players. | |
| If selected, Amarok will read all subfolders. | |
| If selected, the collection folders will be watched for changes. The watcher will not notice changes behind symbolic links. | |
| Whether Amarok should transcode tracks when they are copied or moved to Local Collection. |
Import Statistics
This option allows you to import statistics, e.g. ratings and scores from either
- an older Amarok 1.4.x version (from SQLite, MySQL or PostgreSQL databases)
- from iTunes
It does not import statistics from an Amarok 2.x database, so if you want to merge an older 2.x database version, you will need to do this by hand.
Metadata
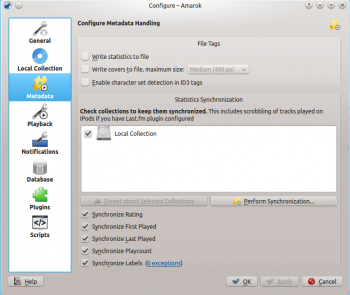
This dialog will allow you to configure the settings for metadata handling. This is a separate page starting with Amarok 2.7
Metadata options:
| Option | Tooltip |
|---|---|
| Check to write play-changing statistics as tags back to the audio files. | |
| Check to write changed covers back to the audio files. This will replace existing embedded covers. Select a value from the drop-down list to set the maximum size of the cover. | |
| If checked, Amarok will use Mozilla's Character Set Detector to attempt to automatically guess the character sets used in ID3 tags. If your tags are correct, it is more safe to leave this option turned off. |
Statistics Synchronization
This dialog will allow you to keep statistics of your collections synchronized. Make sure to only check collections between which you want to synchronize metadata.
Statistics Synchronization options:
| Option | Tooltip |
|---|---|
| Check to synchronize ratings between collections. | |
| Check to synchronize first played dates between collections. | |
| Check to synchronize last played dates between collections. | |
| Check to synchronize playcounts between collections. | |
| Check to synchronize labels between collections. |
Playback
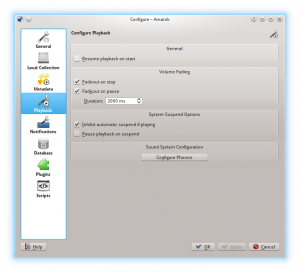
Configure the playback options, as well as the KDE multimedia framework Phonon.
| Option | Tooltip |
|---|---|
| If checked, Amarok will slowly fade the volume of the playing track on stop or at the end of the playlist, or stop playback immediately. | |
| If checked, Amarok will slowly fade the volume of the playing track on pausing the current track. | |
| The length of the fadeout, in milliseconds. | |
| If checked, Amarok will prevent the computer from being suspended will a track is playing. | |
| If checked, Amarok will pause playing of the current track when the computer is about to suspend. | |
| If checked, Amarok will resume playback where you left it the last session -- just like a tape-player. |
Configuring Phonon
Phonon is the multimedia framework used by Amarok. It was created to allow KDE 4 to be independent of any single multimedia framework such as GStreamer or VLC and to provide a stable API for KDE 4's lifetime. As an added bonus, it simplifies development by providing a simple API that works across different platforms such as Windows and OS X.
The result of all this for you, the user, is that you can choose the multimedia framework that works best for you. This is usually pre-configured by your distribution.
Playback problems in Amarok are typically not Amarok issues, but rather Phonon issues, as Amarok doesn't handle sound directly anymore.
Device Preference tab
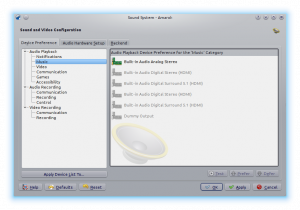
Depending on your OS and distribution, you may need to use ALSA, OSS, PulseAudio, or something else as your default playback device. Find one that works for you with the button and apply to all types of output. If you would like different types of output to go with different devices, this is possible as well.
Speaker Setup tab
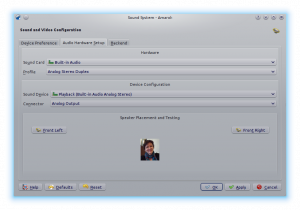
Should you wish to change the standard speaker setup, here is the place to do it.
Backend tab
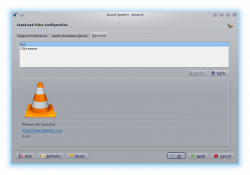
Depending on your operating system you may see options such as Gstreamer, VLC, or DS9 (Windows) here. The recommended phonon-backend for Linux users is VLC or Gstreamer.
If you don't see VLC or Gstreamer, install the package for it. For most distributions the package for VLC, for example, would be phonon-backend-vlc.
Each backend comes with its own codecs, so depending on the backend you choose you will need to also download the codecs, as most distributions don't ship them for legal reasons.
Notifications
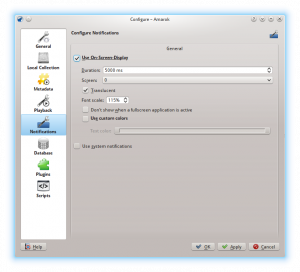
,
| Option | Tooltip |
|---|---|
| Check to enable the On-Screen Display. The OSD briefly displays track data when a new track is played. Once checked, the OSD will be visible on your screen and you can drag it to the location you prefer. | |
| The time in milliseconds for which to show the OSD. The value must be between 500 ms and 10000 ms. | |
| Allows you to choose the screen that should display the OSD if you have a multiscreen setup. Default is 0. | |
| Check to enable translucency if supported by your desktop system. | |
| (choose the size of the font in the OSD) | |
| Do not show On-Screen Display if another application is focused and running in fullscreen mode. | |
| Check to enable custom colors for the On-Screen Display text. | |
| Click to select the color of the OSD text. | |
| Check to use the system notification. This can vary depending on your desktop system and/or distribution. |
Database
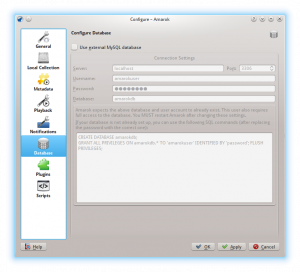
The default database is already set to use embedded MySQL. For most users there is no need to configure an external database, as there is no change in performance. If you want to share your database or use it remotely, you can configure an external MySQL database.
Amarok expects the external database and user account to already exist. The user also requires full access to the database. You MUST restart Amarok after changing these settings.
If your database is not already set up, you can use the SQL commands in the field at the bottom to do so, after replacing the password with the correct one.
| Option | Tooltip |
|---|---|
| Check to enable the use of an external database. | |
| Enter the name of the existing MySQL server. | |
| Enter the port number to access the server. Default is port 3306. | |
| Enter the username to access the database with full access privileges. | |
| Enter the password for the default user. | |
| Enter the name of the database. Default preset is amarokdb. |
You can find more information about the External Database here.
Plugins
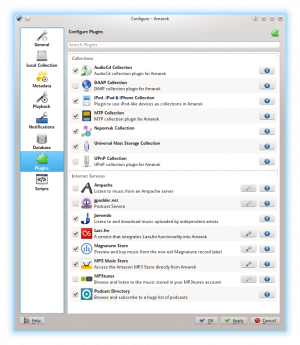
Plugins configuration controls , , and .
Collections
Amarok offers you access to the following Collections, if they are available:
| Collection | Description |
|---|---|
| AudioCD collection plugin for Amarok | |
| DAAP collection plugin for Amarok | |
| Plugin to use iPod-like devices as collections in Amarok | |
| MTP collection plugin for Amarok | |
| UMS/USB collection plugin for Amarok | |
| UPnP collection plugin for Amarok |
Internet Services
Amarok offers by default the following Internet services:
| Service | Description | Needs configuration |
|---|---|---|
| Use an external music server | Yes, Ampache server needed | |
| Podcast service. See also gpodder.net | No | |
| Listen to free music published under Creative Common licenses. See also Jamendo.com | No | |
| A popular internet radio service, streaming only for subscribers. See also Last.fm | Yes, personal information to scrobble | |
| Preview and buy music from a non-evil record label. See also Magnatunes.com | Only for downloads | |
| Access the Amazon MP3 Store directly from Amarok | Yes | |
| A personal mp3 locker. See also mp3tunes.com | Yes | |
| Browse and subscribe to a huge choice of podcasts | No |
Other service are available through scripts.
Local Collection Backends
Amarok offers you access to the following Local Collection Backends, if they are available:
| Devices | Description |
|---|---|
| Local Collection folders on local and pluggable disks | |
| Local Collection folders on remote NFS shares (Network File System) | |
| Local Collection folders on remote Samba (Windows) shares |
Ampache configuration
If you have access to a remote Ampache music server, click ![]() and enter the necessary information. You can configure access to more than one Ampache server. For more information see the Ampache section in what follows.
and enter the necessary information. You can configure access to more than one Ampache server. For more information see the Ampache section in what follows.
Last.fm configuration
While streaming is free with Last.fm's own online player for residents of the US, the UK and Germany, it only works in Amarok for paid subscribers. Scrobbling is free, however, provided you enter your Last.fm username and password by clicking ![]() . Amarok allows you to store the password in the secure KDE Wallet. If you decline the use of Kwallet, your password will be stored in clear text instead.
. Amarok allows you to store the password in the secure KDE Wallet. If you decline the use of Kwallet, your password will be stored in clear text instead.
Magnatune Store configuration
Listen to the music offered by Magnatune for free and buy it directly through Amarok. Click ![]() to add your membership credentials if you are a member and/or add your email address to re-download music you previously have downloaded from Magnatune.
to add your membership credentials if you are a member and/or add your email address to re-download music you previously have downloaded from Magnatune.
To download, you then go to the Media Sources pane, select the Internet section and click on the Magnatune Store. It will then download the catalog where you can search and select the music you want to buy.
MP3 Store configuration
Access the Amazon MP3 Store directly from Amarok.
The Amazon MP3 Store needs to know what country you are located in because it offers different items depending on your location. The following countries are allowed:
- France
- Austria, Germany, Switzerland
- Japan
- United Kingdom
- United States (default)
NOTE: Changing the country invalidates your shopping cart. If your country is not in the list, you cannot use the Amazon MP3 Store because it is not supported by Amazon.
mp3tunes configuration
If you have a personal mp3tunes locker, click ![]() and enter your username and password. You will then be able to access your online locker.
and enter your username and password. You will then be able to access your online locker.
Scripts
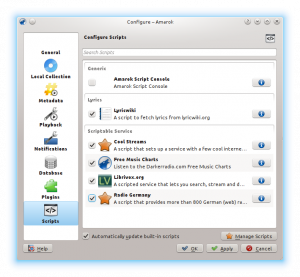
Script Configuration in Amarok covers , , and scripts. Scripts are added in the dialog.
Generic scripts
Generic scripts add functionality to Amarok. The Amarok Script Console is available by default; other scripts which add CD burning, cover image storage, games, and many other choices are available. If installed, these scripts will show up in the Tools menu.
Lyrics scripts
A variety of lyrics scripts are available; Ultimate Lyrics is provided by default. Your chosen lyrics scripts will provide the lyrics shown in the Lyrics applet in the Context pane.
Scriptable Services scripts
Scriptable services, if enabled, will show up in the Internet Services in the Collections pane. Many collections of streams are available, in many languages, and from many sources.
Manage Scripts
At bottom of the configuration dialog are two options:
- Automatically download and install updates for the built-in scripts from the Amarok website if available. Enable if you usually have a working Internet connections, and want your scripts automatically updated. This will not update user-supplied scripts from KDE-apps.org.
- button
- Browse, install and uninstall user-supplied scripts; also search, sort and rate the scripts in the Amarok Add-on Installer.
Add-on Installer
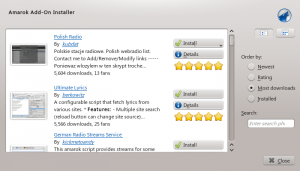
Using the Add-on Installer, one can install the latest user-contributed Amarok scripts. There are also options to search, sort and rate the scripts.
The and buttons can be used to manage scripts. One can install script packages of type amarokscript.tar, amarokscript.tar.bz2, amarokscript.tar.gz
Script Information
Learn more about a script using the ![]() button.
button.
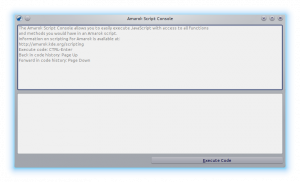
A script can also be executed directly in the Amarok Script Console. This is activated by selecting the Script Console and confirm the selection by hitting either the or the button. To deactivate the Script Console deselect it and confirm again.
There are 137 pages beginning with KA-KZ
- KMail/Screenshots/en
- KDevelop4/en
- KWord/Manual/en
- KDiskFree/en
- KDirStat/en
- KNemo/en
- KNotes/en
- KAddressBook/index/en
- KDE preinstalled/en
- KImageMapEditor/en
- KMPlayer/en
- KOrganizer/Calendar/en
- KFormula/en
- KMouth/en
- KJots/en
- KSniffer/en
- KIPI/en
- KOrganizer/ImpData/en
- KDE Connect/Tutorials/Adding commands/en
- KGraphviewer/en
- KNode/en
- KOrganizer/Web/en
- KDiff3/en
- KLinkStatus/en
- KOrganizer/Alarms/en
- KInfoCenter/en
- KAppTemplate/en
- KWrite/en
- KWord/Tutorials/en
- KFileReplace/en
- KRuler/en
- KMediaFactory/en
- KPlayer/en
- KOrganizer/Future/en
- KPlato/en
- KCalc/en
- KFTPgrabber/en
- KTorrent/en
- KOrganizer/Links/en
- KTouch/en
- KMLDonkey/en
- KHelpCenter/en
- KPDF/en
- KAddressBook/Tutorials/How to create a new address book?/en
- KAddressBook/en
- KCells/en
- KIconEdit/en
- KMouseTool/en
- KChart/en
- KJots/Import KNowIt Into KJots/en
- KGeography/en
- KSystemLog/en
- KPilot/en
- KDbg/en
- KAddressBook/Tutorials/How to add a new contact?/en
- KFloppy/en
- KWord/Manual/Introduction/en
- KTechlab/en
- KAlgebra/en
- KDE Partition Manager/en
- KMail/Courses Information Openpgp/en
- KWin Rules Application Workarounds/en
- KPackage/en
- KMix/en
- KTouch/HowTo/DifferentKeyboardLayout/en
- KMess/en
- KBibTeX/en
- KGet/en
- KFind/en
- KOrganizer/ToDo/en
- KDevelop4/Manual/Appendix A: Building KDevelop from Sources/en
- KRename/en
- KColorEdit/en
- KDevelop5/Manual/Appendix A: Building KDevelop from Sources/en
- KDE Wallet Manager/en
- KAlarm/en
- KDevelop/Install4.5/en
- KMail/Devs/en
- KSysGuard/en
- KDevelop/en
- KOrganizer/Screenshots/en
- KMail/Account Wizard/en
- KLettres/en
- KStars/en
- KMyMoney/en
- KWin Rules Window Matching/en
- KWord/en
- KSnapshot/en
- KUser/en
- KMail/gpg/en
- KXStitch/en
- KDevelop5/Manual/Running programs/en
- KWin Rules/en
- KPackageKit/en
- KMail/Import Options/en
- KMail/en
- KGpg/en
- KGeography/Making Maps/en
- KDE Connect/Tutorials/Useful commands/en
- KDE System Administration/en
- KWord/Manual/IntroGUI/en
- KTimeTracker/en
- KPhotoAlbum/en
- KDevelop4/Manual/en
- KDevelop5/Manual/en
- KDevelop4/FAQ/en
- KOrganizer/en
- KNode/KNode for mailing lists/en
- KWord/Tutorials/ThirdLayout/en
- KAlgebra/Probabilities/en
- KMid/en
- KTurtle/en
- KDevelop4/Manual/Building (compiling) projects with custom Makefiles/en
- KDevelop5/Manual/Building (compiling) projects with custom Makefiles/en
- KDevelop5/Manual/Working with version control systems/en
- KPhotoAlbum FAQ/en
- KDevelop4/Manual/Customizing KDevelop/en
- KDevelop5/Manual/Customizing KDevelop/en
- KMail/Backup Options/en
- KMail/PGP MIME/en
- KWin Rules Window Attributes/en
- KDevelop4/TipsAndTricks/en
- KDevelop5/Manual/Debugging programs/en
- KAlgebra/Console Tab/en
- KDevelop4/Manual/Code generation with templates/en
- KDevelop5/Manual/Sessions and projects/en
- KWin/en
 |
The reliable and flexible window manager for KDE Plasma Desktops, now with effects! |
Feature Overview
- Stable and reliable
- Compositing, 3D effects
- Easy configuration
- Improved efficiency
KWin (pronounced "kay-win") is the window manager for the KDE Plasma Desktop. It gives you complete control over your windows, making sure they're not in the way but aid you in your task. It paints the window decoration, the bar on top of every window with (configurable) buttons like close, maximize and minimize. It also handles placing of windows and switching between them.
KWin supports compositing, which means using 3D effects for handling your windows. This can make window management smoother, easier, more efficient and more natural. It’s hardware requirements are very modest and pretty much every reasonably modern system since 2002 supports it.
Practical Features
Click with your right mouse button on a window decoration or use System Settings to access the new and easier configuration of KWin. Here you can enable effects to more efficiently manage your windows. You can for example use the Present Windows as the effect for window switching. Instead of showing you icons or very small previews of your applications, it arranges them in a grid so you can quickly choose the right one. Just use the Alt-Tab keysequence and keep the Alt key pressed. You can now use tab to switch through the windows or just activate the right one using the mouse. Hitting Alt-Tab keys quickly will show you the next window in the queue, just like it used to.
If your X server already supports compositing, switching it on is as easy as opening System Settings, opening the module, choosing and enabling the checkbox . More advanced compositing settings (such as Use VSync, Scale method, Compositing type) are available through the dialog. Customising the behaviour of the KWin effects means opening the tab, and choosing the plugins you want to use. Please note that only a subset of the plugins works with XRender-based compositing. For the full experience, you need to use OpenGL mode.
Employing motion physics, KWin provides your windows with a more natural feel. New desktop effects like the Cube desktop switcher and Magic Lamp minimize animation have been added. Improvements in the existing effects make window management smoother than ever. KWin has seen many performance improvements to enable these effects even on low-end hardware. Elaborate checks have been build in to ensure users with low-end hardware are not presented with an unusable setup. KWin detects the capabilities of the hardware and if needed gracefully scales its effects down. You can take control and disable these checks or change settings like the global animation speed to fine-tune your experience. When your computer is under heavy load, KWin will automatically disable the compositing temporarily to keep things running smoothly. It will notify you if it does so, and you can re-enable compositing by pressing Shift+Alt+F12. Finally, support for multiple screen handling has been improved in KWin using the new Kephal library. You can move maximized windows between Xinerama screens and the addition of external screens is handled correctly.
More information about what was introduced in KDE SC 4.9 can be found at the following link:
Tutorials
You want an application to launch in a specific size and position every time
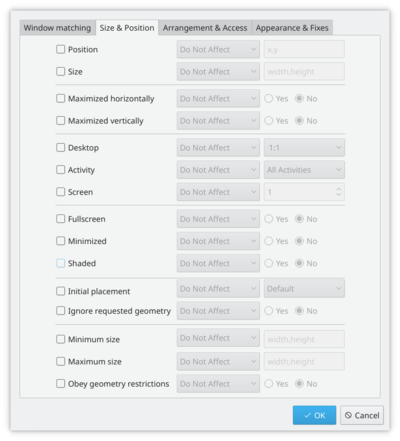
Sometimes the screen position of an application is vital to your comfort, so use the flexibility of KWin to make sure it's always where you want it.
Position the window where you want it to open, then right-click on the title-bar, choosing . This will open a settings window, with appropriate entries already made. All you need to do now is select the tab and check and . OK - you are finished!
Customise the position of titlebar buttons
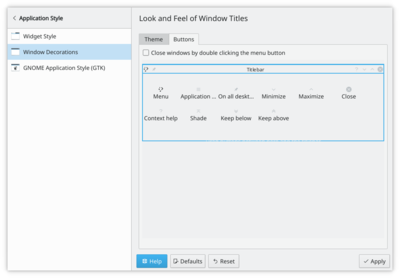
Take a look at tab. The options open to you may depend on your distribution or theme, and it's clear that there is more to come.
To simply move things around you work with the specimen titlebar. Drag icons there to where you want to see them.
You may find that you have other icons available to you. A circle indicates that the button will set that window on all desktops. Another icon that you may find useful is Shade - a toggle between rolled up (titlebar only visible) and normal view. These icons are added by dragging from the text description window onto the speciman title bar - just position them as you want to use them.
If you prefer a Classic, KDE3-style Desktop
|
| Change to traditional desktop |
Right-click on your desktop - select (or , in some distros). Change the from to . The whole desktop is now a folderview, and another right-click on the desktop will allow you to select . Set the folderview to the directory you want to use as your desktop.
Open applications directly into a different desktop
Use commands like
kstart5 --desktop 4 kate
Using with small screens (eg Netbooks)
Make the window decorations smaller
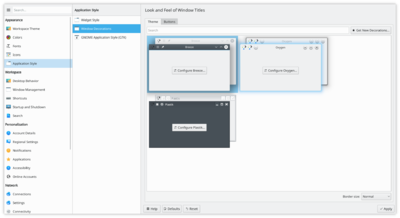
tab. Two good options there:
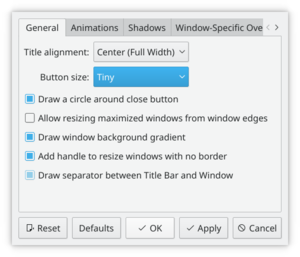
- Using the default style (Breeze), select and set to or .
- Using an other style, with smaller windows decorations.
Both routes will give you slim and functional window titles and borders.
Change the base fonts
On many netbooks the screen is very clear, so that reading fonts much smaller than you expect is feasible. On Acer Aspire One I find that 8 point is a good base settings.
KMail's Aggregation options take up too much space
See this FAQ to change it.
KMail's Folder-List Tooltips hide too many folder names
See this FAQ to change their behaviour
Gallery
The Gallery holds many screenshots of past and present desktops and effects.
Troubleshoot Graphics Problems
Curing graphics problems depends on knowing the correct drivers for your graphics card. Learn more about this on the Desktop Effects Performance page.
Defining Window Rules
There is a tutorial on defining your own rules for the behaviour of specific windows on the KWin Rules pages.
More Information
- Wikipedia
- Window manager (Arch Linux Wiki)
- Using Other Window Managers with Plasma
- KDevelop4/Manual/Sessions and projects/en
- KTurtle/Examples/en
- KMail/Tools/en
- KWin Rules Examples/en
- KBibTeX/Development/en
- KDevelop5/Manual/Code generation with templates/en
- KDEConnect/en
- KDevelop5/Manual/Working with source code/en
- KMail/FAQs Hints and Tips/en
- KDevelop4/Manual/Working with source code/en
There are 165 pages beginning with Ka-Kz but not Kd
- Kopete/Skype Plugin/en
- Konversation/Distributions/Chakra/en
- Konversation/Distributions/Xandros/en
- Kmail/Distributions/Gentoo/en
- Konversation/Distributions/ArkLinux/en
- Krita/en
- Konversation/Distributions/Fedora/en
- Konversation/Distributions/Mageia/en
- Kopete/AIM/en
- Konversation/Distributions/Gentoo/en
- Kopete/Auto Replace/en
- Kopete/Yahoo/en
- Kmail/Distributions/OpenSUSE/en
- Konversation/Distributions/openSUSE/en
- Konversation/Distributions/ArchLinux/en
- Kile/en
- Kexi/Handbook/Appendix B. Comparing Kexi to other database applications/en
- Kwlan/en
- Kexi/File Format Support/en
- Kopete/Firewall/en
- Kio-audiocd/en
- Konversation/Distributions/Slackware/en
- Kig/Screenshots/en
- Kio gopher/en
- KtikZ/en
- Konversation/Scripts/Media/en
- Kexi/Handbook/Kexi Basics/Opening an existing Kexi database file/en
- KuickShow/en
- Kid3/en
- Kopete/ICQ/en
- Kexi/Handbook/Appendix A. Introduction to Databases/en
- Kleopatra/en
- Konversation/Distributions/Exherbo/en
- KsCD/en
- Kbluetooth/en
- Kexi/Handbook/Configuring Kexi/Docking and undocking side panels/en
- Kexi/Handbook/Kexi Basics/Using built-in help/en
- Konversation/Distributions/Kubuntu/en
- Kexi/Handbook/Command Reference/en
- Kmail/Getting Started/en
- Kexi/Handbook/Command Reference/The Tools Tab/en
- Kexi/Handbook/Introduction to Databases/Database Design/en
- Kexi/Handbook/Kexi Basics/Creating a New Database File/en
- Kopete/OTR/en
- Kompare/en
- Kubuntu/en
- Kexi/Handbook/Command Reference/The Kexi Tab/en
- Kexi/Handbook/Building Simple Databases/Designing Forms/Inserting text labels/en
- Kexi/Handbook/Where to go next/en
- Kexi/Handbook/Command Reference/The External Data Tab/en
- Krusader/How To Add Folder Shortcuts on Krusader Toolbar/en
- Kexi/Handbook/Credits and License/en
- Kivio/en
- Kexi/Tutorials/en
- Kexi/Handbook/Building Simple Databases/Designing Forms/Forms versus tables/en
- Kanagram/en
- Krusader/en
- Kexi/Handbook/Command Reference/The Data Tab/en
- Kalzium/Other Chemistry-Applications/en
- Kexi/Handbook/Kexi Basics/en
- Konversation/Distributions/en
- Kopete/Winpopup/en
- Kexi/Handbook/Command Reference/The Create Tab/en
- Kexi/Handbook/Introduction to Databases/Who Needs a Database?/en
- Kexi/Handbook/Kexi Basics/Opening an existing Kexi database file/Opening an existing Kexi database file by clicking on .kexi file's icon/en
- Kraft/en
- Kig/FAQ/en
- Kontact Touch/MeeGo/en
- Kexi/Handbook/Building Simple Databases/Entering Data Using Forms/en
- Konversation/KDE3 Sources/en
- Klipper/Pastebins/en
- Kexi/Handbook/Building Simple Databases/Designing Database Tables/en
- Kig/en
- Kexi/Handbook/Building Simple Databases/Designing Forms/Using the Widgets tab/en
- Kwave/en
- Kooka/en
- Kopete/Jabber/en
- Kexi/Handbook/Building Simple Databases/Designing Forms/en
- Kontact Touch/About/en
- Kaffeine/en
- Kexi/Handbook/Introduction to Databases/What Is a Database?/en
- Kexi/Handbook/Comparing Kexi to other database applications/Data types/en
- Kexi/Handbook/Command Reference/The Report Design Tab/en
- Kexi/Handbook/Introduction/en
- Kexi/Handbook/Kexi Basics/Opening an existing Kexi database file/Opening a database file in the Open Existing Project dialog/en
- Kontact Touch/Screenshots/en
- Konversation/Distributions/PCLinuxOS/en
- Konqueror/Web Shortcuts/en
- Konversation/Browsers/en
- Kaffeine-TV/en
- Kontact/SMS/en
- Kate/en
- Konversation/Scripts/Ghosttrick/en
- Kexi/Handbook/Building Simple Databases/Designing Forms/Working with form design/en
- Kexi/Handbook/Building Simple Databases/Designing Forms/Most important terms/en
- Kalzium/en
- Kontact/en
- Kexi/Handbook/Command Reference/The Form Design Tab/en
- Karbon/en
- KonsoleKalendar/en
- Kexi/Handbook/Appendix D. Supported File Formats/en
- Klipper/en
- Kubuntu/Software/Games/Steam/en
- Kopete/en
- Kexi/Handbook/Building Simple Databases/Designing Forms/Actions/en
- Kexi/Handbook/Building Simple Databases/Designing Forms/Inserting widgets - text fields/en
- Kubuntu/Support/en
- Kopete/Supported Protocols Overview/en
- Kexi/Handbook/Introduction to Databases/Database Creation Software/en
- Karbon/Tutorials/Artistic Text Shape/en
- Kexi/Handbook/Building Simple Databases/Designing Database Queries/en
- Kexi/Handbook/Building Simple Databases/Designing Forms/Assigning data sources/en
- Kexi/en
- Konversation/KDE4 Sources/en
- Kamoso/en
- Kexi/Handbook/Building Simple Databases/Entering Data Into Tables/en
- Kexi/Handbook/Building Simple Databases/Designing Forms/Setting the tab order/en
- Kexi/Handbook/Building Simple Databases/en
- Kubuntu/Welcome/en
- Konversation/Sources/en
- Kopete/Jabber Muc/en
- Kopete/MSN/en
- Krdc/en
- KrossWordPuzzle/en
- Kexi/Handbook/Building Simple Databases/Designing Forms/Setting widgets size and position by hand/en
- Konsole/en
- Kopete/Webcam Support/en
- Kubuntu/Contribute/en
- Konversation/Tips and Tricks/en
- Kexi/Tutorials/Reports/Kexi Reports for Beginners/en
- Kronometer/en
- Kubuntu/Basic/en
- Konversation/FAQ/en
- Kmail/Using Folders/en
- Kexi/Handbook/Building Simple Databases/Designing Database Tables/The Table Designer window/en
- Koko/en
- Kontact Touch/Harmattan/en
- Kubuntu/Advanced/Repositories/en
- Krfb/en
- Kexi/Tutorials/Importing SQLite database into Kexi/en
- Kexi/Handbook/Kexi Basics/The Kexi Main Window/en
- Kontact Touch/en
- Kubuntu/Advanced/en
- Kmail/Using Kmail General/en
- KonsoleDevelopment/en
- Konversation/en
- Konversation/Scripts/Import mIRC server list/en
- KolorManager/en
- Kexi/Handbook/Building Simple Databases/Designing Forms/Widget layouts/en
- Kontact Touch/Maemo5/en
- Kexi/Handbook/References/Command-Line Options/en
- Konqueror/en
- Kubuntu/Software/en
- Krecipes/en
- Konversation/Configuring SASL authentication/en
- Kexi/Handbook/en
- Kubuntu/Installation/en
- Kmail/Folder Properties/en
- Kexi/Handbook/Introduction to Databases/Database and Spreadsheet/en
- Kmail/Configuring Kmail/en
- Kmail/Configuring Kmail/Identities/en
- Kexi/Handbook/Appendix C. Reserved words for SQL/en
- Konversation/Scripts/Scripting guide/en
- Konversation/Releases/en
- Kexi/Tutorials/Drilling Down on Facebook Data/en
There are 38 pages beginning with Kd
- Kdenlive/Manual/View Menu/Clip Monitor/en
- Kdenlive/Manual/Transitions/Hue/en
- Kdenlive/Manual/View Menu/Show Title Bars/en
- Kdenlive/Manual/View Menu/Screen Grab/en
- Kdesvn/en
- Kdenlive/Manual/Transitions/alphaxor/en
- Kdenlive/Manual/View Menu/Effect List/en
- Kdenlive/Manual/Clip Menu/Rename Clip/en
- Kdenlive/Manual/Clip Menu/Locate Clip/en
- Kdenlive/Manual/Transitions/screen/en
- Kdenlive/Manual/Clip Menu/Delete Clip/en
- Kdenlive/Manual/Clip Menu/Extract Audio/en
- Kdenlive/Manual/View Menu/Load Layout/en
- Kdenlive/Manual/View Menu/Audio Spectrum/en
- Kdenlive/Manual/Titles/Download New Title Templates/en
- Kdenlive/Manual/Project Menu/Create Folder/en
- Kdenlive/Manual/Timeline Menu/Insert Clip Zone/en
- Kdenlive/Manual/View Menu/Save Layout As/en
- Kdenlive/Manual/Clip Menu/Edit Clip/en
- Kdenlive/Manual/Installation/en
- Kdenlive/Manual/Edit Menu/Find/en
- Kdenlive/Manual/Transitions/Wipe/en
- Kdenlive/Manual/Transitions/Affine/en
- Kdenlive/Manual/alpha operation transitions/en
- Kdenlive/Manual/View Menu/Undo History/en
- Kdenlive/Manual/Full Luma/en
- Kdevelop5/Manual/Meet KDevelop/en
- Kdenlive/Manual/Project Menu/Online Resources/en
- Kdenlive/en
- Kdenlive/Manual/BugReporting/en
- Kdenlive/Manual/Transitions/Composite/en
- Kdenlive/Manual/Clip Menu/Stabilize/en
- Kdenlive/Manual/en
- Kdenlive/Manual/Effects/Audio/en
- Kdenlive/Manual/Effects/en
- Kdenlive/Manual/QuickStart/en
- Kdenlive/Manual/Timeline/Editing/en
- Kdenlive/Manual/Effects And Transitions/en
There are 220 pages beginning with L-J
- Tellico/Compiling/en
- Rekonq/Manual/en
- Semantik/en
- System Settings/Icons/en
- Plasmate/en
- System Settings/Fonts (Category)/en
- System Settings/Workspace/en
- Tools/en
- System Settings/Launch Feedback/en
- System Settings/Removable Storage/en
- System Settings/Color/en
- System Settings/Spell Check/en
- System Settings/Touch Screen/en
- System Settings/Plasma Search/en
- System Settings/Account Details/en
- System Settings/Notifications/en
- Plan/Tutorials/en
- System Settings/Workspace Theme/en
- System Settings/Search/en
- System Settings/KDE Wallet/en
- Okteta/Tutorials/en
- System Settings/Regional Settings/en
- System Settings/Plasma Theme/en
- System Settings/Online Accounts/en
- System Settings/Touchpad/en
- Showfoto/en
- System Settings/Activities/en
- LemonPOS/en
- System Settings/Mouse/en
- System Settings/Emoticon Theme/en
- System Settings/Formats/en
- Yakuake/en
- System Settings/Web Shortcuts/en
- Rekonq/Manual/Introduction/en
- System Settings/File Search/en
- System Settings/Shortcuts/en
- System Settings/Splash Screen/en
- System Settings/Language/en
- System Settings/Application Style/en
- System Settings/Font/en
- System Settings/GNOME Application Style (GTK)/en
- System Settings/Screen Locking/en
- System Settings/Virtual Desktops/en
- System Settings/Window Rules/en
- System Settings/Mouse Cursor Theme/en
- System Settings/Locations/en
- System Settings/Applications/en
- Plan/Engineering To Order project tutorial/en
- System Settings/Icon Theme/en
- System Settings/Windows Management/en
- System Settings/Screen Edges/en
- System Settings/Font Management/en
- Plasma/FAQ/Index/en
- System Settings/Desktop Session/en
- Peruse/en
- System Settings/Look And Feel/en
- System Settings/Connections/en
- System Settings/User Manager/en
- Rocs/en
- Minuet/en
- System Settings/Desktop Effects/en
- LatteDock/How to report multi screen issues/en
- System Settings/Desktop Behavior/en
- System Settings/Widget Style/en
- Rekonq/Manual/UI/en
- Tutorials/Compose Key Old Version/en
- Skanlite/en
- Tutorials/Change the color of the blue folder icon/en
- Tutorials/hotkeys/en
- System Settings/Power Management/en
- LatteDock/en
- Summary/en
- System Settings/Login Screen/en
- Plasma-browser-integration/en
- Simon/Shadow dictionary/en
- RSIBreak/en
- Showcase/en
- System Settings/Workspace Appearance/en
- Spectacle/Tutorials/Invoking Spectacle with custom shortcuts/en
- Plan/Manual/Introduction/en
- System Settings/Autostart/en
- Smb4K/en
- Plasma/Installing Plasmoids/en
- System Settings/Date & Time/en
- System Settings/Appearance/en
- Plasma/Pager/en
- Parley/en
- System Settings/Default Applications/en
- System Settings/Task Switcher/en
- Sheets/en
- System Settings/Workspace Behaviour/en
- System Settings/Keyboard/en
- System Settings/Search Desktop/en
- Stage/en
- LatteDock/HowToReportCrashes/en
- SymbolEditor/en
- List of KDE themes with GTK ports/en
- Off-line Translation/en
- Wacomtablet/en
- Plan/en
- LabPlot/en
- System Settings/Window Behavior/en
- Words/en
- Welcome to KDE UserBase/en
The home for KDE users and enthusiasts.
An introduction to KDE

Learn more about the KDE community and its software and find information to help you get started. Also, discover what UserBase is and how it can help you.
Tutorials

How-Tos, Tips & Tricks that can help make your KDE software experience more enjoyable and productive.
Getting Help
Applications

Discover the wide variety of applications from the KDE Community, and find out what program suits your needs and preferences.
Websites
If you are willing to contribute, please read Tasks and Tools before starting. If you already contribute, check out Stats to see the top 10 contributors for the week, the most popular pages and most discussed pages.
- Quassel/en
- Update an Image/en
- Websites/en
- Tutorials/Modify KDE Software Defaults/en
- Zanshin/en
- PageLayout/en
- Working with MyKolab/en
- Tutorials/Open a console/en
- Quanta/en
- Tellico/Templates/en
- Nepomuk/kioslaves/tags/en
- Session Environment Variables/en
- Umbrello/en
- Skrooge/en
- Tutorials/Flatpak/en
- Marble/en
- Modify a Page/en
- Plasma/SystemTray/en
- SMPlayer/en
- Tutorials/Kimpanel/en
- Neon/LTS/EOL/en
- Working with Google Contacts/en
- Lokalize/en
- Plasma/TweakingPlasma/en
- Workspace Configuration/Desktop Configuration/en
- System Settings/Input Devices/en
- Plasma/Public Transport/en
- Working with Google Calendar/en
- Plasma/Clocks/en
- System Settings/Task Scheduler/en
- Toolbox/Tables/en
- Plasma/Application Dashboard/en
- Nepomuk/FileIndexer/en
- Okteta/en
- What is a distribution/en
- Neon/Installation/OEM/en
- System Settings/Printers/en
- Showfoto/Levels Adjust/en
- Plasma/Public Transport/NewServiceProviders/en
- Phonon/Handbook/en
- Telepathy/en
- System Settings/Locale/How To Install and Apply Interface Translation/en
- System Settings/File Associations/en
- Step/en
- System Settings/Startup and Shutdown/en
- System Settings/Window Behaviour/en
- Lancelot/Comparison/en
- QCA/en
- Plasma/FAQ/5.10/en
- UserBase/Guidelines/en
- Trojitá/en
- Plasma/Netbooks/en
- Plasma/FAQ/5.10/Configuration/en
- Rekonq/FAQs/en
- Spectacle/en
- Quick Start/en
- Plasma/Kicker/en
- Plan/Manual/Definitions/en
- Taking Screenshots/en
- Tellico/en
- LatteDock/TipsAndTricks/en
- System Settings/Accessibility/en
- Troubleshooting/en
- Simon/Installation/en
- Tutorials/MIDI on Linux/en
- Pairs/en
- Plasma application launchers/en
- Tutorials/Force Transparency And Blur/en
- Showfoto/Curves Adjust/en
- Showfoto/Perspective/en
- Live CDs - a way to choose your distro/en
- Tutorials/Kontact/Office365/en
- Okular/en
- What is KDE/en
- Marble/Tracking/en
- Tutorials/Shared Database/en
- Tasks and Tools/en
- System Settings/en
- Working with GMail/en
- Phonon/en
- RKWard/en
- Sound Problems/en
- System Settings/Shortcuts and Gestures/en
- Plasma/Create a Global Theme Package/en
- Plasma/Kickoff/en
- Plasma/Plasmoids/en
- Plasma/Tasks/en
- Tutorials/Install KDE software/en
- Mailing Lists/en
- Plasma/Panels/en
- Plasma/FAQ/4.4/en
- Translation Workflow/en
- Tutorials/KDE3 to KDE SC 4/en
- Tutorials/ComposeKey/en
- Translate a Page/en
- Plasma/HowTo/4.5/en
- Troubleshooting/Samsung scx-4500W/en
- LatteDock/FAQ/en
- Writing an Application Manual/en
- Umbrello/FAQ/en
- NetworkManagement/en
- System Activity/en
- Table of equivalent applications/en
- Tutorials/Using Other Window Managers with Plasma/en
- Plasma/FAQ/4.4/Configuration/en
- Rekonq/en
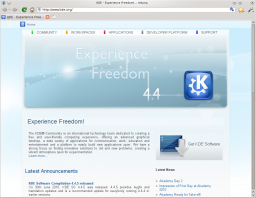 |
The fast, simple WebKit-based KDE browser |
Introduction
Based initially on qtwebkit (and currently on kdewebkit), rekonq is a lightweight browser designed to use the WebKit rendering engine in combination with various KDE technologies, allowing it to integrate seamlessly into the KDE desktop. The name is a throwback to the venerable khtml-based Konqueror which is currently the default KDE web browser.
rekonq has already replaced Konqueror as the default browser in Chakra and Kubuntu, with more distributions expressing similar intent for their future releases. The current stable release version is rekonq 0.7.0.
Interface

By default, the rekonq window uses only one toolbar. This main toolbar consists of four navigation buttons (, , , ), the URL bar and two menu/buttons, one for and one for the . This minimalist approach to the main toolbar marks the most significant user-interface departure from the traditional multi-toolbar paradigm followed by most other browsers like Konqueror.
Further, the main toolbar offers only limited customization - (locked at the top of the window, by default), (medium, by default) and (not shown, by default). This helps keep the rekonq UI simple and puts the focus on the webpage on display.
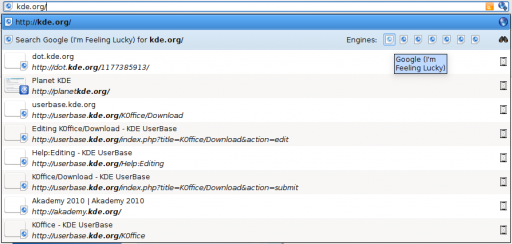
Version 0.5.0 introduces the tech preview of a vastly improved URL bar that offers access to search engines from the drop down completion list itself. The completion list is also populated by matching items from your history and bookmarks.
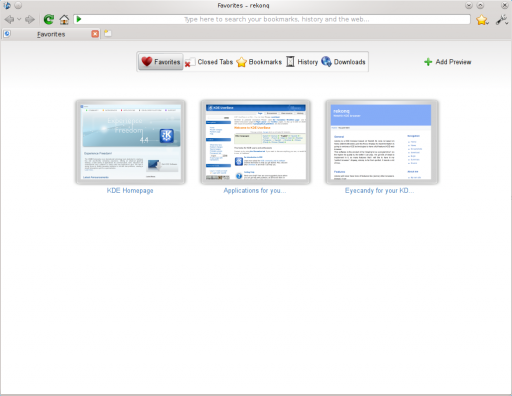
When started, rekonq displays the New Tab page, much of which is taken by a set of preview thumbnails of favorite webpages. These thumbnails offer a speedy way for the user to access their most frequently used webpages. There is also a pane at the top of this page allows the user to switch to previews of recently closed tabs and lists of bookmarked webpages, download and browsing histories.
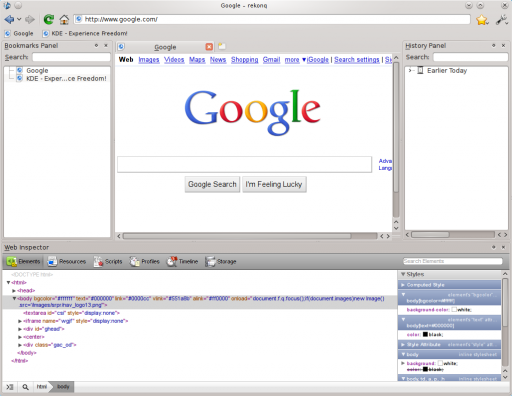
Further configuration options activate several other UI elements hidden by default. These include a toolbar for bookmarks, a panel (a panel, being a mini-window that can be resized, detached or re-docked in the main window) each for bookmarks and history and a web inspector panel (handy for web development).
Features
Under its minimalist appearance, rekonq packs a full set of powerful features. Some of them are described below:
KDE integration
rekonq is designed with the aim of being a KDE browser. And it shows;
Appearance
It obeys your themes, fonts, window decoration, menu highlighting, and many personalization options you set for your desktop.
Applications
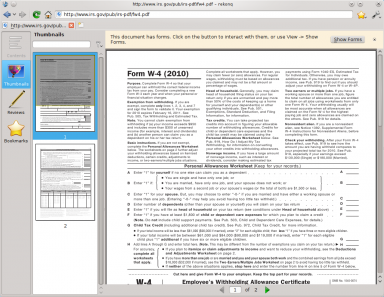
rekonq plays well with other applications in the KDE family. rekonq will always use your chosen default applications to handle file types. PDF files, for example will open in an embedded Okular kpart within rekonq itself. Media files will open in Dragon Player (or any other designated default application for that filetype).
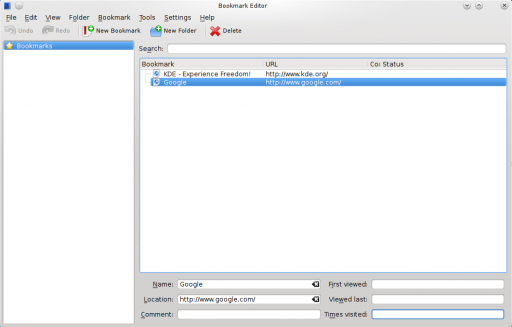
Bookmarks, web shortcuts (more on these later), cookies and authentication information are shared with Konqueror. You will see the same set of bookmarks from either application and you can log onto a website in Konqueror and carry on seamlessly if you decide to switch to rekonq. Your passwords are stored securely in KWallet and can be used from either Konqueror or rekonq.
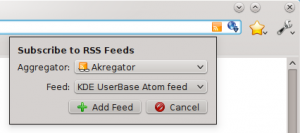
Your downloads can be optionally handled by KGet. Feeds from websites can be saved to Akregator (or Google Reader).
 |
Services
KIO support
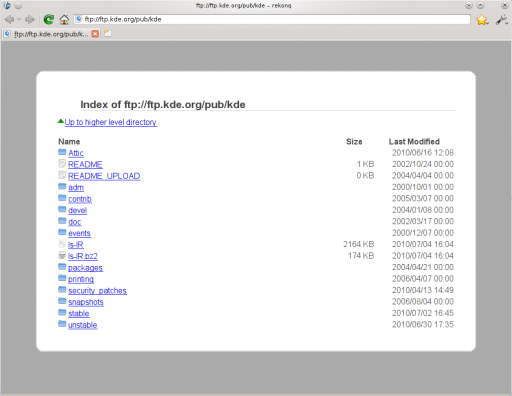
rekonq supports KIO services, including cookies, cache, proxies and network settings. KIO-slaves like file:/, ftp:/, man:/, help:/, info:/ etc will work in rekonq, too.
Dialogs
In addition to all this, rekonq uses KDE's own file dialog for opening/saving documents. This means, you have access to the Places sidebar from Dolphin while you open or save documents.
Thus, rekonq looks, feels and behaves like a part of your KDE desktop.
WebKit engine
rekonq uses the open source WebKit rendering engine which incidentally began life as a branch of the khtml/kjs libraries from the KDE project. WebKit is fast, powerful and used by many other popular browsers today including Google's Chrome/chromium, Apple's Safari and others.
Auto-load/click-to-load plugins
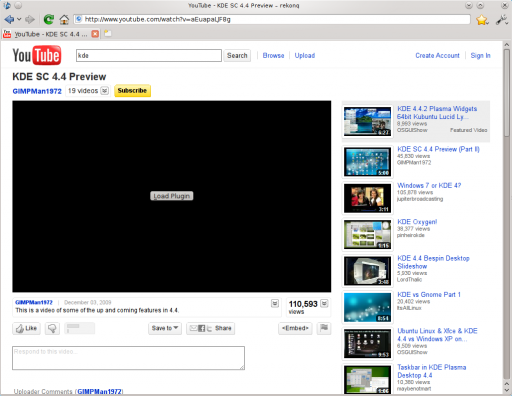
One of the benefits of using the WebKit engine, is that plugins can be disabled from automatically loading. This comes in handy to surf websites fast, without being bogged down by flash plugins. In the so-called Click-to-load mode, you will instead see a button that you can click on to activate the plugin.
Adblock support
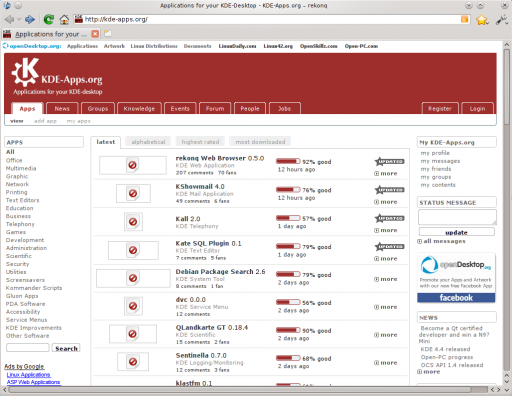
rekonq comes with an automatic subscription to the Easylist filter, which is updated every week. Additionally, you can set up manual filters to block loading of elements from webpages that match your criteria. You can even download and import additional published filterlists or export your list for backup.
If you want to import your Manual Filters e.g. from Konqueror just copy your list into this file: /home/username/.kde4/share/apps/rekonq/adblockrules_local
Web shortcuts support
rekonq allows you to pick from an extensive list of web shortcuts - these are keywords that allow you to search the web quickly. For instance, entering
gg:KDE
in the location bar will search Google for "KDE", while
wp:KDE
will search Wikipedia for "KDE". There are dozens of these defined by default. You can edit these or even define custom shortcuts to search on your favorite websites. See Web Shortcuts for details.
Privacy and security features
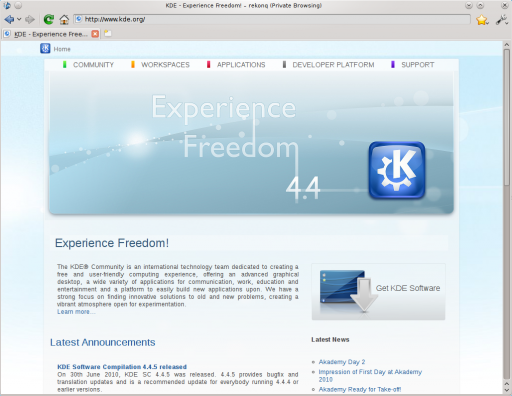
rekonq allows users to browse the web without retaining information about the visited pages in your history. Note that this feature does not necessarily make you anonymous on the Internet - it only prevents fresh information from being recorded on your computer. You can also delete your history, cookies and other private data anytime straight from the configuration menu button.

When viewing webpages over a secure connection, you can also view SSL information straight from the URLbar by clicking on the icon.
Advanced tab handling
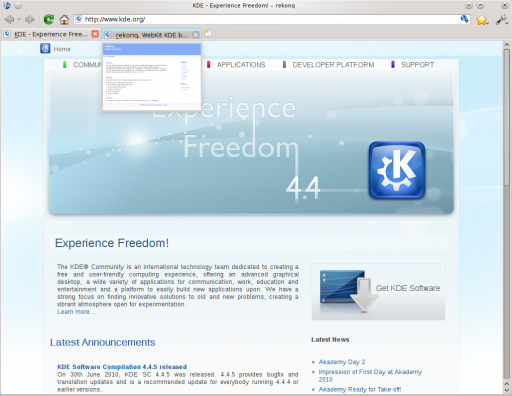
rekonq allows you to rearrange your tabs on the fly. Just drag a tab to the left or to the right and the other tabs will move out of your way. You can also hover over a tab to see a live preview of the webpage being displayed there.
A context menu (right-click menu) gives access to more tab-related functions such as the ability to detach, clone, reload the tab.
Session restore feature
If rekonq crashes, it will automatically attempt to restore your session, complete with all the tabs the next time you start it. If for some reason, the browser continues to crash upon restoring the session, rekonq will automatically start with a fresh session the second time.
Full screen mode
rekonq supports full-screening the webpage straight from the configuration menu button or through a keyboard shortcut (Ctrl+Shift+F, by default). In the full screen view, the main toolbar will auto-hide and the webpage will be displayed over your entire screen.
Zoom slider
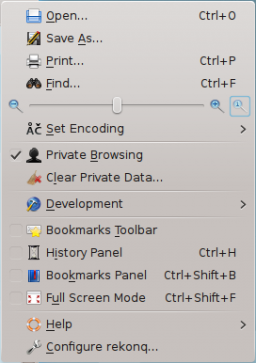
rekonq has a slider to adjust the zoom right from the configuration menu with a handy button to restore the zoom back to default. Of course, you can still use keyboard (Ctrl+ +/-) or mouse (Ctrl + mouse scroll up/down) shortcuts just the same.
Learn more about rekonq from our FAQs, Tips and Tricks page


