User:Claus chr/DPL/Test: Difference between revisions
No edit summary |
No edit summary |
||
| Line 1: | Line 1: | ||
== Testing DPL == | == Testing DPL == | ||
{{Input|1=<nowiki>{{Search|\[\[Special:myLanguage/ | {{Input|1=<nowiki>{{Search|\[\[Special:myLanguage/Applications}}</nowiki>}} | ||
{{Search|\[\[Special:myLanguage/ | {{Search|\[\[Special:myLanguage/Applications}} | ||
This only finds new style links, and conversely find links to subpages as well. Better use the LinksTo template | |||
{{Input|1=<nowiki>{{LinksTo|Applications}}</nowiki>}} | |||
{{LinksTo|Applications}} | |||
<!-- | <!-- | ||
Revision as of 10:20, 16 September 2012
Testing DPL
{{Search|\[\[Special:myLanguage/Applications}}
There are 263 pages beginning with A-J
- ChoqoK
- Draft/MetaInfo
- Build your first KDE application on Kubuntu
- Create your own mouse cursor theme
- Artikulate
- Compile KPhotoAlbum
- Heaptrack/Build/Ubuntu 16.04
- English: Handbook
- Extjs ondiscussionpage:User talk:Heny
- Building KPhotoAlbum
- Artikulate/PhonemeTrainingUnits
- Category Translation
- Amarok/Manual/AdvancedFeatures/WorkingWithMediaDevices
- Artikulate/ScenarioTrainingUnits
- Elisa
- Amarok/Manual/Draft
- Beginner's Guide==Get KDE==
KDE Manuals
<translate>
KDE Accessibility
- Assistive Applications
- The list of assistive applications that KDE provides. This includes magnification, text-to-speech or voice control.
- Getting started with screen readers
- Gives an overview how to setup KDE applications with a screen reader.
- Application Overview
- A list of KDE applications and how accessible they are when used with a screen reader.
- Accessibility in Plasma
- How to use assistive applications in Plasma.
</translate>
- Flow
- Braindump
- Amarok/Manual/Introduction
- Accessibility/Application Overview
- Digikam/AddTextures
- Amarok/Manual/Playlist
- Calligra/Handbooks
- Dolphin/Batch Rename
- Digikam/Faded Effect
- Blogilo
- Digikam/Simple Toning
- Akregator/Tutorials/How to get RSS from a Wordpress blog?
- Amarok/Manual/Organization/ScriptManager
- Digikam/Assign Keyboard Shortcuts to Tags in digiKam
- Amarok/Manual/Organization/Collection/RemoteCollections
- Digikam/Quick Tip:Disable Certain File Types
- Amarok/Manual/Various/AmarokOnOtherPlatforms
- Category Translation Template
- Amarok/Manual/References/KeybindingReference
- Digikam/BleachBypassEffect
- Amarok/Manual/Organization/Collection/RemoteCollections/DAAP
- Filelight
- BasKet
- Amarok/Manual/Various
- BlinKen
- Digikam/Tethered Shooting
- Bluedevil
- Digikam/Configure the Main Toolbar in digiKam
- Artikulate/Introduction
- Amarok/Manual/Organization/Collection/RemoteCollections/UPnP
- Amarok/Manual/Organization/Collection/RemoteCollections/Ampache
- Digikam/Check Database
- Digikam/Geotag Photos with Android
- GCompris
- Digikam/Batch Process
- Digikam/Photoshop Preset Curves
- Amarok/Manual/References
- Digikam/Effects
- Amarok/Manual/Various/AmarokOnOtherPlatforms/OSX
- Digikam/Optimise
- Dragon Player
- Digikam/Face Detection
- Gwenview
- Digikam/Lens Correction Using digiKam
- Amarok/Manual/AmarokWindow
- Amarok/Manual/Organization/Collection
- Applications/Accessibility
- Amarok/QuickStartGuide/TheAmarokWindow
- Digikam/Straighten
- Amarok/Manual/References/MenuAndCommandReference
- Amarok/Manual/References/MenuAndCommandReference/AmarokMenu
- Juk
- Browser Configuration/Mousegestures for all Browsers
- Digikam/Exif
- Digikam/AspectRatios
- Black Screen
- Digikam/MetadataToRaw
- Category Translations Amharic, Arabic Asturianu
- Category Translations Galician Hebrew Hindi
- Digikam/Thumbnails
- Concepts/OpenPGP For Advanced Users
- Category Translations Assamese, Bulgarian Bosnian
- Digikam/Using XMP Sidecar support in digiKam 2
- Digikam/Duplicates
- Digikam/Color Labels and Picks
- An introduction to KDE
- Digikam/Vintage Effect
- Category Translations Luxembourgish Dutch Norwegian
- Dolphin/Customize Folder Icon
- Digikam/Panorama
- Category Translations Català Česky Kaszëbsczi
- Digikam/Using the Advanced Search Tool In digiKam
- Amarok/QuickStartGuide/TheContextView
- Amarok/Manual/Organization/Collection/RemoteCollections/Samba
- Digikam/Performing Fuzzy Searches In digiKam
- Baloo
- Category Translations Hungarian Indonesian Italian
- Amarok/Manual/Organization/Applets
- Digikam/Picasa
- Digikam/Face Recognition
- Cantor
- Amarok/Manual/References/MenuAndCommandReference/Help
- Digikam/ChangeFormat
- Amarok/Manual/References/MenuAndCommandReference/ViewMenu
- Amarok/Manual/References/Credits and License
- Amarok/Manual/Playlist/QueueManager
- Amarok/Manual/Draft/Scrobbling to Libre.fm
- Digikam/Black and White
- Digikam/Geotagging
- Digikam/Noise Reduction
- Amarok/Manual/Organization
- Amarok/Manual/Various/AmarokOnOtherPlatforms/NonKDE Desktops
- Amarok/Manual/Various/AmarokOnOtherPlatforms/Windows
- Gwenview/Hidden Configuration Options
- Category Translations Japanese Georgian Kannada Korean
- Digikam/Levels Adjust
- Amarok/Manual/Draft/References/MenuAndCommandReference/HiddenFeatures
- Digikam/Bugs
- Amarok/QuickStartGuide/HowToDealWithProblems
- Digikam/Import Photos in Digikam
- Category Translations Dansk Deutsch Eesti
- Digikam/Windows
- Digikam/Local Contrast
- Getting started with KAlgebra
- Applications/Science
- Category Translations Kinyarwanda Slovenian Slovak Swedish
- Artwork
- Digikam/Facebook
- Category Translations Polish Brazilian-Portuguese Portuguese
- Digikam/Wikimedia Commons
- Digikam/LightTable
- Digikam/Export via DNLA
- Digikam/Calibrate and Profile Monitor
- Amarok/Manual/References/KeybindingReference/GlobalShortcuts
- Digikam/Versioning
- Category Translations Romanian Russian Rusyn
- Browser Configuration/Opera
- Calligra Author
- Digikam/Soft Proofing
- Digikam/Manage Photos from Multiple digiKam Installations
- Amarok/Manual/References/MenuAndCommandReference/Settings
- Digikam/Maintenance
- Akonadi/Postgres update
- Category Translations Català Croatian Česky Kaszëbsczi
- Category Translations Persian Finnish French
- Amarok/Manual/Playlist/PlaylistFiltering
- Artikulate/Beginning
- Category Translations Greek Esperanto Spanish
- Digikam/Adding Borders To Your Photos
- Digikam/Watermark
- Homerun
- Digikam/Negatives
- Amarok/QuickStartGuide/Glossary
- Ark
- Digikam/Lens Distortion
- Accessibility/Plasma
- Amarok/Manual/Playlist/SavedPlaylists
- Amarok/QuickStartGuide/GettingStarted
- Digikam/Metadata
- Amarok/Manual/AmarokWindow/Toolbar
- Digikam/Compress
- Category Translations Serbian Telugu Turkish Ukrainian
- Digikam/Exposure Blending
- Akregator
- Create a Page
- Digikam/RedEye
- General KDE Software FAQs
- Calligra
- Digikam/Using digiKam with MySQL
- Amarok/Manual/References/MenuAndCommandReference/Playlist
- Google Talk support
- Artikulate/TrainingScreen
- Installing KDE neon
- Digikam/Calendars
- Accessibility/Getting Started
- Amarok/Manual/Organization/CoverManager
- Digikam/Geotagging in digiKam 2.0
- Adding an entry to the Create New menu
- Amarok/Manual/Various/ReplayGain
- Getting Help
- Digikam/Batch Queue Manager and Script
- Applications/Desktop
- Akonadi and AddressBook
- Amarok/Manual/References/MenuAndCommandReference/Tools
- Category Translations Vietnamese Chinese
- Amarok/Manual/Organization/Collection/WorkingWithMediaDevices
- How to chat with other KDE users
- Dolphin
- Apper
- Amarok/Manual/Organization/Transcoding
- Digikam/Basic RAW Processing
- Amarok/Manual/References/KeybindingReference/AmarokShortcuts
- Digikam/Sharpening
- Digikam/Renaming Photos
- Falkon
- Amarok/Manual/Organization/Collection/SearchInCollection
- Amarok/Manual/Organization/Collection/ExternalDatabase
- Configure your desktop
- Amarok/Manual/Organization/Collection/StatisticsSynchronization
- File transfers
- Amarok/Manual/AmarokWindow/ContextPane
- Common Tasks
- Amarok/Manual/ConfiguringAmarok/ChangingLayout
- Amarok/QuickStartGuide
- Jovie
- Amarok/Manual/Organization/Collection/OrganizeCollection
- Amarok/Manual/Organization/TagEditor
- Amarok/Manual
- Digikam/Process RAW Files
- Applications/Development
- Image Kimdaba
- Concepts/OpenPGP Help Spread
- Amarok/Manual/Playlist/AutomaticPlaylistGenerator
- Applications/System
- Applications/Historic
- Bangarang
- Applications
- Digikam/TaggingEfficient
- Gluon
- Amarok/Manual/Organization/CollectionScanning
- Audex
- Color Management
- History of KDE
- Applications/Multimedia
- IRC Channels
- Amarok/Manual/Playlist/DynamicPlaylists
- Applications/Education
- Amarok/QuickStartGuide/Playlists
- ChoqoK/Using ChoqoK
- Edit Markup
- Applications/Graphics
- Digikam
- Applications/Internet
- Amarok/Manual/AmarokWindow/MediaSources
- Introduction to new contributors
- Applications/Utilities
- Calligra/Download
- Discover
- Akonadi
- Amarok
- Digikam/Tutorials
- Asking Questions
- Historical Install Information
- How To Convert a UserBase Manual to Docbook
- Applications/Games
- Amarok/Manual/AmarokWindow/PlaylistPane
- Digikam/Tour
- Applications/Office
- Concepts/OpenPGP For Beginners
- Amarok/Manual/Various/TroubleshootingAndCommonProblems
- Amarok/QuickStartGuide/TheMusicCollection
- Desktop Effects Performance
- Jargon File
- Glossary
- Amarok/Manual/Various/Moodbar
- Digikam/Tutorials/Tagging and Face Tags
- Concepts/OpenPGP Getting Started
- Amarok/Manual/Trash/ConfiguringAmarok
- Digikam/Tutorials/Switch from Microsoft OneDrive or WLPG to digiKam
- Amarok/Manual/ConfiguringAmarok
- Amarok/Manual/Various/FAQ
- Dolphin/File Management
- Digikam/Tutorials/Setup of digiKam for Windows compatibility
There are 326 pages beginning with KA-KZ
- KDE Connect
- KXStitch/Manual
- KDE Applications Versioning
- KColorChooser
- KWord/*
- KPlato/Tutorials
- KDevelop4/Manual/Getting started: Sessions, Projects and Working Sets
- KDE System Administration/Kiosk/Resources
- KDE System Administration/PlasmaDesktopScripting
- KDE System Administration/Kiosk/Keys
- KDE System Administration/PlasmaTwoDesktopScripting
- KDE System Administration/Kiosk/Introduction
- KMenu
- KDevelop4/Manual/Tool list/Snippets
- KOffice
- KDE Connect/Tutorials
- KMail/Distributions/ArchLinux
- KDevelop4/Manual/Appendix: Pages that still lack documentation
- KDevelop5/Manual/Appendix: Pages that still lack documentation
- KAlgebra/Screenshots
- KWord/1.5/Manual/MimeType
- KTux
- KMail/Linux
- KMail/Screenshots
- KWord/1.5/Manual/Compile
- KDevelop4/Manual/Tool list/Decoding table
- KWord/1.5/Manual/TempCat
- KGpg/Manual/Credits
- KPlato/Manual/Project Performance View
- KTurtle/Screenshots
- KDevelop4
- KWord/Manual
- KDiskFree
- KPPP
- KTimer
- KOrganizer/Custom
- KDevelop4/Manual/Tool list/Unit Tests
- KPlato/Manual/Task Performance View
- KGpg/Manual/Introduction
- KNemo
- KPager
- KDE preinstalled
- KOrganizer/Calendar
- KNotes
- KWord/1.5/Manual/InsertBar
- KWord/1.5/Manual/Obtain
- KDirStat
- KDE SVN
- KWord/1.5/Manual/TutorialSummary
- KImageMapEditor
- KAddressBook/index
- KMPlayer
- KDevelop5
- KWord/1.5/Manual/Starting KWord
- KMouth
- KDE Connect/Tutorials/Adding commands
- KMag
- KIPI
- KWord/1.5/Manual/FileBar
- KJots
- KFormula
- KWord/1.5/Manual/ParaBar
- KGraphviewer
- KWord/1.5/Manual/DeletingFrame
- KSniffer
- KOrganizer/Appointments
- KGpg/Manual/Decryption
- KOrganizer/ImpData
- KCharSelect
- KDiff3
- KDevelop5/Manual/Plugins: PHP Debugging
- KWord/1.5/Manual/Inserts
- KOrganizer/Alarms
- KOrganizer/Web
- KWord/Tutorials
- KWord/1.5/Manual/ImpEx
- KWrite
- KAppTemplate
- KInfoCenter
- KNode
- KOrganizer/Future
- KWord/1.5/Manual/IncFilters
- KWord/1.5/Manual/FormatBar
- KWord/1.5/Manual/BorderBar
- KWord/1.5/Manual/RetrieveDoc
- KWin/Gallery
- KRuler
- KWord/1.5/Manual/access
- KLinkStatus
- KWord/1.5/Manual/Toolbars
- KFileReplace
- KOrganizer/Links
- KWord/1.5/Manual/Columns
- KCalc
- KTorrent
- KHelpCenter
- KPlato/Manual/Introduction
- KPDF
- KTouch
- KWord/1.5/Manual/MoveFrame
- KEuroCalc
- KWord/1.5/Manual/EditBar
- KWord/1.5/Manual/ResizeFrame
- KPlato
- KPlayer
- KMediaFactory
- KAddressBook/Tutorials/How to create a new address book?
- KFTPgrabber
- KJots/Recover Deleted KJots Books
- KPlato/Manual/Managing Resources
- KMLDonkey
- KPlato/Manual/Task Execution View
- KAddressBook
- KWord/1.5/Manual/Thesaurus
- KMouseTool
- KPlato/Manual/Main Work Space
- KGeography
- KChart
- KDE International
- KCells
- KJots/Import KNowIt Into KJots
- KTouch/Port Keyboard Layout
- KWord/1.5/Manual/CLO
- KGpg/Manual/Getting Started
- KDE Itinerary
- KPlato/Manual/Cost Breakdown Structure Editor
- KIconEdit
- KSystemLog
- KAddressBook/Tutorials/How to add a new contact?
- KPlato/Manual/Using the Views
- KDbg
- KPilot
- KWord/Manual/Introduction
- KFloppy
- KUIViewer
- KWord/1.5/Manual/Requirements
- KNetworkManager
- KMail/Courses Information Openpgp
- KTechlab
- KPlato/Manual/Work and Vacation Editor
- KDE Partition Manager
- KAlgebra
- KPlato/Manual/Task Status View
- KGpg/Manual
- KWin Rules Application Workarounds
- KTouch/HowTo/DifferentKeyboardLayout
- KGpg/Manual/Using KGpg
- KMix
- KDevelop4/Manual/Tool list
- KDevelop5/Manual/Tool list
- KBibTeX
- KWord/1.5/Manual/Credits
- KMess
- KAlgebra/Credit payment
- KGet
- KFind
- KOrganizer/ToDo
- KWord/1.5/Manual/ToolbarConfig
- KWord/1.5/Manual/Formula
- KWord/1.5/Manual/DocComments
- KGpg/Manual/Keyserver
- KWord/1.5/Manual/HeadFoot
- KWord/1.5/Manual/InitialTemplate
- KWord/1.5/Manual/UsingRulers
- KWordQuiz
- KMail/Protected Headers
- KWord/1.5/Manual/QandA
- KDevelop4/Manual/Appendix A: Building KDevelop from Sources
- KGpg/Manual/Encrypting
- KWord/1.5/Manual/UndoRedo
- KXStitch/Features
- KWord/1.5/Manual/WhoReads
- KPackage
- KDevelop5/Manual/Appendix A: Building KDevelop from Sources
- KDE Wallet Manager
- KDevelop4/Manual/WindowsSetup
- KMail/Devs
- KAlarm
- KWord/1.5/Manual/DataInt
- KWord/1.5/Manual/TextFlow
- KWord/1.5/Manual/UsingFrames
- KDE System Administration/XDG Filesystem Hierarchy
- KWord/1.5/Manual/Differences
- KOrganizer/Screenshots
- KWord/1.5/Manual/Bookmarks
- KDevelop/Install4.5
- KColorEdit
- KMail/Account Wizard
- KDevelop4/Manual/Plugins: Code Generation
- KDevelop5/Manual/Plugins: Code Generation
- KDevelop/Install
- KWord/1.5/Manual/Templates
- KDevelop
- KPlato/Manual
- KWord/1.5/Manual/WindowOverview
- KBruch
- KWord/1.5/Manual/ToC
- KSysGuard
- KLettres
- KMail/Import Options
- KDevelop4/Manual/Getting started
- KDevelop5/Manual/Getting started
- KPlato/Manual/Resource Editor
- KPlato/Manual/Task Dependency Editor (Graphical)
- KWord/1.5/Manual/TemplateWork
- KWord/1.5/Manual/MultiView
- KWord/1.5/Manual/DocInfo
- KWord/1.5/Manual/Spellcheck
- KHangMan
- KWord
- KStars
- KPlato/Manual/Definitions
- KMyMoney
- KWord/1.5/Manual/NewDoc
- KWord/1.5/Manual/DocLinks
- KWord/1.5/Manual/KeyBind
- KSnapshot
- KPhotoAlbum Video Support
- KWord/1.5/Manual/EditDoc
- KWord/Tutorials/SecondLayout
- KAddressBook 4.3
- KWin Rules Window Matching
- KWord/1.5/Manual/ToolbarWork
- KMail/S MIME
- KPlato/Manual/Schedules Editor
- KWord/1.5/Manual/SaveDoc
- KUser
- KXStitch
- KPlato/Manual/Task Editor
- KDevelop5/Manual/Running programs
- KDevelop5/Manual/Tool list/Code browser
- KWord/1.5/Manual/Autocomplete
- KDevelop4/Manual/Running programs
- KWord/1.5/Manual/Clipboard
- KDevelop4/Manual/Working with version control systems
- KWord/1.5/Manual/PrintDoc
- KGpg/Manual/Options
- KWord/1.5/Manual/visual
- KPackageKit
- KWord/1.5/Manual/Book
- KRename
- KWin Rules
- KMail
- KGpg
- KTimeTracker
- KGeography/Making Maps
- KWord/1.5/Manual/Lists
- KWord/1.5/Manual/KeyBindSum
- KWord/1.5/Manual/SelectColor
- KWord/1.5/Manual/DocStruct
- KDE System Administration
- KWord/1.5/Manual/Expressions
- KDevelop4/Manual/Getting started: A small CMake tutorial
- KDevelop5/Manual/Getting started: A small CMake tutorial
- KPhotoAlbum on Knoppix
- KWord/Manual/IntroGUI
- KWord/1.5/Manual/SelectFile
- KDevelop4/Manual
- KWord/1.5/Manual
- KNode/KNode for mailing lists
- KDevelop4/FAQ
- KOrganizer
- KWord/Tutorials/ThirdLayout
- KMid
- KTurtle
- KDE System Administration/Caches
- KWord/1.5/Manual/motor
- KWord/1.5/Manual/Introduction
- KDevelop4/Manual/Working with templates
- KAlgebra/Probabilities
- KDevelop4/Manual/Building (compiling) projects with custom Makefiles
- KDevelop5/Manual/Building (compiling) projects with custom Makefiles
- KDevelop5/Manual
- KDevelop4/Manual/Debugging programs
- KAlgebra/Homework
- KDevelop5/Manual/Working with version control systems
- KDE System Administration/PlasmaDesktopScripting/Examples
- KDevelop4/Manual/Customizing KDevelop
- KPhotoAlbum
- KDevelop5/Manual/Customizing KDevelop
- KWord/1.5/Manual/TabStops
- KWord/1.5/Manual/FootNotes
- KPhotoAlbum FAQ
- KGpg/Manual/Manage
- KDE System Administration/Configuration Files
- KMail/Backup Options
- KMail/PGP MIME
- KWord/1.5/Manual/Characters
- KDevelop5/Manual/Debugging programs
- KDE System Administration/Startup
- KWord/Tutorials/BasicLayout
- KDE System Administration/Environment Variables
- KDevelop4/TipsAndTricks
- KWord/1.5/Manual/Formatting
- KAlgebra/Console Tab
- KDevelop4/Manual/Code generation with templates
- KWin Rules Window Attributes
- KDevelop5/Manual/Sessions and projects
- KDE Connect/Tutorials/Useful commands
- KMyMoney/FAQ
- KDevelop4/Manual/Sessions and projects
- KWord/1.5/Manual/FormatParas
- KWord/1.5/Manual/UI
- KWin
- KWord/1.5/Manual/TextStyles
- KTurtle/Examples
- KMail/Tools
- KWord/1.5/Manual/Autocorrect
- KWord/1.5/Manual/WorkFrames
- KWord/1.5/Manual/Graphics
- KWord/1.5/Manual/Glossary
- KWin Rules Examples
- KBibTeX/Development
- KDE System Administration/KDE Filesystem Hierarchy
- KOffice/File Formats/KOffice 1.6 File Formats
- KDevelop5/Manual/Code generation with templates
- KWord/1.5/Manual/FrameProps
- KWord/1.5/Manual/MailMerge
- KWord/1.5/Manual/Find
- KWord/1.5/Manual/DocVar
- KDEConnect/zh-hans
- KWord/1.5/Manual/Menubar
- KDEConnect
- KDevelop5/Manual/Working with source code
- KMail/FAQs Hints and Tips
- KDevelop4/Manual/Working with source code
There are 288 pages beginning with Ka-Kz but not Kd
- Kexi/Handbook/Configuring Kexi/Docking and undocking side panels
- Kexi/Handbook/Glossary
- Krita/Tutorials
- Kivio/Tutorials
- Khipu/newstuff/provider.xml
- Khipu/QuickStartGuide/HowToPlotFunctionsInKhipu ?
- Kategorie: Utilities
- Kexi/Handbook/Building Simple Databases/Designing Reports
- Kategorie: Sicherheit
- Kexi/File Format Support
- Krita/Manual
- Kexi/Handbook/Appendix B. Comparing Kexi to other database applications
- Krita/Manual/GroupLayer
- Kexi/Handbook/Kexi Basics/Opening an existing Kexi database file
- Karbon/Tutorials
- Kexi/Tutorials/Reports
- Kword/1.6/PDF
- Kexi/Handbook/Kexi Basics/Opening an existing Kexi database file/Opening an existing Kexi database file by clicking on .kexi file's icon
- Kexi/Handbook/References/SQL Reference
- Kexi/Tutorials/Parameter queries
- Khipu temp
- Kopete/Skype Plugin
- Kword/1.6/ApplixWord
- Konversation/Distributions/Chakra
- Konversation/Distributions/Xandros
- Konversation/Distributions/ArkLinux
- Kword/1.6/DocBook
- Kword/1.6/LaTex
- Kmail/Distributions/Gentoo
- Krita/Manual/Tools/Zoom
- Kword/1.6/WML
- Kexi/Handbook/Configuring Kexi
- Khipu/Screenshots
- Konversation/Distributions/Fedora
- Kexi/Handbook/References/Supported File Formats
- Kword/1.6/PalmDoc
- Konversation/Distributions/Mageia
- Kscreen
- Kword/1.6/AmiPro
- Kamoso/3.2
- Kexi/Handbook/ Template
- Kword/1.6/WordPerfect
- Kexi/Cheat Sheet
- Kopete/AIM
- Konversation/Distributions/Gentoo
- Kopete/Auto Replace
- Kexi/Handbook/References/Menu Commands/Context Menu in the Object Tab
- Krita/Manual/Tools/Star
- Kexi/Handbook/Kexi and Other Database Applications
- Khipu/newstuff/stuff.xml
- Kmail/Distributions/OpenSUSE
- Kexi/Handbook/References/Menu Commands/The Help Menu
- Kopete/Yahoo
- Krita/Manual/Resources/ResourceManager
- Khipu/Manual/Introduction
- Kexi/Handbook/References
- Konversation/Distributions/openSUSE
- Krita/Manual/Tools/Pan
- Kexi/Handbook/References/Data Types
- Kile
- Konversation/Distributions/ArchLinux
- Kopete/Jabber/More info on Kopete
- Kexi/Handbook/References/Tabs
- Krita/Manual/Dockers/SnapSettings
- Kwlan
- Kopete/Firewall
- Konversation/Distributions/Slackware
- Kexi/Handbook/References/Menu Commands/The Settings Menu
- Kexi/Handbook/Kexi Basics/Opening an Existing KEXI Project/Opening Recent Project from Welcome Screen
- Khipu/Manual
- Khipu/Manual/References/Credits and License
- Kopete/Jabber/First steps
- Kio gopher
- Kio-audiocd
- KtikZ
- Konversation/Scripts/Media
- Khipu/Manual/Credits and License
- Kig/Screenshots
- Kamoso/3.0
- Kexi/Handbook/Kexi Basics/Kexi Databases
- Kopete/ICQ
- Kexi/Handbook/References/Menu Commands/The Tools Menu
- Kid3
- Kexi/Handbook/Introduction to Databases
- Kubuntu/Contribute/BugReporting
- KuickShow
- Kword/1.6/MSWrite
- Kleopatra
- Kexi/Handbook/Kexi Basics/Using built-in help
- Konversation/Distributions/Exherbo
- Kexi/Handbook/References/Menu Commands/The Data Menu
- KsCD
- Kiten
- Kmail/Getting Started
- Kexi/Handbook/Kexi Basics/Opening an Existing KEXI Project
- Konversation/Distributions/Kubuntu
- Kexi/Handbook/Introduction to Databases/Database Design
- Kbarcode

Pending Deletion
 |
<translate>
KBarCode is a program that allows you to generate a barcode from a number/character sequence you can determine.</translate> |
<translate>
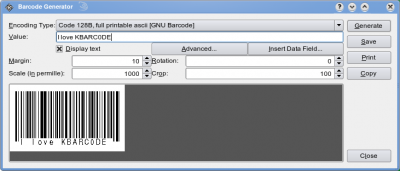
First-time use
When you use it for the first time, first make sure you have mysql and kbarcode installed and started. E.g. with openSUSE Linux you do this in a Konsole:
yast -i mysql kbarcode
 /etc/init.d/mysql start
 kbarcode
Author
Dominik Seichter <domseichter AT web.de>
See also
- Applications/Graphics
- Homepage
- Mailinglist (english and german)
- http://en.wikipedia.org/wiki/Barcode
</translate>
- Krita/Manual/Layerstyles
- Kexi/Handbook/References/Toolbar Commands
- Kbluetooth
- Kexi/Handbook/References/Supported File Formats/Comma-separated Values Format
- Kexi/Handbook/Building Simple Databases/Designing Forms/Inserting text labels
- Kopete/OTR
- Kexi/Tutorials
- Kexi/Handbook/References/Menu Commands/The Window Menu
- Kexi/Handbook/Where to go next
- Kexi/Handbook/Credits and License
- Kompare
- Krusader/How To Add Folder Shortcuts on Krusader Toolbar
- Kopete/ICQ/About ICQ
- Kexi/Handbook/Kexi Basics/Creating a New Database File
- Kexi/Handbook/Introduction to Databases/Who Needs a Database
- Kivio
- KolourPaint
- Kubuntu
- Kanagram
- Krusader
- Kexi/Handbook/References/Toolbar Commands/The Create Toolbar
- Kexi/Handbook/Introduction to Databases/Who Needs a Database?
- Kalzium/Other Chemistry-Applications
- Kexi/Handbook/Building Simple Databases/Entering Data Using Forms
- Konversation/Distributions
- Kaption
- Kopete/Winpopup
- Kexi/Handbook/Kexi Basics
- Khipu
- Kontact Touch/MeeGo
- Kexi/Handbook/Building Simple Databases/Designing Forms/Forms versus tables
- Kopete/ICQ/creating an account
- Kig/FAQ
- Kexi/Handbook/Kexi Basics/Opening an Existing KEXI Project/Opening an Existing KEXI Project by Clicking on a .kexi File
- Klipper/Pastebins
- KmPlot/Using Sliders
- Kexi/Handbook/Introduction to Databases/What Is a Database
- Kexi/Handbook/References/Menu Commands
- Kraft
- Kexi/Handbook/Building Simple Databases/Designing Forms/Using the Widgets tab
- Kexi/Handbook/Building Simple Databases/Designing Database Tables
- Kexi/Handbook/Kexi and Other Database Applications/Data Types
- KrossWordPuzzle/Settings
- Kexi/Handbook/References/Supported File Formats/Microsoft Access File Formats
- Kopete/Jabber
- Konversation/KDE3 Sources
- Kig
- Kalzium/Screenshots
- Kooka
- Kontact Touch/About
- Kexi/Handbook/Building Simple Databases/Designing Forms
- Klipper/How to search in phone books using Klipper
- Kontact Touch/Screenshots
- Kexi/Handbook/References/Toolbar Commands/The Report Design Toolbar
- Kexi/Handbook/References/Menu Commands/The Edit Menu
- Kexi/Handbook/Introduction to Databases/What Is a Database?
- Kopete/Jabber/Create your Jabber account
- KmPlot
- Kig/Macros
- Kexi/Handbook/References/Menu Commands/The KEXI Menu
- Kmail/Configuring Kmail/Accounts/Office 365
- Krita/Manual/BrushEngines/InstantPreview
- Kaffeine
- Konqueror/Web Shortcuts
- Kexi/Handbook/References/Menu Commands/The File Menu
- Konversation/Distributions/PCLinuxOS
- Konversation/Browsers
- Kwave
- Kontact/SMS
- Kopete/ICQ/add friends
- Kate
- Kaffeine-TV
- Konversation/Scripts/Ghosttrick
- Kopete/Jabber/About Jabber XMPP
- Kexi/Handbook/Kexi Basics/Opening an Existing KEXI Project/Selecting a Project from the Open Project Screen
- Kexi/Handbook/References/Menu Commands/Context Menus in the Project Navigator
- Kexi/Handbook/Building Simple Databases/Designing Forms/Working with form design
- Kopete/Jabber/Messaging and sending files
- Kexi/Handbook/Kexi Basics/Opening an existing Kexi database file/Opening a database file in the Open Existing Project dialog
- Kexi/Handbook/Building Simple Databases/Designing Forms/Most important terms
- Kalzium
- Karbon
- Kontact
- Klipper
- Khipu/Manual/DotKhipuFiles
- Kword/1.6/StarWriter
- Kopete/Jabber/Adding friends
- Kexi/Handbook/Introduction
- Kexi/Handbook/Introduction to Databases/Database Creation Software
- Kubuntu/Software/Games/Steam
- Kopete
- KonsoleKalendar
- Kexi/Handbook/References/Keyboard Shortcuts
- Kopete/Supported Protocols Overview
- Kexi/Handbook/Building Simple Databases/Designing Forms/Inserting widgets - text fields
- Kexi/Handbook/Building Simple Databases/Designing Forms/Actions
- Khipu/QuickStartGuide
- Kubuntu/Support
- Karbon/Tutorials/Artistic Text Shape
- Khipu/KhipuBeyondJustPlotting
- Kexi/Handbook/Building Simple Databases/Designing Forms/Assigning data sources
- Kexi/Handbook/Building Simple Databases/Designing Database Queries
- Khipu/PlayingWithPlotDictionary
- Kexi
- KrossWordPuzzle/Crossword Types
- Konversation/KDE4 Sources
- Kamoso
- Kword/1.6/Writer
- Kword/1.6/RTF
- Kopete/Jabber Transport
- Kexi/Handbook/Building Simple Databases/Designing Forms/Setting the tab order
- Kopete Jabber Jingle
- Kexi/Handbook/Building Simple Databases/Entering Data Into Tables
- Kalgebra/Probabilities
- Kontact Touch/WinCE
- Kubuntu/Welcome
- Kword/1.6/AbiWord
- Konversation/Sources
- Kopete/Jabber Muc
- Kopete/MSN
- Kexi/Handbook/Building Simple Databases
- Krdc
- Krita/Manual/Animation
- KrossWordPuzzle
- Kexi/Handbook/References/Toolbar Commands/The Form Design Toolbar
- Konsole
- Kword/1.6/HTML
- Kexi/Handbook/Building Simple Databases/Designing Forms/Setting widgets size and position by hand
- Kubuntu/Contribute
- Kopete/ICQ/connect through kopete
- Kopete/Jabber/Fill in your account data in Kopete
- Kopete/Webcam Support
- Kexi/Tutorials/Reports/Kexi Reports for Beginners
- Kubuntu/Basic
- Konversation/Tips and Tricks
- Konversation/Konvi2x
- Kmail/Using Folders
- Kontact Touch/Harmattan
- Kword/1.6/Plain text
- Kontact/Kontact Palm Pre Sync
- Kubuntu/Advanced/Repositories
- Koko
- Kexi/Handbook/Building Simple Databases/Designing Database Tables/The Table Designer window
- Krfb
- Kronometer
- Konversation/FAQ
- Krita/Manual/FAQ
- Krita/Manual/ColorManagement/ProfilingandCalibration
- Kexi/Tutorials/Importing SQLite database into Kexi
- Kontact Touch
- Kubuntu/Advanced
- Khipu/newstuff/data/test.khipu
- KonsoleDevelopment
- Kmail/Using Kmail General
- Kronometer/Changelog
- Kronometer/Downloads
- Kexi/Handbook/Building Simple Databases/Designing Forms/Widget layouts
- Konversation/Scripts/Import mIRC server list
- Kontact Windows Mobile
- KolorManager
- Konversation
- Kexi/Handbook/Kexi Basics/The Kexi Main Window
- Krita/new/BugWritingGuidelines
- Kontact Touch/Maemo5
- Kopete/Jabber/Useful configuration hints
- Kexi/Handbook/References/Command-Line Options
- Konqueror
- Kubuntu/Software
- Konversation/Configuring SASL authentication
- Krecipes
- Krita/Tutorial 3A
- Kubuntu/Installation
- Kmail/Folder Properties
- Kexi/Handbook
- Kmail/Configuring Kmail
- Kexi/Handbook/Introduction to Databases/Database and Spreadsheet
- Kmail/Configuring Kmail/Identities
- Kexi/Handbook/References/SQL Reference/SQL Reserved Words
- Krita/Tutorial 6
- Konversation/Scripts/Scripting guide
- Konversation/Releases
- KrossWordPuzzle/Using KrossWordPuzzle
- Krita/Tutorial 5
- Kexi/Tutorials/Drilling Down on Facebook Data
- Krita/Tutorial 7
- Krita/Tutorial 1
- Krita/Tutorial 4B
- Krita/Tutorial 4A
- Krita/Tutorial 2
- Krita/Tutorial 8
There are 206 pages beginning with Kd
- Kdenlive/Manual/Credits and License
- Kdenlive/Manual/Useful Information/Useful Resources
- Kdenlive/Manual/Useful Information/Tips Tricks
- Kdenlive/Manual/Useful Information/Surround Sound
- Kdenlive/Manual/Useful Information/Shortcuts
- Kdenlive/Manual/Useful Information/FAQ
- Kdenlive/Manual/Useful Information
- Kdenlive/Manual/KdenliveOnOtherPlatforms/OSX
- Kdenlive/Manual/KdenliveOnOtherPlatforms/Non-KDE Desktops
- Kdenlive/Manual/KdenliveOnOtherPlatforms
- Kdenlive/Manual/Troubleshooting and Common Problems
- Kdenlive/Manual/ShootingHints
- Kdenlive/Manual/Toolbars
- Kdenlive/Manual/CapturingAudio
- Kdenlive/Manual/Capturing
- Kdenlive/Manual/Project Menu/Render/Render Profile Parameters
- Kdenlive/Manual/Rendering
- Kdenlive/Manual/Project Menu/Render
- Kdenlive/Manual/Settings Menu
- Kdenlive/Manual/View Menu
- Kdenlive/Manual/Monitor Menu
- Kdenlive/Manual/Timeline Menu
- Kdenlive/Manual/Clip Menu
- Kdenlive/Manual/Tool Menu
- Kdenlive/Manual/Project Menu
- Kdenlive/Manual/Edit Menu/Undo
- Kdenlive/Manual/Edit Menu/Redo
- Kdenlive/Manual/Edit Menu/Copy
- Kdenlive/Manual/Edit Menu/Paste
- Kdenlive/Manual/Edit Menu/Paste Effects
- Kdenlive/Manual/Edit Menu
- Kdenlive/Manual/File Menu/New
- Kdenlive/Manual/File Menu/Open
- Kdenlive/Manual/File Menu/Open Recent
- Kdenlive/Manual/File Menu/Save
- Kdenlive/Manual/File Menu/Save As
- Kdenlive/Manual/File Menu/Revert
- Kdenlive/Manual/File Menu/Transcode Clips
- Kdenlive/Manual/File Menu/DVD Wizard
- Kdenlive/Manual/File Menu/Quit
- Kdenlive/Manual/File Menu
- Kdenlive/Manual/Menu
- Kdenlive/Manual/Titles
- Kdenlive/Manual/Monitors
- Kdenlive/Manual/Effects/Motion
- Kdenlive/Manual/Effects/Misc
- Kdenlive/Manual/Effects/Fun
- Kdenlive/Manual/Effects/Fade
- Kdenlive/Manual/Effects/Enhancement
- Kdenlive/Manual/Effects/Distort
- Kdenlive/Manual/Effects/Custom
- Kdenlive/Manual/Effects/Crop and transform
- Kdenlive/Manual/Effects/Colour Correction
- Kdenlive/Manual/Effects/Colour
- Kdenlive/Manual/Effects/Blur and hide/Auto Mask
- Kdenlive/Manual/Effects/Blur and hide
- Kdenlive/Manual/Effects/Audio Correction
- Kdenlive/Manual/Effects/Audio channels
- Kdenlive/Manual/Effects/Artistic
- Kdenlive/Manual/Effects/Analysis and Data
- Kdenlive/Manual/Effects/Alpha manipulation/Blue Screen
- Kdenlive/Manual/Effects/Alpha manipulation/Color Selection
- Kdenlive/Manual/Effects/Alpha manipulation/Alpha operations
- Kdenlive/Manual/Effects/Alpha manipulation/Alpha shapes
- Kdenlive/Manual/Effects/Alpha manipulation/Rotoscoping
- Kdenlive/Manual/Effects/Alpha manipulation
- Kdenlive/Manual/Transitions
- Kdenlive/Manual/Timeline/Right Click Menu
- Kdenlive/Manual/Timeline/Guides
- Kdenlive/Manual/Timeline/Grouping
- Kdenlive/Manual/Timeline
- Kdenlive/Manual/Projects and Files/Management
- Kdenlive/Manual/Projects and Files/Importing
- Kdenlive/Manual/Projects and Files/Clips
- Kdenlive/Manual/Projects and Files/Notes
- Kdenlive/Manual/Projects and Files/Backup
- Kdenlive/Manual/Projects and Files/Archiving
- Kdenlive/Manual/Projects and Files/Project Settings
- Kdenlive/Manual/Projects and Files/Project
- Kdenlive/Manual/Projects and Files/Project Tree
- Kdenlive/Manual/Projects and Files
- Kdenlive/Manual/Windows Issues
- Kdenlive/Manual/Tutorials
- Kdenlive/Manual/Introduction
- Kdenlive/Manual/Transitions/Hue shift
- Kdenlive/Manual/WIndows Issues
- Kdenlive/Manual/Effects/Misc/Glow (GLSL)
- Kdenlive/Manual/UsingKdenlive/QuickStart/CreatingProject
- Kdialog
- Kde-pim
- Kdenlive/Manual/BugReporting
- Kdenlive/Roadmap
- Kdenlive/Manual/Effects/Misc/threelay0r
- Kdenlive/Templates/ContentTodo
- Kdenlive/Manual/Effects/Audio channels/Mono to stereo
- Kdenlive/Manual/Effects/Misc/colorize
- Kdenlive/Manual/Transitions/addition alpha
- Kdenlive/Manual/Useful Information/Tips Tricks/Ffmpeg and BT 601 Color
- Kdenlive/Manual/Transitions/alpha over
- Kdenlive/Manual/Transitions/addition
- Kdenlive/Manual/View Menu/Show Timeline
- Kdenlive/Manual/Effects/Alpha manipulation/Masking
- Kdenlive/Manual/View Menu/Audio Signal
- Kdenlive/Manual/View Menu/Effect Stack
- Kdenlive/Manual/View Menu/Transition
- Kdenlive/Manual/View Menu/Project Monitor
- Kdenlive/Manual/View Menu/Project Tree
- Kdenlive/Manual/Effects/View Menu/Vectorscope
- Kdenlive/Manual/Transitions/alphain
- Kdenlive/Manual/Settings Menu/Full Screen Mode
- Kdenlive/Manual/Transitions/alphaout
- Kdenlive/Manual/Settings Menu/Toolbars Shown
- Kdenlive/Manual/Transitions/alphaatop
- Kdenlive/Manual/Effects/Misc/twolay0r
- Kdenlive/Manual/Project Menu/Open Backup File
- Kdenlive/Manual/Transitions/alphaover
- Kdenlive/Manual/File Menu/Close
- Kdenlive/Manual/Effects/Misc/nosync0r
- Kdenlive/Manual/Project Menu/Generators
- Kdenlive/Manual/Settings Menu/Configure Notifications
- Kdenlive/Manual/Effects/Misc/Threshold0r
- Kdenlive/Manual/Effects/Colour/B
- Kdenlive/Manual/Settings Menu/Themes
- Kdenlive/Manual/View Menu/Clip Monitor
- Kdenlive/Manual/Project Menu/Analyse Keyframes
- Kdenlive/Manual/Projects and Files/Media Browser
- Kdenlive/Manual/Transitions/Hue
- Kdenlive/Manual/Project Menu/Stop Motion Capture
- Kdenlive/Manual/Settings Menu/Run Config Wizard
- Kdenlive/Manual/Settings Menu/Download New Project Profiles
- Kdenlive/Manual/Project Menu/Adjust Profile to Current Clip
- Kdenlive/Manual/Clip Menu/Reload Clip
- Kdenlive/Manual/Transitions/alphaxor
- Kdenlive/Manual/View Menu/Show Title Bars
- Kdenlive/Manual/Settings Menu/Download New Wipes
- Kdesvn
- Kdenlive/Manual/View Menu/Screen Grab
- Kdenlive/Manual/Clip Menu/Duplicate Clip
- Kdenlive/Manual/View Menu/Effect List
- Kdenlive/Manual/Settings Menu/Manage Project Profiles
- Kdenlive/Manual/Clip Menu/Rename Clip
- Kdenlive/Manual/Transitions/screen
- Kdenlive/Manual/View Menu/Vectorscope
- Kdenlive/Manual/Effects/Audio/Mono to stereo
- Kdenlive/Manual/Clip Menu/Locate Clip
- Kdenlive/Manual/Project Menu/Clean Project
- Kdenlive/Manual/Clip Menu/AutomaticSceneSplit
- Kdenlive/Manual/Clip Menu/Delete Clip
- Kdenlive/Manual/Clip Menu/Replace Clip
- Kdenlive/Manual/Effects/Motion/Speed
- Kdenlive/Manual/Clip Menu/Extract Audio
- Kdenlive/Manual/Edit Menu/Find Next
- Kdenlive/Manual/View Menu/Histogram
- Kdenlive/Ideas
- Kdenlive/Manual/View Menu/Waveform
- Kdenlive/Manual/View Menu/Spectogram
- Kdenlive/Manual/View Menu/Audio Spectrum
- Kdenlive/Manual/View Menu/Load Layout
- Kdenlive/Manual/Effects/Misc/pr0be
- Kdenlive/Manual/Effects/Misc/pr0file
- Kdenlive/Manual/Project Menu/Reverse Clip
- Kdenlive/Manual/Settings Menu/Configure Shortcuts
- Kdenlive/Manual/Titles/Download New Title Templates
- Kdenlive/Manual/Project Menu/Create Folder
- Kdenlive/Manual/Clip Menu/Clip in Timeline
- Kdenlive/Organization
- Kdenlive/Manual/Clip Menu/Duplicate Clip with speed change
- Kdenlive/Manual/Clip Menu/Transcode
- Kdenlive/Manual/View Menu/Save Layout As
- Kdenlive/Manual/Installation/zh-hans
- Kdenlive/Manual/Clip Menu/Edit Clip
- Kdenlive/Manual/Timeline Menu/Insert Clip Zone
- Kdenlive/Manual/View Menu/RGB Parade
- Kdenlive/Manual/alpha operation transitions/zh-hans
- Kdenlive/Manual/Edit Menu/Find
- Kdenlive/Manual/Settings Menu/Download New Render Profiles
- Kdenlive/Manual/Installation
- Kdenlive/Manual/Clip Menu/Markers
- Kdenlive/Manual/Transitions/Wipe
- Kdenlive/Manual/Monitors/Project Monitor RightClick
- Kdenlive/Manual/alpha operation transitions
- Kdenlive/Manual/Transitions/Affine
- Kdenlive/Manual/Timeline Menu/Tracks
- Kdenlive/Manual/View Menu/Undo History
- Kdenlive/Manual/Full Luma
- Kdenlive/Manual/Timeline Menu/Selection
- Kdevelop4/Manual/Meet KDevelop
- Kdevelop5/Manual/Meet KDevelop
- Kdenlive/Manual/Project Menu/Online Resources
- Kdenlive
- Kdenlive/Manual/Timeline Menu/Current Clip
- Kdenlive/Manual/Transitions/Composite
- Kdenlive/Manual/Timeline Menu/Space
- Kdenlive/Manual/Effects/Alpha manipulation/Key Spill Mop Up
- Kdenlive/Manual/zh-hans
- Kdenlive/Manual/Clip Menu/Stabilize
- Kdenlive/Manual/Monitors/Clip Monitor RightClick
- Kdenlive/Manual
- Kdenlive/Manual/Effects/Audio
- Kdenlive/Manual/Settings Menu/Configure Kdenlive
- Kde wayland for artists
- Kdenlive/Manual/QuickStart/zh-hans
- Kdenlive/Manual/QuickStart
- Kdenlive/Manual/Effects
- Kdenlive/Manual/Timeline/Editing
- Kdenlive/Manual/Effects And Transitions
There are 460 pages beginning with L-Z
- Plan/Manual/1/Definitions
- Tips/Take screenshots faster with Spectacle by using shortcuts
- Showcase/Tutorials
- New Imports
- Parley/Manual/Practice
- Parley/Manual/Vocabulary Editing
- Parley/Manual/Practice Setup
- Parley/Manual/Summary After Practice
- Ub-helpfiles-languages
- Plan/Howto/Create New Project
- Macaw-Movies
- Plasma/4.0 (zh CN)
- Projects/Usability/HIG/Layout
- LabPlot/2DPlotting/Histogram
- Toolbox/Subpage Demo
- Plan/Manual/Menus and Tool bars
- LabPlot/Cursor tool
- LabPlot/CursorTool
- LabPlot/Statistics
- LabPlot/DataAnalysis/Smoothing
- Plan/Manual/Cost Breakdown View
- Plan/Manual/Work Package View
- Plan/Manual/Configure Plan Dialog
- Plan/Howto/Create Shared Resources
- Plan/Manual/Task Progress Dialog
- Plan/Manual/Define Currency Dialog
- Translation Workflow/Galician
- Plan/Manual/Project Settings Dialog
- Plan/Manual/Task Settings Dialog
- Plan/Manual/Summary Task Settings Dialog
- Plan/Manual/Edit Work Intervals Dialog
- Plan/Manual/Define Estimate Conversions Dialog
- Plan/Manual/Resource Settings Dialog
- Plan/Manual/Insert File Dialog
- Translation Workflow/Spanish
- Plan/Manual/Define WBS Pattern Dialog
- LabPlot/2DPlotting/XY Curve from a Formula
- Userbase Technical Issues
- Plan/1/Manual
- LabPlot/DataAnalysis/Fitting
- LabPlot/Interface/PropertiesExplorer
- Tellico/Compiling
- Translation Workflow/French
- Parley/FileFormats
- Temlate:Plan/Docversion1
- Troubleshooting/Peripherals Problems
- LabPlot/2DPlotting
- Plan/Howto
- System Settings/Global Policy Configurations
- PlanWork/Manual
- System Settings/Permissions
- System Settings/Actions Policy
- Rekonq/Manual
- Simon/Developing Command Plugins
- Semantik
- Simon/Back ends
- Plan/Manual/Task Dependency Editor (List)
- System Settings/Information Sources
- System Settings/Digital Camera
- System Settings/Workspace
- Tools
- LabPlot/2DPlotting/XYCurve
- LabPlot/DataContainers
- Plasmate
- Plan/Manual/Context Help
- System Settings/Launch Feedback
- System Settings/Windows Decorations
- System Settings/Color
- System Settings/Spell Check
- Simon/TTS Voices
- System Settings/Icons
- System Settings/Touch Screen
- LabPlot/Tutorials
- System Settings/Removable Devices
- System Settings/Plasma Search
- System Settings/Fonts (Category)
- System Settings/Notifications
- Plan/Tutorials
- System Settings/Software Management
- Raptor
- System Settings/Removable Storage
- System Settings/Personal Information
- Task Oriented Plan
- LabPlot/ImportExport/ImportFromFiles
- System Settings/KDE Wallet
- System Settings/Account Details
- LabPlot/GettingStarted
- Okteta/Tutorials
- Software from Source
- Plan/Manual/Startup View
- Plan/Manual/Project Performance View
- LabPlot/DataContainers/Matrix
- System Settings/Plasma Theme
- System Settings/Online Accounts
- System Settings/Search
- System Settings/Activities
- Stats
- System Settings/Device Actions
- System Settings/Mouse
- Rekonq/Manual/Introduction
- System Settings/Touchpad
- Showfoto
- System Settings/Web Shortcuts
- System Settings/Emoticon Theme
- System Settings/File Search
- Plasma/HowTo/Index
- System Settings/Formats
- System Settings/Display and Monitor
- System Settings/Workspace Theme
- LemonPOS
- Simon/Handbook
- LabPlot/CurveTracing
- System Settings/Splash Screen
- Simon/Scenarios
- System Settings/Language
- System Settings/Font
- System Settings/GNOME Application Style (GTK)
- System Settings/Screen Locking
- PvfViewer
- Parley/Manual/Existing collection
- System Settings/Virtual Desktops
- System Settings/Window Rules
- Plan/Manual/Task Performance View
- PlanWork
- System Settings/Locations
- PulseAudio
- Sweeper
- System Settings/Mouse Cursor Theme
- Plan/Manual/Managing Resources
- Yakuake
- System Settings/Regional Settings
- System Settings/Icon Theme
- Plasma Mobile
- Plan/Engineering To Order project tutorial
- Plasma/FAQ/Index
- System Settings/Screen Edges
- Projects/Usability/HIG/Layout/Wizard
- QtiPlot
- System Settings/Application Style
- System Settings/Font Management
- Translation Workflow/Ukrainian
- System Settings/Application and System Notifications
- Translator Account/2017
- System Settings/Desktop Session
- Peruse
- Projects/Usability/HIG/Layout/ViewingVsEditing
- System Settings/Shortcuts
- Plan/Manual/Report Generator
- System Settings/User Manager
- System Settings/Look And Feel
- System Settings/Connections
- Plan/Howto/Organize Your Projects
- Plan/Manual/Task Gantt View
- Tips
- Plan/Manual/Import and Export
- System Settings/Desktop Effects
- Translation Workflow/Russian
- Plan/Manual/Milestone Gantt View
- Projects/Usability/HIG/Layout/Image
- Rocs
- Single database server
- Translator Account/2016
- Plan/Manual/Resource Assignment Gantt View
- Plan/Manual/Resource Assignment View
- System Settings/Applications
- LabPlot/GettingStarted/Installation
- Minuet
- System Settings/Multimedia
- Translator Account/2018
- System Settings/Windows Management
- SymbolEditor File Format
- System Settings/Widget Style
- System Settings/Locale
- Rekonq/Manual/UI
- LatteDock/How to report multi screen issues
- Tutorials/Compose Key Old Version
- Simon
- Translation Workflow/German
- Simon/What do I need?
- PlanWork/Manual/Introduction
- Tutorials/Access another computer's display
- RSIbreak
- Lancelot
- Plasma/PictureFrame
- Tutorials/Change the color of the blue folder icon
- System Settings/Power Management
- LabPlot/CASComputing
- Tutorials/hotkeys
- Skanlite
- Parley/Manual/Vocabulary Practice
- System Settings/Login Screen
- System Settings/Application Appearance
- Plan/Manual/Creating a Project
- Plan/Manual/View Selector
- Plan/Manual/Task Execution View
- LatteDock
- LabPlot/FITSMetadataEditor
- Summary
- Simon/Shadow dictionary
- Translator Account/2019
- System Settings/Desktop Behavior
- Plan/Manual/Cost Breakdown Structure Editor
- LabPlot/DataContainers/Workbook
- Translation Workflow/Romanian
- Translator Account/2014
- Plasma-browser-integration
- Plan/Manual/Introduction
- Spectacle/Tutorials/Invoking Spectacle with custom shortcuts
- System Settings/Workspace Appearance
- Plan/Manual/Reports Generator View
- Plan/Manual/Using the Views
- Showcase
- RSIBreak
- ReadyForTranslation
- System Settings/Autostart
- Tips/Enabling the blue light filter on KDE Plasma
- System Settings/Date & Time
- Translator Account/2015
- LabPlot/ImportExport/Export
- Plasma/Pager
- Simon/Contribute Data
- System Settings/Task Switcher
- Translation Help Needed
- Parley/Manual/Start Page
- Plasma/Installing Plasmoids
- Plan/Manual/Task Status View
- System Settings/Default Applications
- Plan/Manual/Work and Vacation Editor
- Smb4K
- System Settings/Search Desktop
- LabPlot/DataContainers/Spreadsheet
- System Settings/Workspace Behaviour
- Plasma/NetworkMonitor
- Plasma/DeviceNotifier
- Parley
- System Settings/Keyboard
- Temlate:Plan/Prevnext
- Plan/Manual/Main Work Space
- Translator Account/2013
- Sandbox
- Sheets
- Tutorials/Mouse pointer settings for large displays
- SymbolEditor
- LabPlot
- Tips/Pairing your phone and PC with KDE Connect
- LabPlot/Tutorials/Plotting/PlotTextData
- Stage
- Pairs/Editor
- LabPlot/Interface/MainArea
- Off-line Translation
- Raw to DNG
- System Settings/Window Behavior
- Tips/Enable fun desktop effects on KDE Plasma
- LatteDock/HowToReportCrashes
- LabPlot/Interface
- Tutorials/Modify KDE Software Defaults
- Words
- LabPlot/DataAnalysis/FourierTransfromation
- Tutorials/Keyboard
- Update an Image
- System Settings/Appearance
- Wacomtablet
- Propose Deletion
- Zanshin
- Working with MyKolab
- Websites
<translate>

Websites for the KDE Community
Websites where users can get general information about KDE. These are either run by KDE or are directly affiliated with KDE.
- The KDE Homepage. Here you will find general information about both KDE software and the KDE Community. There are many links to other resources
- KDE news or simply, The Dot. This is the authoritative source of KDE-related news and announcements.
- Planet KDE. An aggregation of blogs of KDE developers and contributors. These blogs express the opinion of individual people. It may sometimes contain posts unrelated to KDE software.
- KDE Forums. The official forum of the KDE community. Get or give online support. Brainstorm for projects or applications. Or even just hang around with fellow KDE software lovers.
- KDE Community Wiki. High-quality documentation and tutorials for KDE development. Perfect for people who want to get involved and contribute to KDE software.
- KDE Store is where you can find 3rd-party themes, icons, widgets and more for Plasma, as well as app-specific add-ons for your KDE apps. Most pieces of KDE software provide an integrated browser to find content available by clicking on the "Get New…" buttons sprinkled around in various places. Note that store.kde.org is not owned or run by KDE, and is actually part of the openDesktop project, so be very careful when installing things from there.
KDE Applications
Some KDE applications have their own website. Please check with the application's page here in UserBase to see if the program you are looking for has one. The Applications Catalogue gives you an overview of the KDE applications that has a page here on UserBase. Find a list of all official applications on KDE kde.org.
</translate>
- Tutorials/Open a console
- Parley/Manual/Introduction
- Plan
- PageLayout
- Quanta
- Session Environment Variables
- Tips/How to customize Night Color on KDE Plasma
- Parley/Manual/Advanced Practice Configuration
- Quassel
- Tellico/Templates
- Tutorials/Change Plasma Language
- Tips/Downloading KDE Connect
- Sound Problems/External Sound Cards
- Nepomuk/kioslaves/tags
- LabPlot/ImportExport/ImportFromSQLDatabases
- LabPlot/UserGuide
- Translation Workflow/Italian
- Marble
- Skrooge
- Plasma/SystemTray
- Nepomuk/kioslaves/search
- Translator Account/2012
- Welcome to KDE UserBase
<translate>
The home for KDE users and enthusiasts.</translate>
<translate>
</translate>
==== <translate> An introduction to KDE</translate> ====

<translate> Learn more about the KDE community and its software and find information to help you get started. Also, discover what UserBase is and how it can help you.</translate>

<translate> How-Tos, Tips & Tricks that can help make your KDE software experience more enjoyable and productive.</translate>
===<translate> Getting Help</translate>===

<translate> Can't find your answer on UserBase? Here are some other places like forums where you can get help.</translate>
===<translate> Applications</translate>===

<translate> Discover the wide variety of applications from the KDE Community, and find out what program suits your needs and preferences.</translate>
===<translate> Websites</translate>===
<translate> If you are willing to contribute, please read Tasks and Tools before starting. If you already contribute, check out Stats to see the top 10 contributors for the week, the most popular pages and most discussed pages.</translate>
<translate>
</translate>
- Parley/Manual/Imparare vocaboli utilizzando multiple choice
- Umbrello
- SMPlayer
- Modifying the Sidebar
- List of KDE themes with GTK ports
- Translation Workflow/Chinese
- Modify a Page
- Neon/LTS/EOL
- Simon/Base models
- Working with Google Contacts
- Nepomuk/RemovableMediaHandling
- LabPlot/ThemesAndTemplates
- LabPlot/DataAnalysis/CurveFitting
- Tutorials/Flatpak
- Parley/Manual/Vokabellernen im Mutliple Choice Modus
- Lokalize
- Tutorials/Kimpanel
- Projects/Usability/HIG/Layout/CommandPatterns
- Plasma/ColorPicker
- Marble/Maemo/GUIGuidelines
- Plan/Manual/Task Dependency Editor (Graphical)
- LabPlot/Interface/ProjectExplorer
- Parley/Manual/How to study vocabulary in multiple choice mode
- Tips/Take screenshots faster with Spectacle using shortcuts
- LabPlot/ImportExport/ImportFromProjects
- Marble/Maemo/Installation
- Plasma/TweakingPlasma
- Workspace Configuration/Desktop Configuration
- System Settings/Input Devices
- Working with Google Calendar
- Plasma/Clocks
- Lokalize/de-formal
- Plasma/Public Transport
- Plan/Manual/Resource Editor
- Toolbox/Tables
<translate>
How to use tables
Find the sample table here that most matches your need, then use the ![]() button to see the markup.
button to see the markup.
This is a plain table
| One | Two |
| Three | Four |
| Five | Six |
One with borders
| One | Two |
| Three | Four |
| Five | Six |
This is with labels
| One | Two | |
|---|---|---|
| More | Three | Four |
| Again | Five | Six |
This one can be sorted
| One | Two |
| Three | Four |
| Five | Six |
Now all of them combined
| One | Two | |
|---|---|---|
| More | Three | Four |
| Again | Five | Six |
Some other types of table
class="tablecenter":
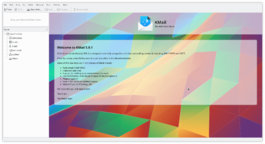 The KMail Welcome Screen |
Here the text is top-aligned |
 |
Here it is vertical-centered |
class="vertical-centered" - table aligned left, text aligned vertically centered
Internet and Networking | |||
class="vertical-centered wikitable" style="border: 1px solid grey;"
Centered heading -
'"`UNIQ--syntaxhighlight-0000000B-QINU`"'
| Debugging | |
|---|---|
| F10 | Step over (gdb's "next") |
| F11 | Step into (gdb's "step") |
| F12 | Step out of (gdb's "finish") |
| Description | Windows | Mac OS X | KDE Software |
|---|---|---|---|
| Blogging client | Windows Live Writer | Blogilo | |
| BitTorrent Client | BitTorrent | KTorrent, KMLDonkey, KGet | |
| Download Manager | FlashGet | KGet | |
| eDonkey Client | eMule | KMLDonkey | |
| E-mail Client | Outlook Express, Windows Live Mail | Apple Mail | KMail |
| Feed Aggregator | Akregator | ||
| PIM | Outlook | Kontact | |
| Web Browser | Internet Explorer | Safari | Konqueror, rekonq |
| Instant Messaging Client | Windows Live Messenger | iChat, Adium | Kopete, KMess |
| IRC Client | mIRC | Colloquy | Konversation |
:{|class="tablecenter" style="border:1px solid darkgray;"
Link image and external url:
</translate>
- Plasma/Application Dashboard
- Quanta RefreshDoc script
- What is a distribution
- Plasma/Public Transport/NewServiceProviders
- Nepomuk/FileIndexer
- LabPlot/GettingStarted/YourFirstDataImportVisualisation
- Marble/Bookmarks
- System Settings/Printers
- System Settings/Task Scheduler
- Phonon/Handbook
- Showfoto/Levels Adjust
- Step
- Neon/Installation/OEM
- System Settings/File Associations
- System Settings/Startup and Shutdown
- Plan/Manual
- System Settings/Window Behaviour
- Telepathy
- Okteta
<translate>
Overview
</translate>
|
<translate>
</translate> |
<translate>
Description
Okteta is a simple editor for the raw data of files.
- Values and characters shown either in two columns (the traditional display in hex editors) or in rows with the value on top of the character
- Editing and navigating similar to a text editor
- Customizable data views
- Data view profiles
- Tools dockable on all sides or floating
- Numerical encodings: Hexadecimal, Decimal, Octal, Binary
- Character encodings: All 8-bit encodings as supplied by Qt, EBCDIC
- Fast data rendering on screen
- Multiple open files
- Support for remote files, by http, ftp, fish & other protocols supported by KDE Platform
- Export of data to text, both file and clipboard.
- Checksum/Hashsum calculator: Modular sum (8/16/32/64 bit), Adler-32, CRC-32 and Hashsums by the QCA2 library, can be SHA-0/1/224/256/384/512, MD2/4/5, RIPEMD-160, Whirlpool
- Structures tool for analyzing and editing based on user-creatable structure definitions
- Statistic tool
- String extraction tool
- 8-bit charset conversion tool
- Decoding table listing common simple data types.
- Bookmarks
- Printing
- Table with complete list of all byte values
Data manipulation
- Insert and Overwrite modes
- Unlimited Undo - Redo operations
- Find and Replace operations
- Pattern insertion
- Binary Filter tool with bitwise operations:
- AND filter
- OR filter
- XOR filter
- Inverse filter
- Shift filter
- Rotate filter
- Reverse filter
FAQ
"What is the relation to KHexEdit?"
Okteta is an independent new project, with a completely different codebase and architecture, written from scratch, by a different author.
KHexEdit is discontinued for the KDE 4 series, as it hasn't had a real maintainer and the port to KDE 4 was only incomplete. Okteta is first included in the 4.1 release of KDE. So in fact Okteta is the successor to KHexEdit for KDE 4.
"Are very large files (up and larger than 1 GiB) supported?"
Not yet, as it is still subject of discussion how partial loading and the related issues should be reflected in the UI.
Currently a complete copy of the file is loaded into the working memory, so please be careful if the size of the file is close to the order of magnitude of the size of your working memory.
"What about a diff tool?"
A facility to view and work on differences between files and file versions is planned for later versions of Okteta.
Other Info
Structure definitions used by the tool can be shared on https://store.kde.org/ (also used by the integrated sharing dialog in the tool's configuration).
There are a few tutorials </translate>
- System Settings/Locale/How To Install and Apply Interface Translation
- Simon/Tips, Tricks and Best Practices
- Quick Start
- Translator Account/2011
- UserBase/Guidelines
<translate>
Ready to write some cool howto's or content for UserBase? Don't worry, using MediaWiki is easy. But before you get started, please take a few moments to read these guidelines that will help everyone have a great UserBase experience.
1. Take note of our license. All content that you put into KDE UserBase is licensed under the GNU Free Documentation License and the Creative Commons Attribution-Share Alike license. This basically means that you are free to use content in UserBase, distribute it and modify it, provided that you follow the attribution indicated by the original author(s) and that you distribute the modified work under this same license.
2. Respect content from outside sources. When you are using content from other websites, whether it be text, screenshots, or images, please make sure that you have their permission and that you acknowledge their work and probably link to their site. If you have doubts, the Community Working Group can assist in contacting the appropriate parties.
3. Respect the work of others. Particularly if some previous content already exists. Try to follow the pattern if one exists, like in the Applications pages. If you need to make some major changes, please leave a note in the Discussion tab of the page before you make the changes and wait for a reply within a considerable timeframe. You can use the Discussion pages to talk with other contributors. A wiki is designed for collaborative editing, so feel free to talk with each other.
4. Leave short but meaningful Summary when you save changes. This makes it a lot easier to see at a glance what was done. This is specially helpful for those who are monitoring the Recent changes. Of course, we presume that what you write in the Summary actually describes the changes that you did. We all work on the basis of trust and cooperation, so it's best to keep that in mind.
5. Register and login. This is a mandatory requirement, as it makes it possible for the administrators to contact you if there is a problem, and also enables us to protect your pages against spamming and vandalism.
6. Remember the purpose of UserBase. UserBase is not the correct place to make feature requests or bug reports for KDE software. We have a dedicated bug tracker for that and a BugSquad that helps take care of it (you might be interested in helping out, too). Your wishes or bugs will get heard better there. Be aware of putting in information or steps that apply to specific distributions only. Please put a note that the information applies to that particular distribution. When in doubt, it's best to note it anyway.
7. Be consistent in style. A good template for a new article is PageLayout and code snippets to help you achieve it can be copied from Toolbox. Guidelines for most common tasks are available from Tasks and Tools.
8. Last, but definitely not the least, please be guided by the Code of Conduct. The KDE community is built on a culture of collaboration, mutual respect, and trust. These values allow the community to work together in a pleasing and inspiring atmosphere. The Code expresses these values in concrete words. Be sure to give it a good read and keep it mind, whether contributing to UserBase or any area relating to the KDE community.
We look forward to your help in building up KDE's knowledge base for users and we hope that you will enjoy the experience of being an active part in this international family, the KDE Community. </translate>
- Projects/Usability/HIG/Layout/NavigationPatterns
- What is KDE (pt BR)
- Quanta RefreshDoc
- Plan/Manual/Schedules Editor
- Lancelot/Comparison
- Plasma/FAQ/5.10
- Plasma/GroupingDesktop
- Marble/OfflineSearch
- Trojitá
- Rekonq/FAQs
- Marble/CustomSpeakers
- QCA
- Plasma/FAQ/5.10/Configuration
- Taking Screenshots
- LabPlot/Worksheet
- Plasma/Netbooks
- Plasma/Kicker
- Marble/Search
- LabPlot/LaTeXTypesetting
- Tellico
- Spectacle
- System Settings/Accessibility
<translate>
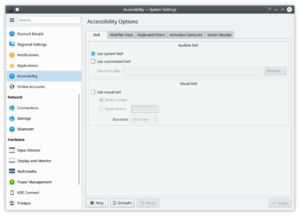 |
Settings to improve the desktop experience for disabled persons |
Plasma contains accessibility settings for you in order to make your experience easier when using the computer.
Bell
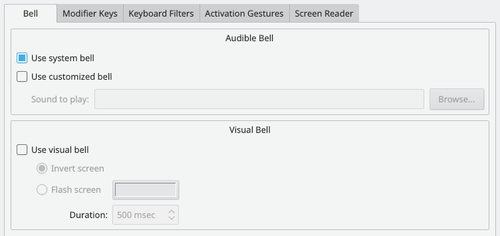
In the tab you can customize the system bell. The visible bell settings allows you to change their preferences to having a visual notification on the screen. For example, if a document is being edited, and a sticky key is pressed, you can choose between having the document's interface window being color-inverted, or having the entire window screen of the document change to a custom user-selected color.
The slider allows you to select how long the active window will change color in milliseconds. A smaller amount of time will mean there will be a shorter pause in between visible bells, while a larger amount of time means that the visible pause will be longer.
If you find these settings useful, you may also want to have a look at the Application and System Notifications module of System Settings.
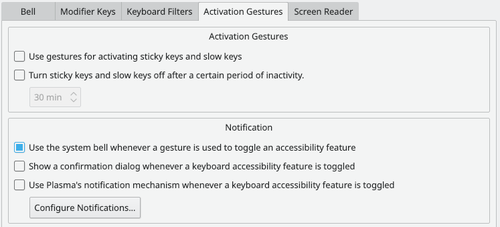
If you find it difficult to use the keyboard, the and tabs have options that you may find helpful; and the has options to use mouse gestures to activate sticky keys or slow keys, if you do not want to use these features all the time.
Modifier Keys
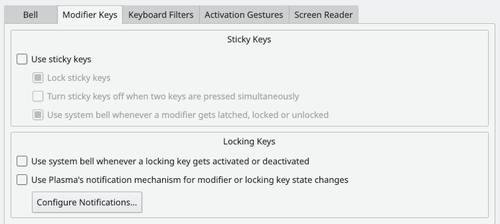
There are two panels here, the Sticky Keys and the Locking Keys panel. Sticky keys is a setting to make it easier to enter multiple key shortcuts. For instance, when one wants to capitalize a letter, the Shift key is pressed at the same time as the letter. Sticky Keys allow you to first press Shift, Control, or Alt, and then release it and press another key. This system will interpret it as those keys being simultaneously pressed.
There are 3 Locking Keys on most keyboards. These keys are the Caps Lock, Num Lock, and Scroll Lock keys. In the tab, you can choose to have a system bell played if these are activated or deactivated.
Keyboard filters
Slow Keys
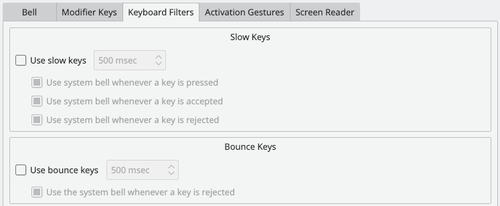
Slow Keys allow confirmation that a key has been pressed and entered. The system bell is activated when the time allotted with the slider has passed. For a key to be accepted, it has to be held until the set amount of time. The system bell can be used to indicate when a key press has been made, accepted, rejected, or any combination of the three.
Bounce Keys
The bounce key setting is used to prevent multiple characters appearing in a document as a result of an immediate key press occurring after the first one. If you press a key again in less time that has been set with the slider, the second repeat character won't be made and a system bell might activate.
Even simple settings like slowing the rate of keyboard repeat can be a great help
Activation Gestures
Screen Reader

More information
- KDE official documentation
- Accessibility project (Community wiki)
- Accessibility project (Phabricator workboard)
- KDE accessibility applications
</translate>
- Pairs
- Tutorials/MIDI on Linux
- Translator Account/2010
- Simon/Installation
- Tutorials/Force Transparency And Blur
- Plan/Manual/Definitions
- Showfoto/Curves Adjust
- Showfoto/Perspective
- Tips/Transfer files between phone and PC using Wi-Fi
- LatteDock/TipsAndTricks
- Okular
- Plan/Manual/Task Editor
- LabPlot/ComputationalNotebooks
- Tutorials/Shared Database
- Tutorials/Kontact/Office365
- Plasma application launchers
- Troubleshooting/Black Screen
- Live CDs - a way to choose your distro
- Marble/Tracking
- What is KDE
<translate>

Greetings stranger! Welcome to the wonderful world of KDE. KDE is a worldwide project dedicated to bringing the best software to you - for free. Read on and find out what we can offer you and what you can do for us.
An International Community
KDE is more than just software. It is a community made up of programmers, translators, contributors, artists, writers, distributors, and users from all over the world. Our international team is committed to creating the best free software for the desktop and mobile. And not only contributors, but users and fans of KDE software can be found throughout the entire globe, giving help to other users, spreading the news, or just simply enjoying the experience.</translate>
<translate>==A New, Shiny Workspace==
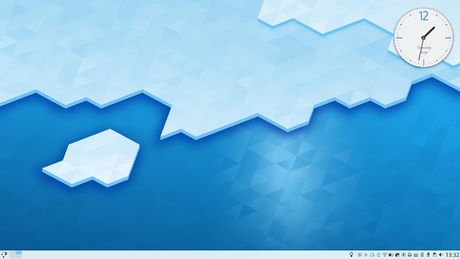
KDE started life as a desktop environment over 20 years ago. As activities have grown, KDE is now an international team that creates Free and Open Source Software.
What this means in practice is that the many programs from the KDE community work together to give you the best possible computing experience. Does that mean you can't use a KDE application if you don't use the KDE desktop? Not at all. With the help of one or two extra libraries the applications can be used on almost any Linux desktop. What's more, increasingly that software runs on a variety of other platforms. You can now find many KDE applications running under Windows and Mac OS or other devices such as smartphones and tablets.
There are a variety of programs to suit any user's needs, from simple yet powerful text editors, to rocking audio and video players, to the most sophisticated integrated development environment. Plus, KDE applications follow a consistent look and feel across the desktop, giving you a comfortable and familiar experience when using any KDE program.
KDE software has several other features that makes it a top-class working environment, such as:
- A beautiful and modern desktop
- A flexible and configurable system, letting you customize applications without too much editing of text files
- Network transparency allows you to easily access files on other networks and computers as if they were on your own computer
- A software ecosystem of hundreds, even thousands, of programs
- Availability in over 60 languages
Tons of Free Software
KDE software isn't just any software. It is Free Software. As a user, this is an important fact, even without getting deep into technical or legal considerations. Why? Because as free software, you are free to use KDE wherever you want and in whatever manner you want, no activation keys and no installation limits. And you're free to share it with others as well! So not only do you have in your hands great and powerful software, but you can also give your family and friends the opportunity to enjoy it, too.</translate>
{{<translate> Info</translate>| <translate> Curious about Free Software? Read more about it on the Free Software Foundation's website.</translate>}}<translate>
Components
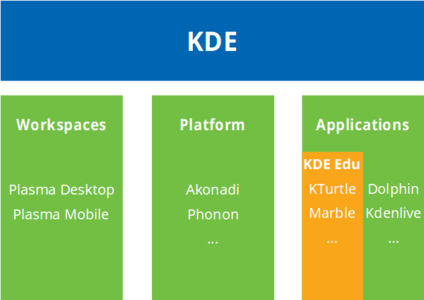
</translate>
<translate> KDE is a huge community of people who create software. We all have in common that we're building upon an infrastructure we have developed over the years: the KDE Platform.
- the Plasma workspace - the user interface element, customized for different devices such as PCs, notebooks, or mobile devices
- the KDE Frameworks - most KDE applications are built with the help of a unified framework. Do you also want to write a killer app? The KDE Frameworks can help you with that!
- KDE Applications - software programs that are written to utilize the platform
More information can be found on KDE TechBase
</translate>
<translate>
Getting KDE Software

If you are using Windows or Mac OS, a growing number of KDE apps such as Krita or Kdenlive are available for you to download and install. You'll find installers on their pages.
As of right now, some KDE software is for various reasons only on Linux, a free operating system that you can try right now. The community produces KDE neon, a downloadable Ubuntu Linux-based operating system which includes the newest version of KDE.
Helping KDE
KDE can only exist because thousands of dedicated contributors from around the world have given their time. You can help too! There is a task for everybody, and we are looking forward to see how you are going to make KDE better.
</translate>
| <translate>
Back to the Introduction page</translate> |
<translate> </translate>
- Working with GMail
- Troubleshooting
- Phonon
- Tasks and Tools
- Sound Problems
- RKWard
- Wiki Team Page
- LabPlot/2DPlotting/BoxPlot
- Marble/WizardMap
- Plasma/Kickoff
- System Settings/Shortcuts and Gestures
- Plasma/Plasmoids
- Mailing Lists
- Plasma/Tasks
- Tutorials/Install KDE software
- Plasma/Panels
- Plasma/FAQ/4.4
- Plasma/FAQ/4.4/Tips
- Plasma/Create a Global Theme Package
- Marble/Maemo/GuidanceMode
- NewSystemSettings
- Translation Workflow
- Plan/Engineering To Order project tutorial/executing
- System Settings
- Tutorials/KDE3 to KDE SC 4
- Translation Workflow/Danish
- Marble/Maemo/OfflineRouting
- Plasma/HowTo/4.5
- Showfoto/White Balance
- Translate a Page
- Simon/Development Environment
- Tutorials/ComposeKey
- Showfoto/Brightness
- Wiki Team Page/Problems
- Troubleshooting/Samsung scx-4500W
- Simon/Troubleshooting Guide
- Plasma/Public Transport/CreateServiceProviders
- Lancelot/Discover Lancelot
- Plasma/How to create a Unity-like look and feel theme using Plasma’s Desktop Scripting API
- NetworkManagement
- Plasma/Public Transport/ServiceProviders
- Simon/Licensing
- System Activity
- Translation Workflow/Catalan
- Writing an Application Manual
- LatteDock/FAQ
- Table of equivalent applications
<translate> This is a table of applications that are approximately equivalent. It is not by any means exhaustive, but tries to help a new user of KDE software to find packages that might suit. The section headings are links to take you to pages with more software in that group.</translate>
<translate> Desktop</translate> |
<translate>
| Description | Windows | Mac OS X | KDE Software |
|---|---|---|---|
| File manager | Windows Explorer | Finder | Dolphin, Konqueror, Krusader |
| Control Center | Control Panel | System Preferences | System Settings |
| Command Line Interpreter | Command Prompt | Terminal | Konsole, Yakuake, KRunner |
</translate>
<translate> Internet and Networking</translate> | ||
<translate>
| Description | Windows | Mac OS X | KDE Software |
|---|---|---|---|
| Blogging client | Windows Live Writer | Echo, MarsEdit | Blogilo |
| BitTorrent Client | BitTorrent | utorrent, Transmission | KTorrent, KGet |
| Download Manager | FlashGet | jDownloader, pyLoad | KGet |
| E-mail Client | Outlook Express, Windows Live Mail | Apple Mail, Unibox | KMail |
| Feed Aggregator | Reeder, Vienna | Akregator | |
| Personal Information Manager | Outlook | Outlook, Together | Kontact |
| Web Browser | Internet Explorer | Safari | Konqueror, rekonq, Falkon |
| Instant Messaging Client | Windows Live Messenger | iChat, Adium | Kopete, KMess |
| IRC Client | mIRC | Colloquy | Konversation, Quassel |
</translate>
<translate> Graphics and Imaging</translate> | ||
<translate>
| Description | Windows | Mac OS X | KDE Software |
|---|---|---|---|
| Image Editor | Paint.NET, Adobe Photoshop | Adobe Photoshop, Pixelmator | Krita, KolourPaint |
| Image Viewer | ACDSee | iPhoto, Quicklook | Gwenview, KuickShow, digiKam, KPhotoAlbum |
| Photo Management | ACDSee | iPhoto, Aperture | digiKam, KPhotoAlbum, Gwenview |
| PDF Viewer | Adobe Reader | Preview, Adobe Reader | Okular |
| Vectorial Drawing | Adobe Illustrator | Adobe Illustrator, Sketch | Karbon |
</translate>
<translate> Multimedia</translate> | ||
<translate>
| Description | Windows | Mac OS X | KDE Software |
|---|---|---|---|
| Audio Player | Windows Media Player, Winamp | iTunes | Amarok, Juk, KsCD, Kaffeine |
| Video Player | Windows Media Player | QuickTime Player, MPlayer, VLC | Bangarang, Dragon Player, KPlayer, KMPlayer, Kaffeine |
| CD and DVD Authoring | Nero Burning ROM | iDVD, Toast | K3b, K9Copy |
| Disk image emulator | Daemon Tools | Silicon | |
| Non-linear Video Editor | Windows Movie Maker | iMovie | Kdenlive |
</translate>
<translate> Office and Productivity</translate> | ||
<translate>
| Description | Windows | Mac OS X | KDE Software |
|---|---|---|---|
| Office Package | Microsoft Office | iWork | Calligra |
| Word Processor | Microsoft Word | Pages | Words, KWord |
| Spreadsheet | Microsoft Excel | Numbers | Sheets, KCells |
| Presentation | Microsoft PowerPoint | Keynote | Stage, Showcase |
| Desktop Database Creation | Microsoft Access | FileMaker | Kexi |
| Diagram, Flowcharting and Mind Mapping | Microsoft Visio | OmniGraffle | Flow, Kivio, Semantik |
| Project Management | Microsoft Project | iTaskX, Merlin | Plan, KPlato |
| Personal Information Manager | Microsoft Outlook | Address Book, iCal | Kontact |
| Personal Finance Manager | Quicken | Outbank, Pecunia | KMyMoney, Skrooge |
| Notetaking | Microsoft OneNote | MacJournal, Evernote | BasKet |
</translate>
<translate> Education</translate> | ||
<translate>
| Description | Windows | Mac OS X | KDE Software |
|---|---|---|---|
| Touch-typing trainer | TypingMaster, Stamina | KTouch |
</translate>
<translate> System Administration</translate> | ||
<translate>
| Description | Windows | Mac OS X | KDE Software |
|---|---|---|---|
| Partition Editor | Logical Disk Manager | Disk Utility | KDE Partition Manager |
| System Monitor | Windows Task Manager | Activity Monitor | KSysGuard |
| System Information | EVEREST | Systeminformation | KInfoCenter |
</translate>
<translate> Utilities and Tools</translate> | ||
<translate>
| Description | Windows | Mac OS X | KDE Software |
|---|---|---|---|
| File archiver | WinRAR | The Unarchiver | Ark |
| Text Editor | Notepad | TextEdit | KWrite, Kate |
</translate>
<translate> Development and Programming</translate> | ||
<translate>
| Description | Windows | Mac OS X | KDE Software |
|---|---|---|---|
| IDE | Visual Studio | Xcode | KDevelop |
| Computer-aided translation system | Poedit, Virtaal | Poedit, LocFactory | Lokalize |
| UML tool | Enterprise Architect | Astah | Umbrello, Kivio |
</translate>
<translate>
</translate>
<translate> </translate>
- Umbrello/FAQ
- Tutorials/Using Other Window Managers with Plasma
- Plasma/FAQ/4.4/Configuration
- Rekonq
- Typographical Guidelines
- Plasma
- Plan/Manual/Creating ODT Report Templates
- LabPlot/FAQ
- Marble/MapThemes
- Test
- Tellico/DefaultFields
- Tutorials
- Nepomuk
- Plan/Engineering To Order project tutorial/planning
- Translator Account
- Plasma/Krunner
- Plasma/4.2
- Toolbox
<translate>
Add an Introductory Screenshot and Description
Whenever possible we begin an application's top-level page with this. The code to achieve it is
{|class="tablecenter vertical-centered"
|[[Image:YourScreenshot.png|250px|thumb]]
|Your descriptive text
|}
Format Your Text
Use Headings
Each heading goes on its own line starting and ending with two or more '=' characters. Once there are more than a handful of headings on a page they automatically create a Table of Contents, so use them. The number of '=' characters determines their level in the Table of Contents, thus your headings should be '==Main section name==', '===Subsection name===', '====Sub-subheading name here====', and so on. Avoid using single '=', as that denotes a page heading and every wiki page already has one made from its name; for example, this page's title "Claus chr/DPL/Test" appears as its page heading.
Use bold and italic
Blips are used to specify bold and italic words.
Use '''bold text''' to specify bold text and ''italic text'' to specify italic text.
In order to ensure we get easy and accurate translations, please adhere to the typographical guidelines.
Add a Code Snippet
We have templates to assist in correctly displaying code snippets. Examples of use in various situations are available on the typographical guideline page
If you have problems displaying pipe characters in your code snippet, please see the explanation and markup detailed on Typographical Guidelines
Add Indents
- ":" is used for an indent, and was used in multiples in some old pages. This is deprecated, and causes some problems, so the multiples will be removed as they are found. A single ":" indents by four characters.
Format Dates
Dates in a purely numerical format cause confusion, due to differences in expectations of geographical zones. Please format dates as
18 Mar 2011
with the month either spelled out completely or in abbreviated form, and the year in 4-digit format. The day may be single or double-digit.
</translate><translate>
Bulleted Lists
* is the symbol to use for bulletted lists. ** gives a second level:
* Almonds

<!--T:22-->
* Nuts
** Cashews

<!--T:23-->
* Raisins
produces
- Almonds
- Nuts
- Cashews
- Raisins
Enumerations
Enumerations are produced in the same way, using '#'.
# Sift
# Mix
## Stir thoroughly
# Bake
produces
- Sift
- Mix
- Stir thoroughly
- Bake
For more details see wikimedia on lists.
Combining Bulleted Lists and Enumerations
You can have an enumerated sublist in a bulleted list and vice versa, like this:
* Nuts
*# Cashew
*# Crazy
* Other things
produces
- Nuts
- Cashew
- Crazy
- Other things
while
# Nuts
#* Cashew
#* Crazy
# Other things
produces
- Nuts
- Cashew
- Crazy
- Other things
To get each bullet and each sub bullet in its own translation unit you can enter something like this:
* First bullet </translate >
<translate >
** First sub bullet </translate >
<translate >
** Another sub bullet<br /><br />This one consists of two paragraphs </translate >
<translate >
* The next main bullet </translate >
<translate >
** And so on
This displays like this:
- First bullet</translate>
<translate>
- First sub bullet</translate>
<translate>
- Another sub bullet
This one consists of two paragraphs</translate>
- Another sub bullet
<translate>
- The next main bullet</translate>
<translate>
- And so on
The same method should apply to the other kinds of lists.
If on the other hand you need to have more sections in the same item, you can do something like this to have each section in a translation unit of its own:
* First bullet </translate >
<translate >
* Second bullet, first section. </translate><br /><br /> <translate > Second section of the
second bullet. This section has a translation unit of its own </translate >
<translate >
* And so on
This displays like this:
- First bullet</translate>
<translate>
- Second bullet, first section.</translate>
<translate>
Second section of the second bullet. This section has a translation unit of its own</translate> <translate>
- And so on
Itemizations
Itemizations are produced using ; and : alternatively. They are best for giving short descriptions for a group of related objects.
;Animals
: They move around and devour other creatures.

<!--T:46-->
;Plants
: They have roots and feed upon ground water and sun.
produces
- Animals
- They move around and devour other creatures.
- Plants
- They have roots and feed upon ground water and sun.
Add a Link
There are three kinds of links to learn, internal ones, to another userbase page, internal links to a section of a userbase page, and external URL links.
For an internal link the format [[PageLayout]], where you want to display the name of the page, does work, but it is not ideal, particularly for translation to docbook and for localisation. It is better to use the form [[Special:myLanguage/PageLayout|Page Layout]], because that allows translators to link correctly even though the page name is localised. The result is that it directs to the correctly translated page, if one exists. You often need to include the link in a sentence, so in that case you would use
[[Special:myLanguage/PageLayout|this page]]
which displays
Internal links to subsections of a page use character '#' (hash) and should look like this
[[Special:myLanguage/Tasks_and_Tools#Working_with_Languages|...]]
With this kind of link it is very important, that the page you link to declares the reference anchor. If the anchor contains space characters, replace them by character '_' (underscore) when calling the reference. If the reference is found, the section will be automatically displayed by your browser (if it manages anchors). If it is not the case, you will have to go down through the page to find the referenced section. External links are given as the URL and a text separated by a space and delimited by single square brackets as in
[https://en.wikipedia.org/wiki/KDE KDE's Wikipedia page]
which gives KDE's Wikipedia page.
Anchor declaration
Anchor declaration must be done immediatly BEFORE the referenced section, and followed by a blank line separating the anchor and its headline. In the following example just copy in the ID value, the title of associated section. It should look like this:
</translate><span id="Working with Languages"></span> <translate>
If the page containing the section that you link to is not yet marked up for translation, you should omit the </translate > and <translate > tags.
External links are slightly different so
[http://techbase.kde.org/Schedules our road map]
displays
our road map, which would take you straight to the techbase page.
One last thing to note - when you preview your page, all links are live. This gives you two benefits. You can check (by hovering) that your links are set up as you expected, and you can use a red link to create a new page.
Make an application list
If you want to make a list of applications like the ones in the subpages of Applications, you should use the AppItem template. Simply enter
{|
{{AppItem|System Settings/Locale|Preferences-desktop-locale.png|
Settings for localized handling of numbers, dates, etc}}A short text.
A few more short lines about the app. This is optional.
|-
{{AppItem|System Settings/Shortcuts and Gestures|Preferences-desktop-keyboard.png|
Shortcuts and Gestures}}Another short text. If you do not type <keycap>Enter</keycap> between the texts
you get one section no matter how long the text is.
|}
This gives the following display:
Settings for localized handling of numbers, dates, etc | |
| A short text.
A few more short lines about the app. This is optional. | |
Shortcuts and Gestures | |
| Another short text. If you do not type Enter between the texts you get one section no matter how long the text is. | |
Note, that you should not prepend "Special:myLanguage" to the page name - the template takes care of that. Also note, that you must give a title, even if the title is the same as the page name.
Footnotes
Footnotes are rarely used in our pages, but if you need them you can place a <ref>text</ref> in the source where the footnote mark should appear. There has to be one <references /> somewhere in the source as well, usually towards the end of the page. This is where the text added by the <ref> tags will appear. For more info see the Wikipedia help page.
Illustrate Your Text
Add a single image, centered
[[File:KMail-kde4.png|250px|center]]
Note that you can change the position of the image, but the default is left. The size of the image depends on the circumstances, but for screenshots I recommend no less than 250px and no more than 500px.
Also note that Image: and File: are synonyms.
So that [[Image:KMail-kde4.png]] is the same as [[File:KMail-kde4.png]]. However Image: is deprecated, so prefer File: in new content.
see mediawiki for more info.
Make the Image Clickable and Add a Caption
Where you need to show more detail, create a moderately sized image, clickable, so that the full-size can be seen. Simply add the parameter '|thumb' within the image parentheses.
A caption can also be added as a parameter, but will only show if '|thumb' is present.
Example:
[[File:file_name.png|thumb|this will be the caption]]
Add a caption without a thumbnail
Captions also appear on images marked up with the frame syntax.
Example:
[[File:image.png|frame|left|this will be the caption]]
Prevent text from flowing around image
Sometimes you might not want the text to flow down the sides of your image. You can prevent this by adding a <br clear=all> tag between the file tag and the text in question.
Example:
[[File:image.png]]
<br clear=all>
This text would normally flow down the sides of the image but now it will be found under the image
Use Tables to Precisely Place Multiple Images
{|class="tablecenter" style="border: 1px solid grey;"
|[[Image:Desktop-config-customized.png|230px|center]]||[[Image:Desktop-settings-rightclick.png|230px|center]]
|-
|[[Image:Desktop-theme-details-dialog.png|230px|center]]||[[Image:Plasma-multiple-themes.png|230px|center]]
|}
displays
 |
 |
 |
 |
Note that all the parameters for one image are contained within [[...]], and cells are separated by '||'. To start a new line, insert '|-' on an otherwise-empty line, then '|' at the start of the next one.
For more details on Table formating see mediawiki
</translate> <translate>
Embed a Video
As of July 2012 the MediaWiki EmbedVideo extension has been installed on userbase.kde. This means you can embed videos from various video hosting sites into the page content and have them display in line.
EmbedVideo parser function expects to be called in any of the following ways:
{{#ev:service|id}}
{{#ev:service|id|width}}
{{#ev:service|id|width|align}}
{{#ev:service|id|width|align|desc}}
{{#evp:service|id|desc}}
{{#evp:service|id|desc|align}}
{{#evp:service|id|desc|align|width}}
Where:
service is the name of a video sharing service (See "service name" in the list below)
id is the id of the video to include
width (optional) is the width in pixels of the viewing area (height will be determined automatically)
align (optional) is an alignment (float) attribute. May be "left" or "right".
desc (optional) is a short description to display beneath the video when it is aligned
For example, to include the famous "evolution of dance" YouTube video, you'd enter:
{{#ev:youtube|dMH0bHeiRNg}}
And if you wanted scaled down to thumbnail size, on the right with a short description, you could use:
{{#ev:youtube|dMH0bHeiRNg|100|right|This is an embedded video!}}
As of version 1.0, EmbedVideo supports embedding video content from the following services:
| Site | Service Name |
|---|---|
| Dailymotion | dailymotion |
| Div Share | divshare |
| Edutopia | edutopia |
| FunnyOrDie | funnyordie |
| Google Video | googlevideo |
| Interia | interia or interiavideo |
| Revver | revver |
| sevenload | sevenload |
| TeacherTube | teachertube |
| YouTube | youtube and youtubehd |
| Vimeo | vimeo |
</translate> <translate>
Add Notes and Warnings
Where a note or warning is relevant within your text, use these templates:
{{Info|This is general information}} displays
{{Note|Some important information at this point}} displays
{{Tip|A helpful piece of advice, something to remember}}displays
{{Warning|Take care - this is a dangerous thing to do}} displays
Where the strongest possible warning is needed, the Remember box can be used, but please use sparingly.
{{Remember|1=This is for things that definitely must not be forgotten}}
You can also change the heading:
Page Redirection
You can make a page to redirect to another page automatically by using:
#REDIRECT [[Pagename]]
KDE3 and KDE SC 4 Versions of Applications
By default, KDE SC 4 is assumed. If the KDE SC 4 version is not yet ready for release, or where only a KDE 3 version exists, it may be necessary to document the KDE3 version. In this case you should add the template {{KDE3}}
which displays
![]() Should you be writing about a KDE3 version and KDE SC 4 version on the same page, use icons for both — {{KDE4}} which displays
Should you be writing about a KDE3 version and KDE SC 4 version on the same page, use icons for both — {{KDE4}} which displays
![]()
Other Useful Templates
</translate><translate>
Inserting GUI Icons
The best way to refer to icons in the GUI is to display it in the text. This can be done with a template like this: {{Icon|list-add}}. This will display the ![]() icon.
icon.
For this to work, the icon image must have been uploaded to the wiki. See Update an Image for an explanation on how to upload images. The .png files can usually be found here: usr/share/icons/oxygen. If possible use the 16x16 icon. The file name should have an Icon- prefix as in Icon-list-add.png — apart from the prefix the filename should exactly match the usual name. Note, that when using the template you should neither write the Icon- prefix nor the .png file type extension.
The ![]() icon can also be written as
icon can also be written as {{Plus}}, and the ![]() icon as
icon as {{Minus}}. You can also use {{Configure}} to get the ![]() icon, and
icon, and {{Exit}} gets you the ![]() icon.
icon.
Community Applications
The final consideration concerns those applications which are not distributed as core KDE applications. These need to be indicated by an icon, placing {{Community-app}}
at the end of your sentence or line, just as you would to denote a footnote in general writing. You then need to add {{Community-app-footnote}} which will create a footnote, like this:
![]() Support for this application can be found from the project's home page
Support for this application can be found from the project's home page
Making Major Edits to Existing Pages
If a page is likely to be open for editing for some time there is a danger of conflicts - someone else may edit at the same time, and saving your edit will cancel out theirs, or vice versa. The way to avoid that is to make a temporary entry, directly under the language bar, using {{Being_Edited}} which will display
Don't forget to remove it when you have finished!
Adding a New Complex Page
If you need to be able to work on a page for quite some time, over several days, for instance, you may like to use the Construction template - {{Construction}}, which displays
Links to Pages in the Neighbourhood
You can add links to a preceding or a following page using the {{Prevnext2}} template…
{{Prevnext2
 | prevpage  = Previous Pagename
 | nextpage  = Following Pagename
 | prevtext  = The page before this one
 | nexttext  = The next page you should read
 | index     = Index page
 | indextext = Back to Menu
}}
…to produce helpful navigation links of the form…
All six arguments are optional, but keep in mind that if you don't specify a value for the indexname parameter, the untranslated name of the current page will be displayed. For the first and last pages in a series, the template is most often used like this:
| First page | Last page |
|---|---|
{{Prevnext2
 | nextpage  = Following Pagename
 | nexttext  = Read this page next
 | indextext = Tasks and Tools
}}
|
{{Prevnext2
 | prevpage  = Previous Pagename
 | prevtext  = The page before this one
 | indextext = Tasks and Tools
}}
|
| 🡻 Output 🡻 | 🡻 Output 🡻 |
|
|
Links to bugs
You can link directly to a bug in Bugzilla by using this template:
{{Bug|123456}}
Please do not forget to add the <s> and </s> to strike through a bug that is closed.
Adding a List of Sub-Pages
== Subpages of {{FULLPAGENAME}} ==
{{Special:PrefixIndex/{{FULLPAGENAME}}/}}
is very useful when you want to list subpages with active links, such as
Subpages of User:Claus chr/DPL/Test
It does, however, also list all "other-language" pages, so use with discretion.
</translate>
- Okteta/Writing structure definitions
- Plasma/Tips
- Parley/Manual unstable
- Parley/Manual dev
- Parley/Manual
This only finds new style links, and conversely find links to subpages as well. Better use the LinksTo template
{{LinksTo|Applications}}


